Setup
Thanks for choosing Tickets as your support solution! In this guide we'll teach you how to get up and running in no time at all.
If you need any assistance in the process, feel free to join our Discord server and open a ticket to talk to our support staff.
For those with previous experience configuring Discord bots
Quickly get the absolute basic functions of a ticket system for your server in 5 steps:
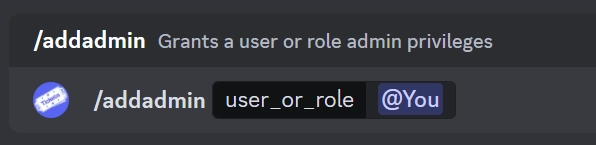
1. Invite the bot
2. Make yourself admin of the bot /addadmin @YourUsername
3. Go to online dashboard
4. Make a reaction panel
5. Go back to discord and add your staff as support so they can see and answer tickets /addsupport @TheirUsername or /addsupport @TheirRole
It is HIGHLY RECOMMENDED to continue reading through SETUP and the rest of the documentation, as these steps only provide the most basic working ticket system. There are many ways to customize the system, messages, notifications, and support staff.
For beginners with Discord bots
You'll need to start by inviting Tickets to your server.
- Learn how to do this here.
If you've already invited the bot to your server, feel free to jump ahead and start configuring it.
- View our guide on this here.
Inviting The Bot
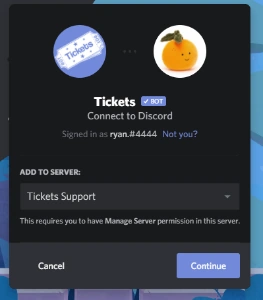
To get started with adding Tickets to your server, visit invite.ticketsbot.net: you'll be redirected to Discord automatically.
You'll first be asked to select the server you want to add the Tickets bot.
Note: you must have the Manage Server permission to do this.
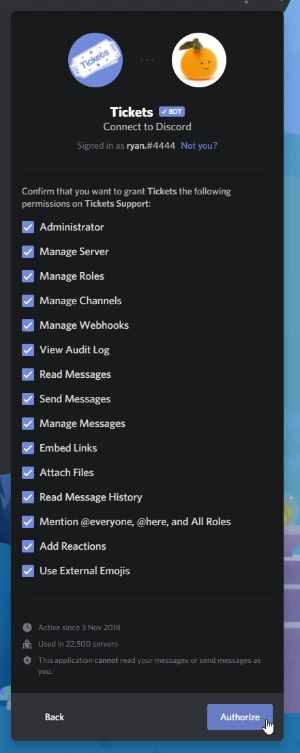
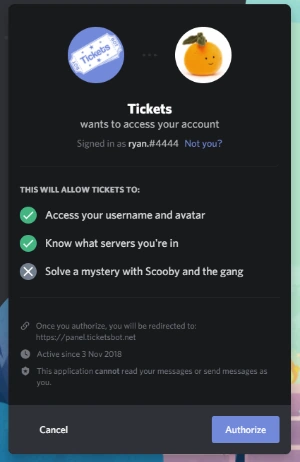
Upon pressing Continue, you'll be presented with a list of permissions Tickets is asking for. It is important that you allow the bot all of these permissions to ensure successful operation. However, you are able to remove the Administrator permission if you so wish, but please make sure you do not have any deny permission overrides applied to roles the bot has (including @everyone) on your channel categories.
Click Authorize to proceed.
Discord will then present you with a screen stating that you've authorised the bot: it's now in your server!
If you need the bot to be in a language other than English, learn more here.
If not, let's start configuring the bot: Bot Configuration
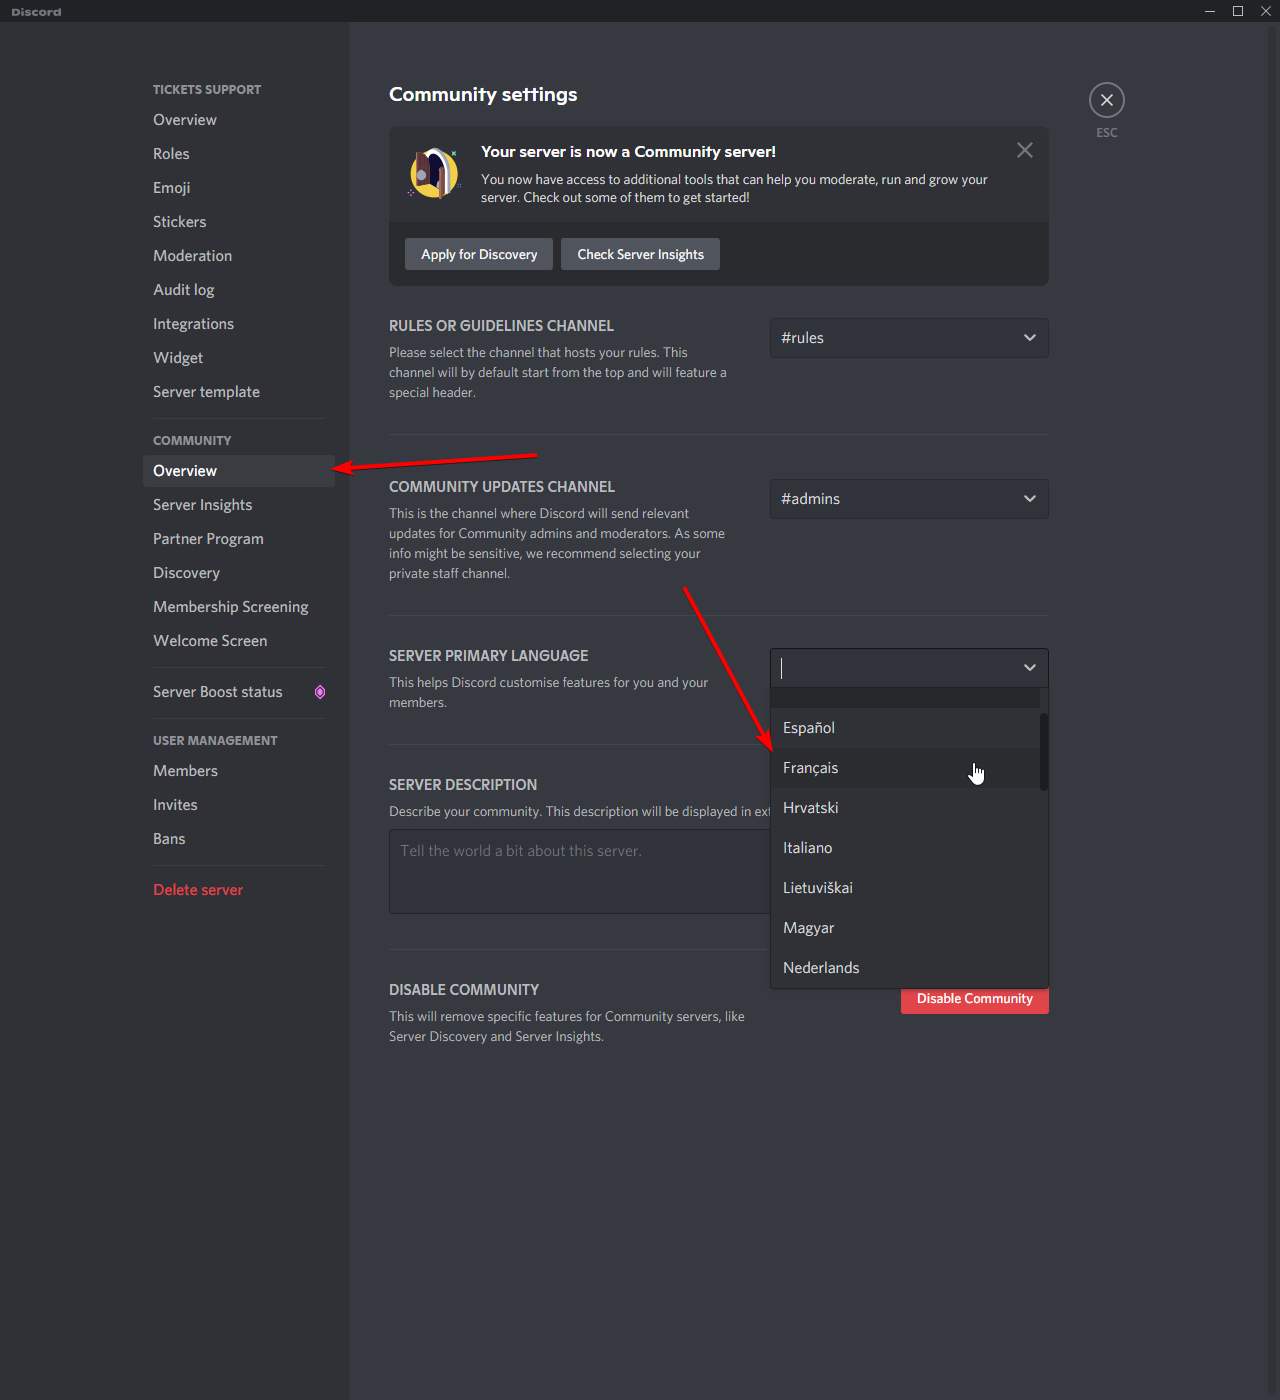
Language Customisation
Tickets is highly accessible, supporting over 30 languages at the time of writing.
Use the /language command and a embedded message with all supported languages will appear, select the language you want from one of the dropdowns below the message
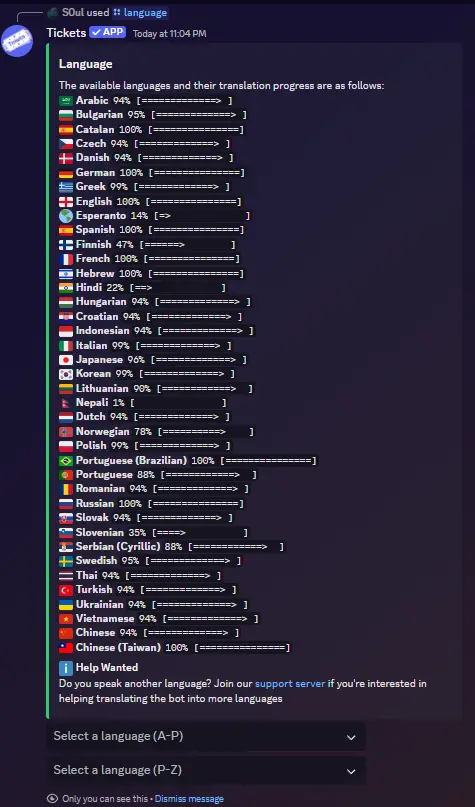
If you do not have a language selected, your server's preferred language will be used:
Limitations
- The bot does not currently support server-level customisation of individual messages
- Some messages, such as embed titles and some button messages, are not currently translated
Help Wanted
If you are multilingual and interested in helping translate the bot into more languages (or getting languages to 100%), please join our support server and let us know!
Bot Configuration
Let's start getting the bot ready for use in your server!
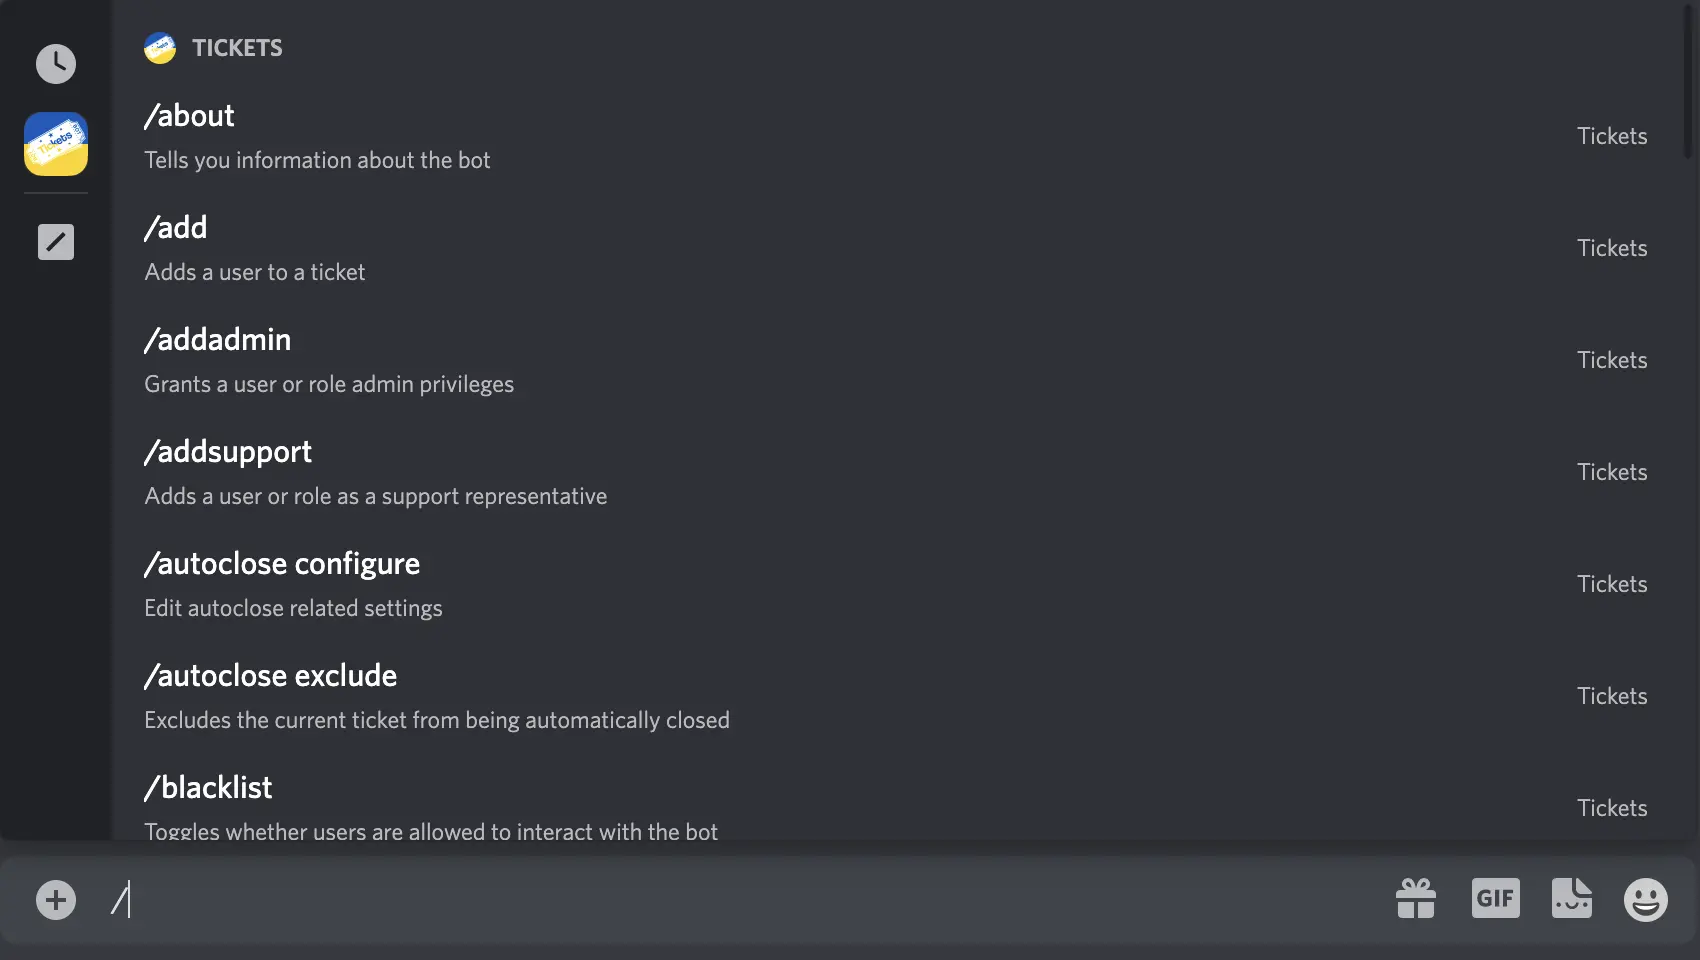
Tickets was a very early adopter of slash commands, meaning that you can simply hit / in your Discord client to have commands auto-completed with the correct arguments:
If you're not the owner of the server, now would be a good time to get the owner to designate you as an admin of Tickets. You can do this by asking the owner to run the command /addadmin @YourUsername in a channel the bot can see. If successful, Tickets will show you a ✅.
We've created a few different ways in which you can configure the bot:
- Via the web dashboard [Recommended]
- Via
/setup- Auto
- Individual Settings
Note: We recommend using the web dashboard to configure the bot, as it's easier and more settings are available - including reaction panels.
If you'd prefer to stick to configuring the bot via commands in Discord, there are a few different methods in which you can do so:
/setup autowill automatically create roles, channels, and everything else you need (excluding reaction panels) without any interaction required from you. This is okay for simple usecases, but you'll likely want to configure the options yourself.- Individual Settings: Run commands such as
/setup limitand/setup use-threadsto change individual settings one by one.
We have guides on each of the available methods:
- Web Dashboard [Recommended]
- Auto
- Individual Settings
Bot Configuration: Web Dashboard
First, head over to the dashboard at dashboard.ticketsbot.net. You'll be asked to login with Discord - simply click Authorize and you'll be taken back to the dashboard.
A list of servers which you are a Tickets bot administrator (/addadmin) and the bot has been invited to should show up. Simply click on the server you want to configure. If the server does not show up, ensure that you are either the owner of the server or have been added as a Tickets bot administrator by the owner using /addadmin @YourUsername and log out of, then back into, the dashboard.
You'll be taken to the settings page as follows:
You'll first want to pay attention to the main Settings card. Here you can edit the following settings:
Prefix
Note: Prefix commands are no longer used! Tickets bot works solely on slash commands!
Ticket Limit
This is the amount of tickets that a single user can have open at a single time. We usually recommend setting this to 1, but the default is 5.
For example, if you set this value to 1, a user will be able to open and close tickets an infinite amount of times, but only have a single ticket open at once. This value does not affect the total amount of tickets that can be opened at once in a server.
We do not impose any limits on the amount of tickets that a server can have open at once. However, please note that Discord only permits a total of 500 channels to exist in a server at once, and 50 channels to exist at once in a category. This means that you can move tickets to a new category if one gets filled, however you are limited to 500 channels overall by Discord.
Allow Users To Close Tickets
This option specifies whether users are allowed to close their own tickets. If unchecked, only your support staff & administrators will be able to close them.
Ticket Close Confirmation
This option specifies whether Tickets will send a confirmation message when closing a ticket via the 🔒close reaction. If checked, Tickets will send the following message after reacting:
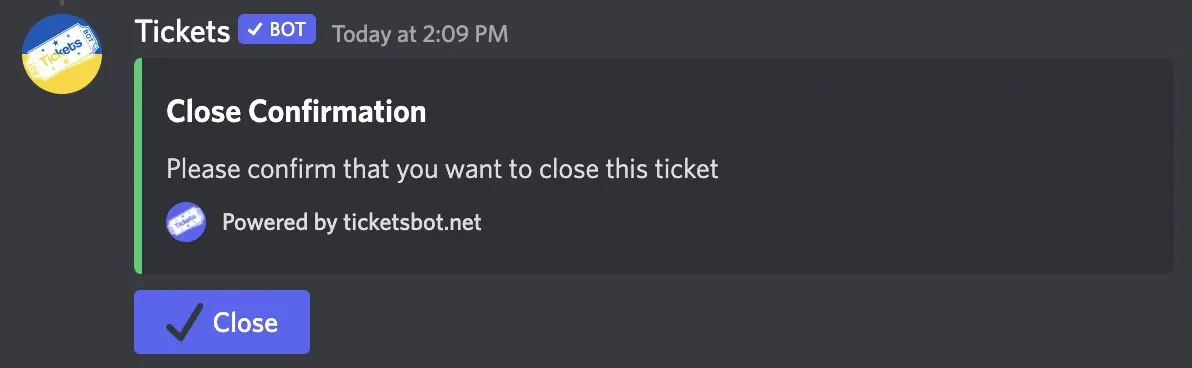
Simply click the blue ✔️close reaction to confirm you want to close the ticket.
Close confirmation does not apply to tickets closed using the slash command /close.
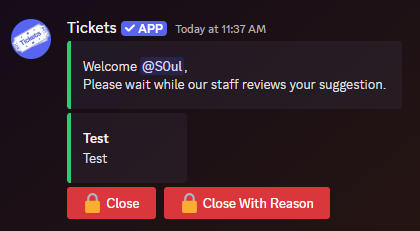
Welcome Message
The welcome message is the message displayed in the Ticket as soon as the user opens it:
Note: the message has a maximum limit of 1024 characters due to Discord limitations.
-
You may make use of placeholders in your welcome message. You can view a list of placeholders here.
-
You may also use discord message formatting to include links to channels, emojis, roles, or usernames in your welcome message. First, you will need to have discord developer mode turned on - in your personal discord account settings > advanced > discord developer mode. Second, you can right click any channel name, username, message, etc and choose
Copy ID. Third, use thestructuresection of discord's messge formatting chart to include it in your welcome message.
The title of the embed will either be based off of the subject provided by the user when using /open [Subject], or the title of the reaction panel if used. We are unable to get a subject from the user when using reaction panels currently, however, this will be possible in a future update of Discord.
Transcripts Channel
When Tickets are closed, a transcript will automatically be recorded, encrypted, and stored in cloud based object storage - with no user interaction required.
A message, similar to the one following, will also be sent to your transcripts channel to notify you the ticket was closed and provide you with a link to the dashboard to view the archive:
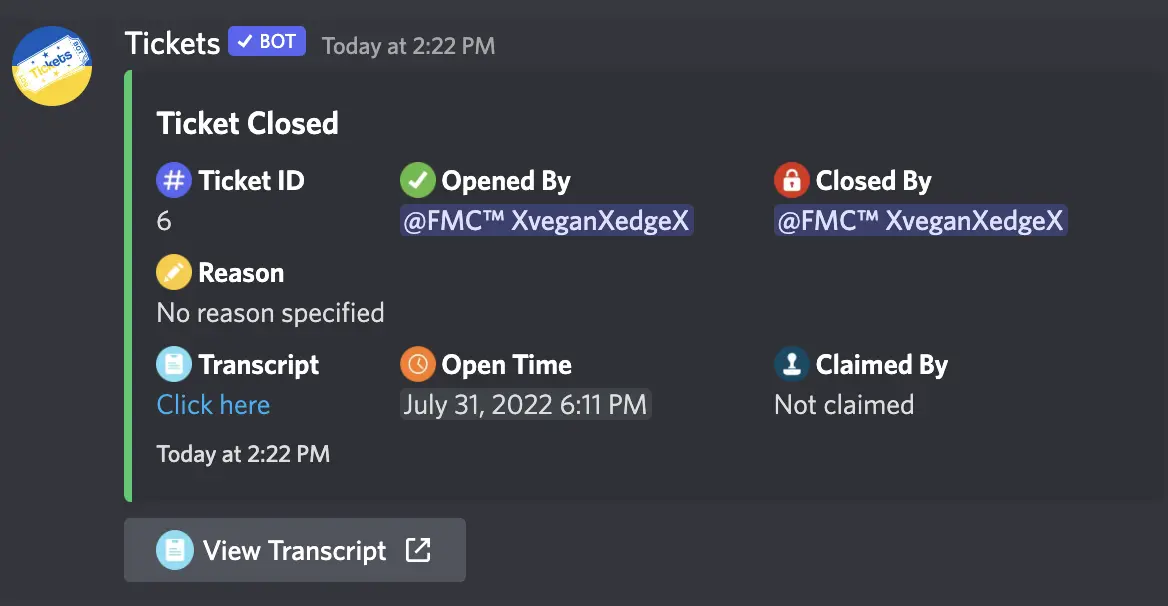
This message will also be sent via direct messages to the user who opened the ticket. It is not possible to disable this functionality since we believe it is important for transparency purposes that users are also able to access the transcripts.
If you have privacy concerns, please join our support server to enquire. Unfortunately we are unable to answer any questions regarding your user data off-platform in order to verify your identity.
Channel Category
Designates the channel category that tickets will be created under. If you are unsure what a channel category is, Discord has a guide explaining them available here.
Your tickets will be grouped together under the category as follows:
Overflow Category
Discord has an imposed limitation that each Channel Category can only hold 50 channels. Once you hit this limit, Tickets bot will fail to be able to open more ticket channels for you and your server members. To help rectify this, you can set an Overflow Category. This is a category that the ticket channels will open in once your selected Channel Category has hit the Discord imposed limit.
Naming Scheme
Defines how the ticket channels should be named. Currently, the 2 options are by ticket ID (#ticket-1) or by username (#ticket-name). You can define more custom naming schemes in the settings of individual reaction panels, instead of this overall setting.
Submission
Once you are satisfied with your settings, press the Submit button to save them. An example follows:
We now have the basic configuration completed!
You may wish to configure the following options next:
Bot Configuration: Automatic Setup
Tickets provides an option to automatically create a basic configuration for you. This isn't recommended since the settings are unlikely to be to your preference, and a reaction panel is not automatically created. For information on creating reaction panels, see our guide here.
To run the automatic setup mode, first ensure that you are either the owner of the server, or the owner has designated you as an administrator using /addadmin @YourUsername. Next, simply execute /setup auto in a channel the bot can see.
It will update you as the process progresses:

Simply assign your support staff the new Tickets Support role and your administrators the Tickets Admin role and your staff will be able to open and support users in tickets created via /open or the context menu (right click > apps > start ticket.)
You'll probably want to create a reaction panel so it's easier for your server members to open a ticket, or tweak the settings on the web dashboard.
Bot Configuration: Indiviual Commands
You can also tweak individual settings by using a single command. Note, not all settings are available via command, some are only accessible on the dashboard, such as reaction panels.
To run the setup, first ensure that you are either the owner of the server, or the owner has designated you as an administrator of the bot by using /addadmin @YourUsername.
For definitions and explanations of settings, please refer to the dashboard guide.
Setup Commands
| Command | Description |
|---|---|
| /setup auto | Bot will make a very basic configuration (no reaction panels - you'll still want to customize on dashboard) |
| /setup limit | Change the quantity of tickets a single user can have open at the same time |
| /setup transcripts | Change the transcripts channel |
| /setup use-threads | Change whether thread mode is enabled |
Prefix
Note: prefix commands are no longer active! Tickets bot works solely on slash commands! No need to setup a prefix.
Auto
See our guide on auto setup here.
Ticket Limit
An explanation of ticket limits is available here. The command /setup limit is used to configure the ticket limit.
For example: to change the per user simultaneous ticket limit to
1- Run/setup limit 1
Transcripts
An explanation of transcript channels is available here. The command /setup transcripts is used to configure the transcripts channel.
For example: to change the transcripts channel to
#logs- Run/setup transcripts #logs
- Please note, the channel must already exist.
Use Threads
It is recommended to read an explanation of thread mode (and how it compares to channel mode) here before using this command. The command /setup use-threads is used to enable (true), or disable (false), whether tickets open as private threads instead of channels. It will also be necessary to select the ticket notification channel.
For example: to enable thread mode - Run
/setup use-threads, choosetrue, clickticket_notification_channel, then select the channel desired from list
- Please note, the selected channel must already exist.
Additional Settings
Additional settings are available on the dashboard, such as reaction panels. It is advised that you read these guides next.
Panels
Basic Video Walkthrough
Creating A Panel
In order to create a reaction panel, head over to the web dashboard and select your server. If unfamiliar with how to do that, read our guide on the web dashboard here.
Once on your server's main settings page, select Ticket Panels in the navigation bar to be taken to the ticket panel configuration page which looks as follows:
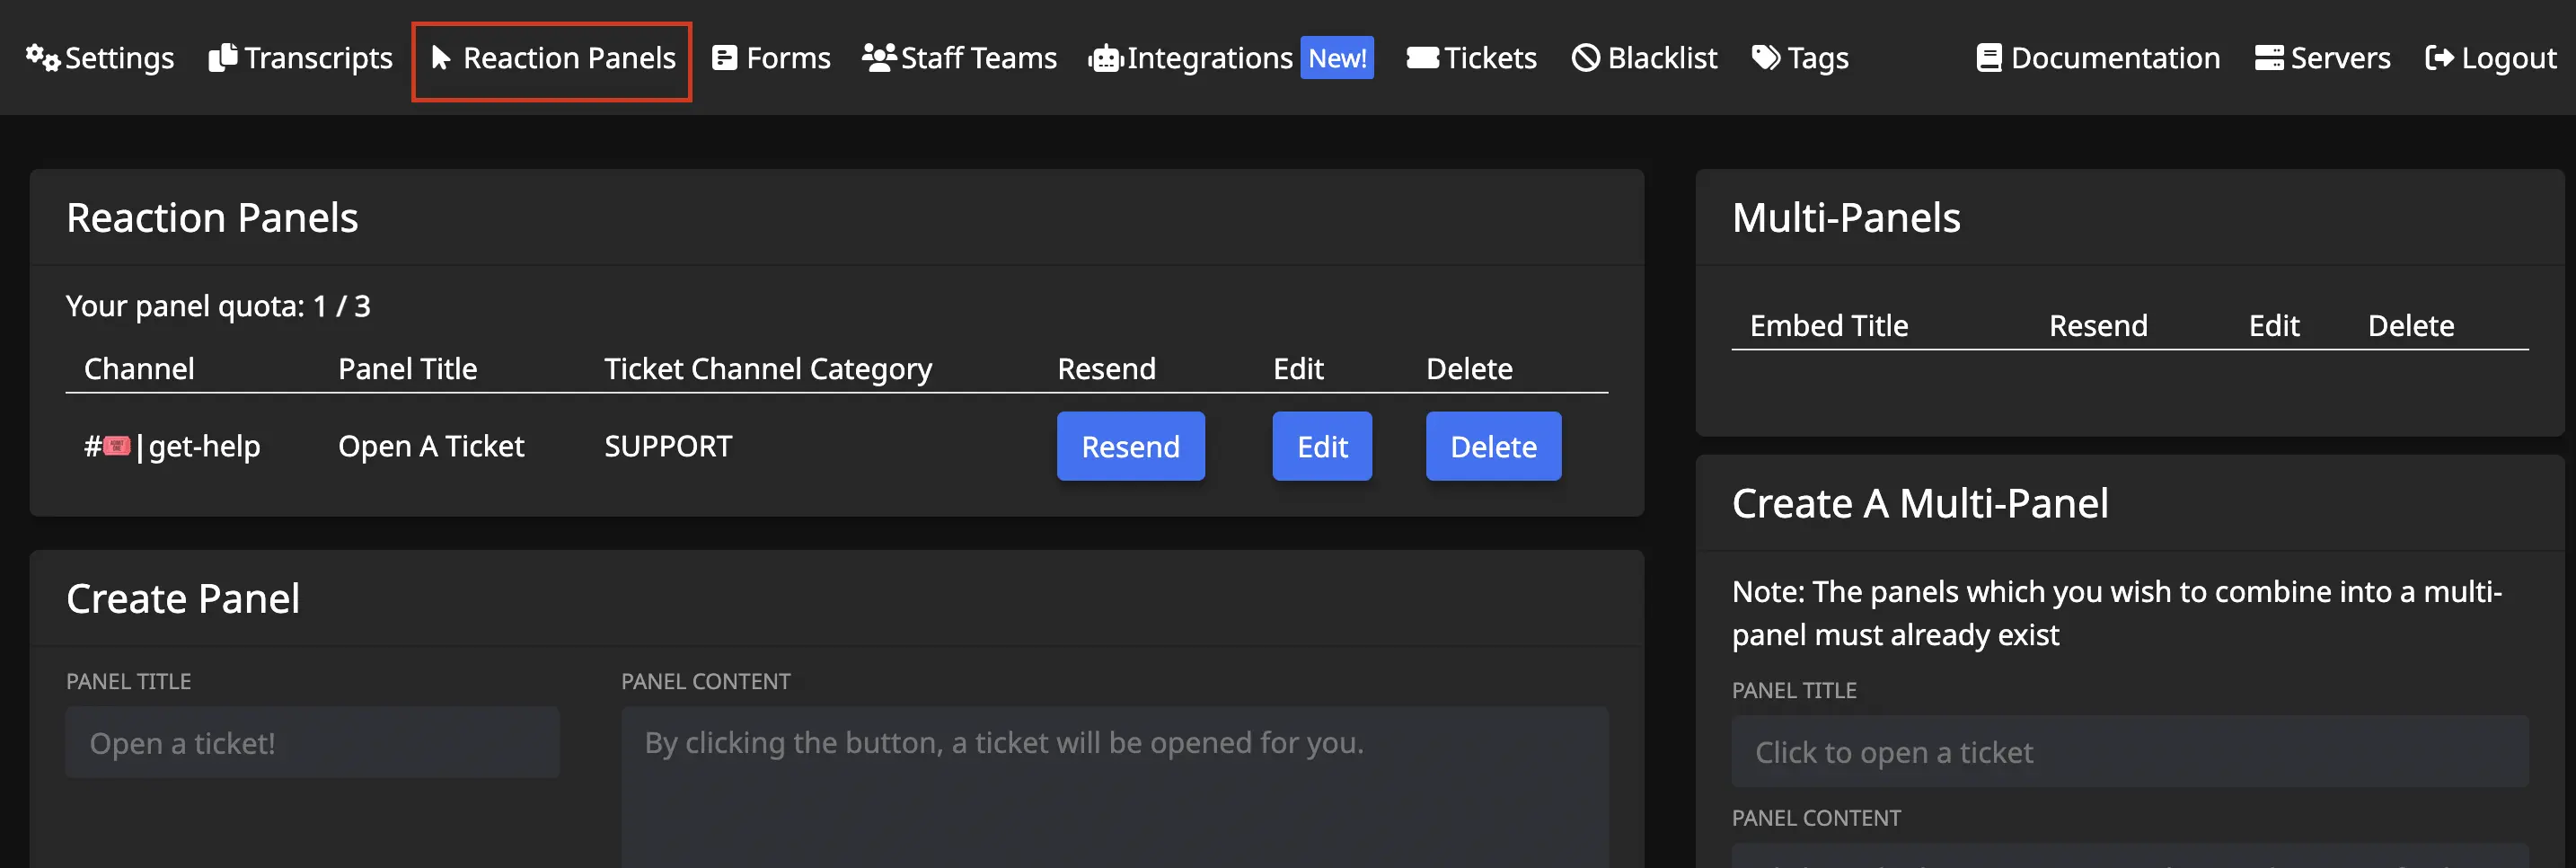
Focus on the left side of the screen. The right side are settings for combining different panels into a single message.
Draw your attention to the New Panel card. Configure the panel's appearance here:
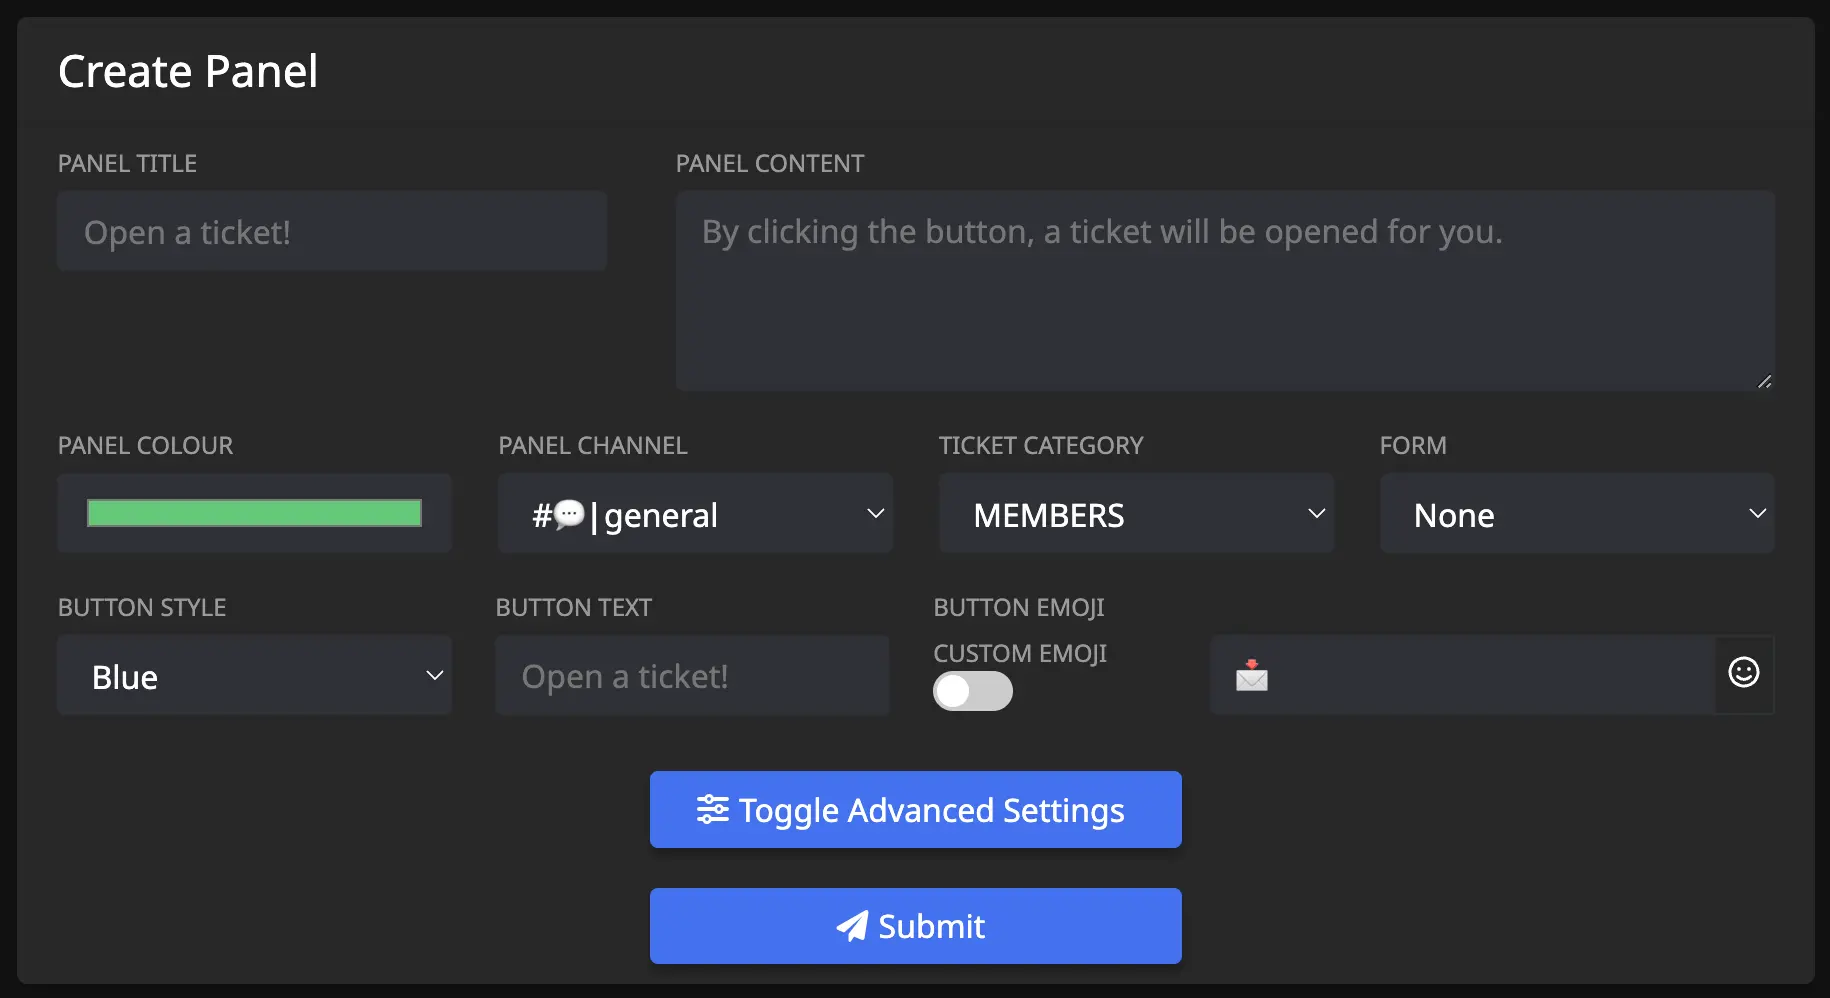
Panel Title
The panel title is the bold text at the top of the embed.
Note: The panel title has a maximum length of 255 characters, and by default, it is set to
Open a ticket!.
Panel Content
The panel content is the text in the long description of the embed. We recommend providing a general overview of how your support system works, such as which languages the support agents are fluent in.
Note: The panel content has a maximum length of 1024 characters.
Panel Colour
This is the colour on the left side of the embed. When clicked, a colour picker will open as shown below:

Panel Channel
This is the channel that the reaction panel will be sent in for users to react to. Therefore, this channel should be accessible to all members, and be the only message in the channel to avoid confusion.
Note: This should NOT be the same as your transcript channel.
Ticket Category
Designates the channel category that the ticket channel will be created under. If unsure of what a channel category is, Discord has a guide explaining them available here.
Reaction panels use different channel categories to the one configured on the main settings tab to allow for distinction when using multiple reaction panels - meaning it is possible to have each "type" of ticket open in it's own category for easier organization.
Form
Assign a form to the panel.
- Learn more about Forms here.
Button Colour
Choose the colour of the button.
Button Text
Enter the text that the button will contain.
Button Emoji
This is the emoji that users will click in order to open a ticket. The emoji can either be pasted directly into the box, for example: 📩, or the Discord name can be used, for example: envelope_with_arrow (colons are optional.)
Custom emojis from your server can be used by clicking the toggle to show green instead of grey. When toggled on, the input field will show you a list of your available emojis to choose from.
Advanced Settings
Upon clicking Toggle Advanced Settings, extra fields will be displayed:
Welcome Message
The server's welcome message can be overridden on a per-panel basis using this field. If left blank, the welcome message from the main settings page will be used.
Note: the message has a maximum limit of 4096 characters due to Discord limitations.
-
Placeholders can be used in the welcome message. View a list of placeholders here.
-
Discord message formatting can also be used to include links to channels, emojis, roles, or usernames in the welcome message.
- First, discord developer mode must be turned on - in your personal discord account settings > advanced > discord developer mode.
- Second, right click any channel name, username, message, etc and choose
Copy ID. - Third, use the
structuresection of discord's messge formatting chart to include it in the welcome message.
Naming Scheme
This toggle can be used to change the naming scheme of the ticket channels. If it's left on green, it will use the naming scheme set in the Settings portion of the Dashboard. If it's flipped to grey, a custom scheme can be setup.
- Placeholders can be used in the custom naming scheme. View a list of placeholders here.
Mention On Open
Specify a list of roles/users to mention after the ticket is opened.
Note: the message mentioning these roles/users will be deleted instantly, however the mention will still persist until they open the channel. This will not work for those who have their notification settings on mute.
Support Teams
Input which Staff Teams will handle tickets created from this reaction panel.
Large Image URL
Input a URL link to an image here, it will display underneath the welcome message.
- File path MUST end in .png - easy trick is to send the image as a message in a discord channel, then right click the message and choose "Copy Link." Paste link into the input.
Small Image URL
Input a URL link to an image here, it will display to the right of the welcome message.
- File path MUST end in .png - easy trick is to send the image as a message in a discord channel, then right click the message and choose "Copy Link." Paste link into the input.
Completion
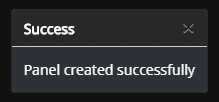
Once the reaction panel has been configured, click Submit and the panel will be created in the server. A success message should be shown in the bottom right hand corner of the screen if successful, or an appropriate error message if there was a mistake:
- If any fields are left blank, the default values will be used.
Editing
Reaction panels can be edited at a later date. Simply click the Edit button in the list of panels and the editing modal will be opened:
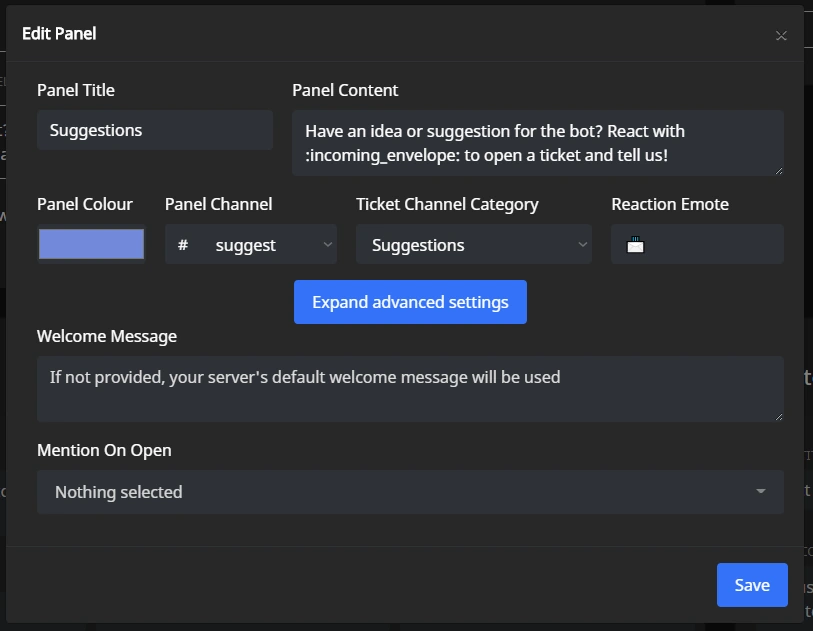
A panel can also be deleted by clicking the Delete button, or deleting the message containing the panel in Discord. If only the message in Discord is deleted, the panel will continue to exist on the Web Dashboard and can be resubmitted to Discord if needed, by clicking the Resend button.
A panel can also be deleted by clicking the Delete button, or deleting the message containing the panel in Discord. If only the message in Discord is deleted, the panel will continue to exist on the Web Dashboard and can be resubmitted to Discord if needed, by clicking the Resend button.
Support Staff
Now that the ticket system is in place, Tickets bot needs to know which of your staff should have access to the tickets (and the online dashboard settings - if desired.)
There are two scenarios for how to setup support staff:
- Staff members handle ALL tickets
- Staff members handle SPECIFIC tickets
Staff members handle ALL tickets
Setting the support staff in this scenario, is recommended via slash commands.
Command: /addadmin @username or /addadmin @role
Not only does this add the specified user to the Default Team in Staff Teams, but it also gives that user full administrative privileges of the Tickets bot for your server. This is just having admin of the Tickets bot, not your server.
- Having admin privileges of the bot means the user will be able to use the web dashboard fully, and control all the configuration, settings, customization of the bot, as well as see ALL of the tickets/transcripts contained there. Only give this privilege to those you trust.
Command: /addsupport @username or /addsupport @role
This adds the specified user to the Default Team in Staff Teams. The only thing they will be able to see on the online dashboard are the tickets where the Default Team has been assigned as a support team.
Staff members handle SPECIFIC tickets
Setting the support staff in this scenario can only be accomplished via the web dashboard. A guide on this can be found here.
Commands
This chapter provides some information regarding key commands.
Use the sidebar to navigate this chapter.
Command List
| General Commands | Description |
|---|---|
| /about | Information about the bot |
| /help | Displays a list of commands |
| /invite | Provides an invite link for the bot |
| /vote | Gives a link to vote for free premium beneftis |
| Ticket Commands | Description |
|---|---|
| /add (user) | Add a user to an existing ticket |
| /claim | Assigns a single staff member to the current ticket |
| /close (reason) | Closes the current ticket |
| /closerequest (close_delay) (reason) | Sends a message asking the ticket opener to approve or deny closing of the ticket |
| /jumptotop | Displays a button to click and will automatically scroll to the top of the ticket |
| /on-call | Toggles whether the user of command will be added and pinged to all new thread mode tickets |
| /open (subject) | Opens a new ticket |
| /remove (user) | Removes a user from the current ticket |
| /rename (new_ticket_name) | Renames the current ticket |
| /reopen (ticket ID) | reopens a thread ticket that was previously closed |
| /switchpanel (to_panel) | Switches the current ticket to another ticket panel - changing the channel category, support teams, etc |
| /transfer (user) | Transfers a claimed ticket to another user |
| /unclaim | Removes the claim on the current ticket |
| /notes | Creates a private thread for staff to talk in, only works in channel mode |
| Setting Commands | Description |
|---|---|
| /addadmin (user_or_role) | Grants a user or role admin priveledges of the bot |
| /addsupport (user_or_role) | Adds a user or role as a support representative |
| /autoclose configure | Edit autoclose related settings |
| /autoclose exclude | Excludes the current ticket from being automatically closed |
| /blacklist (user_or_role) | Toggles whether users are allowed to interact with the bot |
| /language (language) | Changes the language the bot messages are displayed in |
| /panel | Provides a link to create a reaction panel for users to open tickets |
| /premium | Activates premium benefits after purchasing (choose patreon on select menu) |
| /removeadmin (user_or_role) | Revokes a user's or role's admin priveledges |
| /removesupport (user_or_role) | Revokes a user's or role's support representative priviledges |
| /setup auto | Bot will make a very basic configuration (no reaction panels - you'll still want to customize on dashboard) |
| /setup limit | Change the quantity of tickets a single user can have open at the same time |
| /setup transcripts | Change the transcripts channel |
| /setup use-threads | Toggle if the bot creates new threads or new channels |
| /viewstaff | Lists the staff members and roles (admin or support) |
| Tag Commands | Description |
|---|---|
| /managetags add | Adds a new tag |
| /managetags delete | Deletes a tag |
| /managetags list | Lists all existing tags |
| /tag (tag_id) | Sends a message snippet |
| Statistics Commands | Description |
|---|---|
| /stats user | Displays statistics about the selected user |
| /stats server | Displays statistics about the server |
Add Admin and Add Support
You can quickly add users to your Default Team in Staff Teams with these commands.
There is a major difference between the two, so let's cover that:
Add Admin
Command: /addadmin @username, /addadmin @role
Not only does this add the specified user to the Default Team in Staff Teams, but it also gives that user full administrative privileges of the Tickets bot for your server. This is just having admin of the Tickets bot, not your server.
- Having admin privileges of the bot means the user will be able to use the online dashboard fully, and control all the configuration, settings, customization of the bot, as well as see ALL of the tickets/transcripts contained there. Only give this privilege to those you trust.
Add Support
Command: /addsupport @username, /addsupport @role
This adds the specified user to the Default Team in Staff Teams. The only thing they will be able to see on the online dashboard are the tickets where the Default Team has been assigned as a support team.
Close Requests
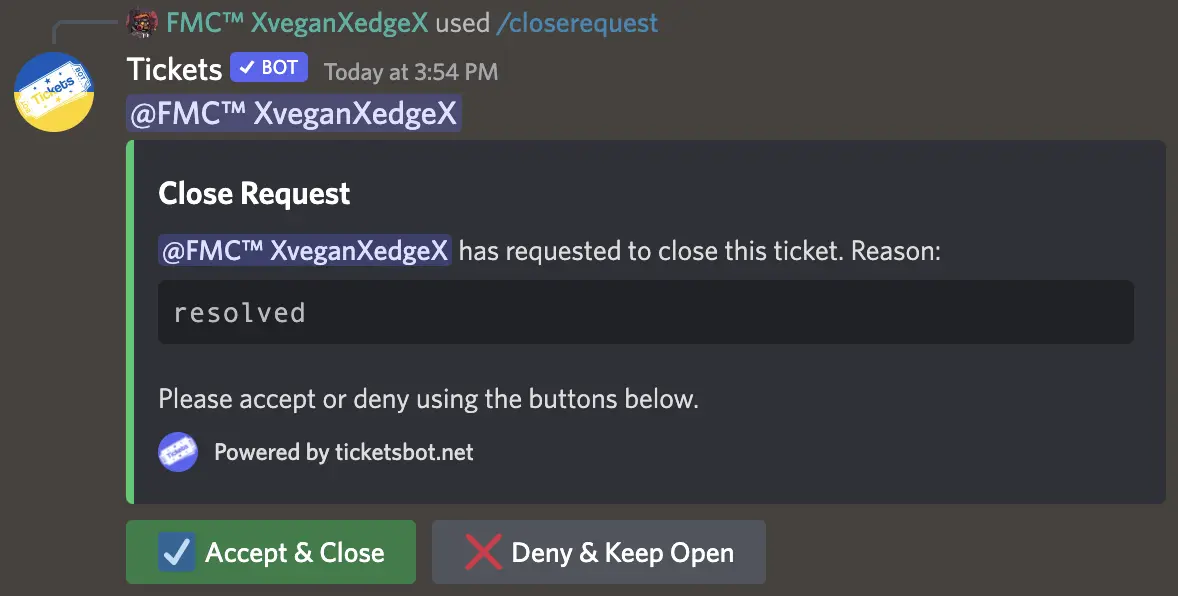
Another unique feature of Tickets is close requests.
When you feel a ticket is able to be closed, you can use the /closerequest command to ask the user to confirm they feel everything is resolved:
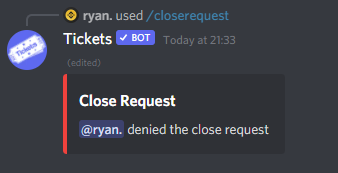
If the user chooses to deny the request, the message will be updated:
Timeouts
Additionally, you can specify a time (in hours) after which the ticket will be closed automatically if the user has not responded, and a reason for closure of the ticket:

If a close delay is not specified, the ticket will not be closed until the user accepts the request.
Notes
- If you exclude a ticket from being automatically closed via
/autoclose exclude, close request timeouts will not apply, even if provided.
Dashboard
This chapter provides information regarding configuring the bot using the web dashboard.
Use the sidebar to navigate this chapter.
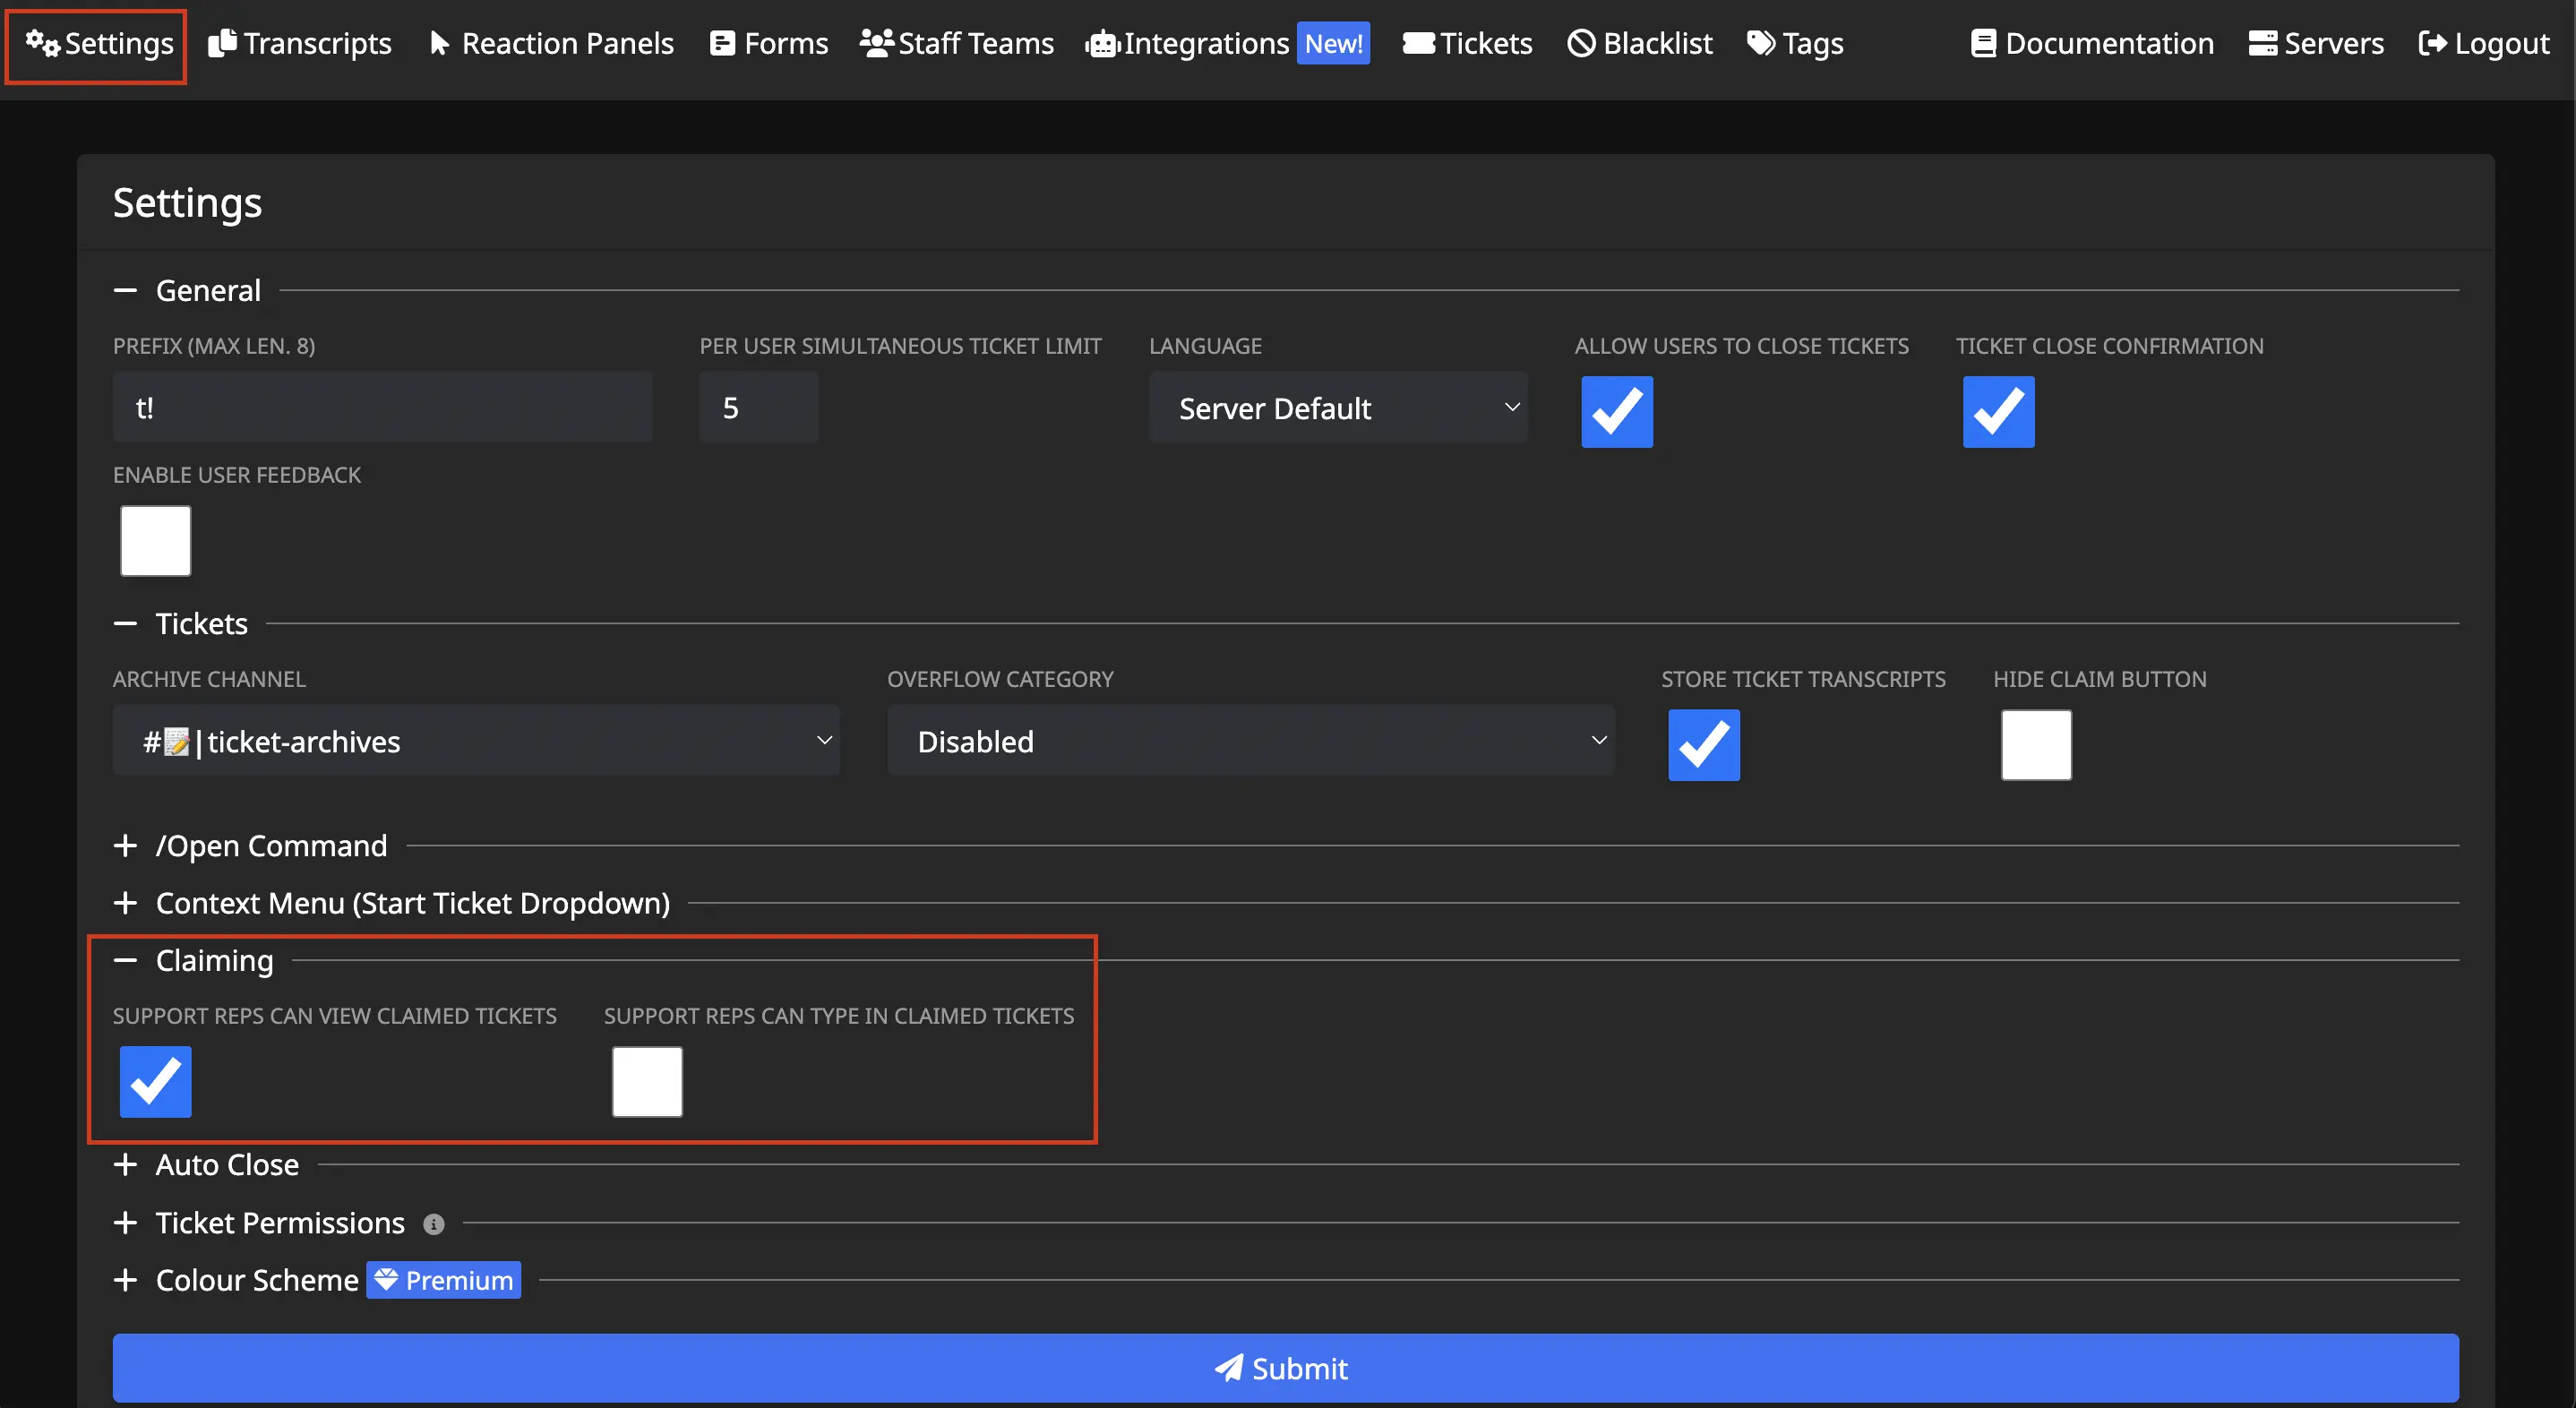
Settings
Upon opening the Settings tab, extra sections will be displayed (with the first two being expanded):
- General
- Thread Mode
- Tickets
- /Open Command
- Context Menu (Start Ticket Dropdown)
- Claiming
- Auto Close
- Colour Scheme

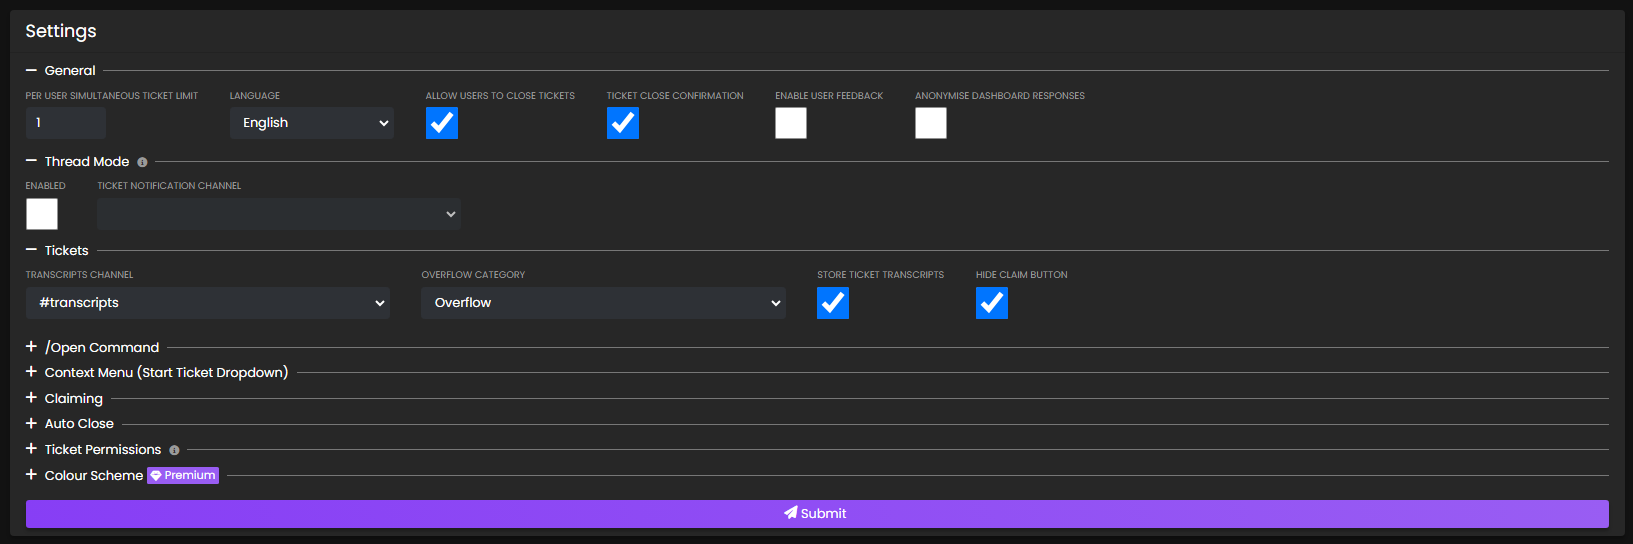
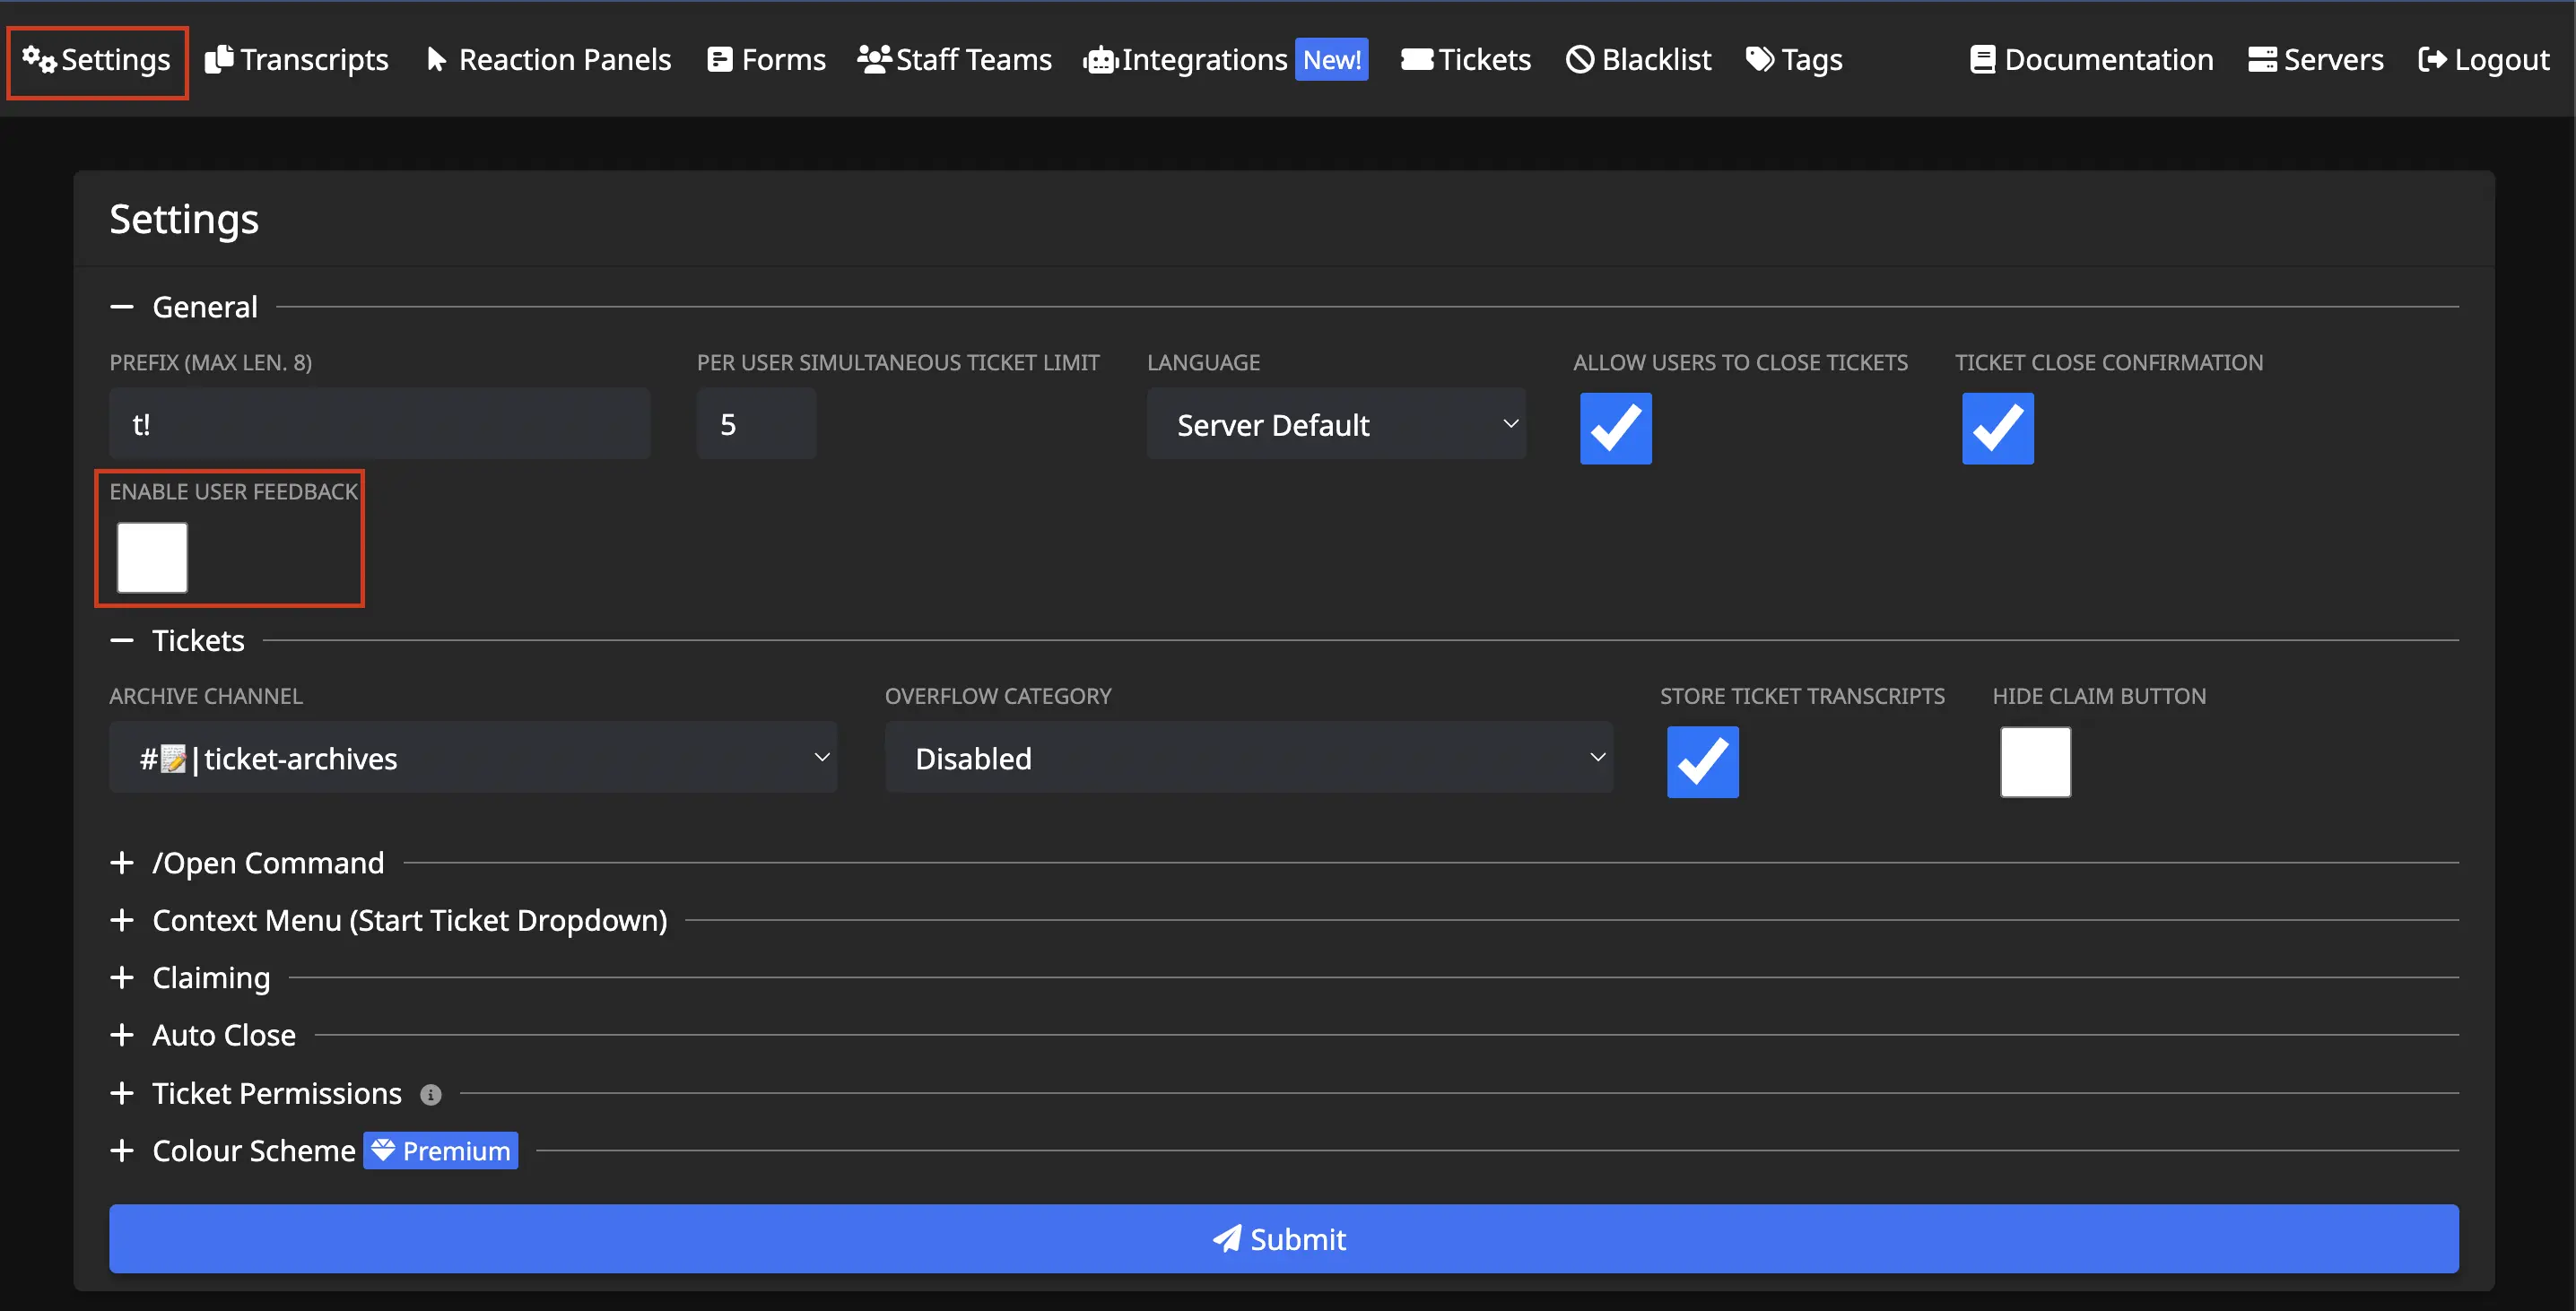
General
Here you will find settings that affect the entire server, not just a specific ticket panel.
Per User Simultaneous Ticket Limit
Set the max amount of tickets a server member can have open (staff is immune to this limit.)
- This is total number of tickets per member, not per panel.
Language
Set the bot's language.
- Learn more about Language Customization here.
Allow Users To Close Tickets
Toggle whether the server members that open tickets can close them (or if that will be a permission only given to staff.)
Ticket Close Confirmation
Toggle whether a second confirmation is required to close a ticket.

Enable User Feedback
Toggle whether a user can provide a star rating feedback on the service they received.
- Learn more about User Feedback here.
Thread Mode
We now support using private threads for tickets! This is a new optional mode for the bot that drastically changes how tickets operate.
- Learn more about Thread Mode here.
Enabled
Toggle whether tickets are created using Channel Mode or Thread Mode.
- Must be checked for rest of section to work.
Ticket Notification Channel
Select which channel should receive the embedded messages containing a notification to your staff that a ticket has been opened. This same message will also have a button for your staff to click and join the ticket thread.
Tickets
This section has a few more optional settings.
Transcripts Channel
Select if/which channel should receive an embedded message containing a summary of each closed ticket. If you have also chosen to store transcripts (see below) there will also be a link to the transcript. Only those who had access to the ticket (plus all those with administration permissions in the server) will be able to access it.

Overflow Category
Discord has a limit of 50 channels to a category (and 500 channels total per server), so here is where another category can be selected for tickets to go into if the first Ticket Category is full.
- Learn more about Ticket Category here.
Store Ticket Transcripts
Toggle whether transcripts of each ticket are stored for later review by your staff.
Hide Claim Button
Toggle whether the Claim button is shown in each ticket.
- Learn more about Claiming here.
/Open Command
This section has settings when using the /open command to create a ticket.
Disable /Open Command
Toggle whether server members can use /open to create a ticket.
Channel Category
Select which category the open tickets will display.
Naming Scheme
Select a naming scheme: Ticket followed by numbers or Ticket followed by the username of opener.
Welcome Message
The welcome message is the message displayed in the Ticket as soon as the user opens it:

Note: the message has a maximum limit of 4096 characters due to Discord limitations.
-
Placeholders can be used in the welcome message. View a list of placeholders here.
-
Discord message formatting can also be used to include links to channels, emojis, roles, or usernames in the welcome message.
- First, discord developer mode must be turned on - in your personal discord account settings > advanced > discord developer mode.
- Second, right click any channel name, username, message, etc and choose
Copy ID. - Third, use the
structuresection of discord's messge formatting chart to include it in the welcome message.
The title of the embed will either be based off of the subject provided by the user when using /open [Subject], or the title will show "No subject given" if one wasn't input.
Context Menu (Start Ticket Dropdown)
This section has settings dealing with tickets that are created via the context menu (right clicking a message.)
- There is a dedicated page documenting this section here.
Claiming
This section has the settings dealing with claiming tickets.
- There is a dedicated page documenting this section/feature here.
Auto Close
This section has settings dealing with automated closing of tickets.
Enabled
Toggle whether any auto-close features work or not.
- Must be checked for rest of section to work.
Close On User Leave
Toggle whether you'd like open tickets to be automatically closed if the Ticket Opener leaves the server.
Since Open With No Response
Set a timeframe in the boxes. If Ticket Opener does not type a message within that timeframe, the ticket will be closed automatically.
- This is a premium feature. Learn more about premium here.
Since Last Message
Set a timeframe in the boxes. If no messages occur within that timeframe, the ticket will be closed automatically.
- This is a premium feature. Learn more about premium here.
Ticket Permissions
In this area you can define if some permissions are given to the users who open tickets.
- Green toggle buttons - user will receive this permission in their respective ticket channel.
- Grey toggle buttons - user will not receive this permission in their respective ticket channel.
Colour Scheme
Select custom colours for the embedded messages from Tickets bot.
- This is a premium feature. Learn more about premium here.
Completion
Once you have configured these settings to your liking, click Submit for them to take effect in your server.
Editing
If you wish to update your settings at a later date, simply change the desired settings and click Submit again.
Feedback
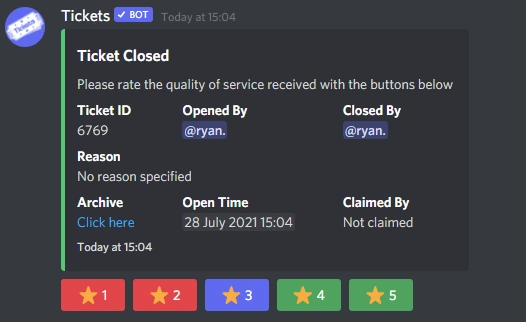
Tickets allows your users to provide feedback on the support they received:
Enabling Feedback
In order for users to be asked to rate your service, you must first enable feedback on the web dashboard.
Select your server and open the settings page:
Check the Enable User Feedback box and press submit.
Next time a user closes a ticket, they will be asked for feedback.
Viewing Feedback
There are several ways to view feedback:
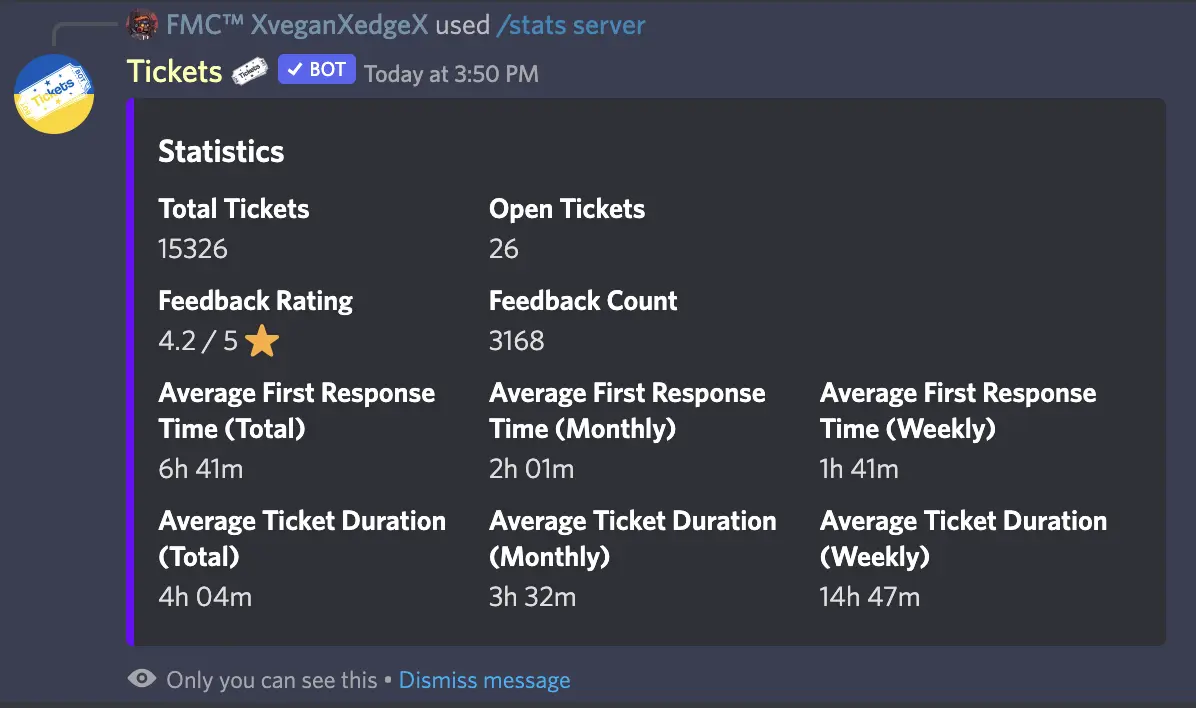
Server Stats
If you are a premium subscriber, you can view your feedback statistics with /stats server:
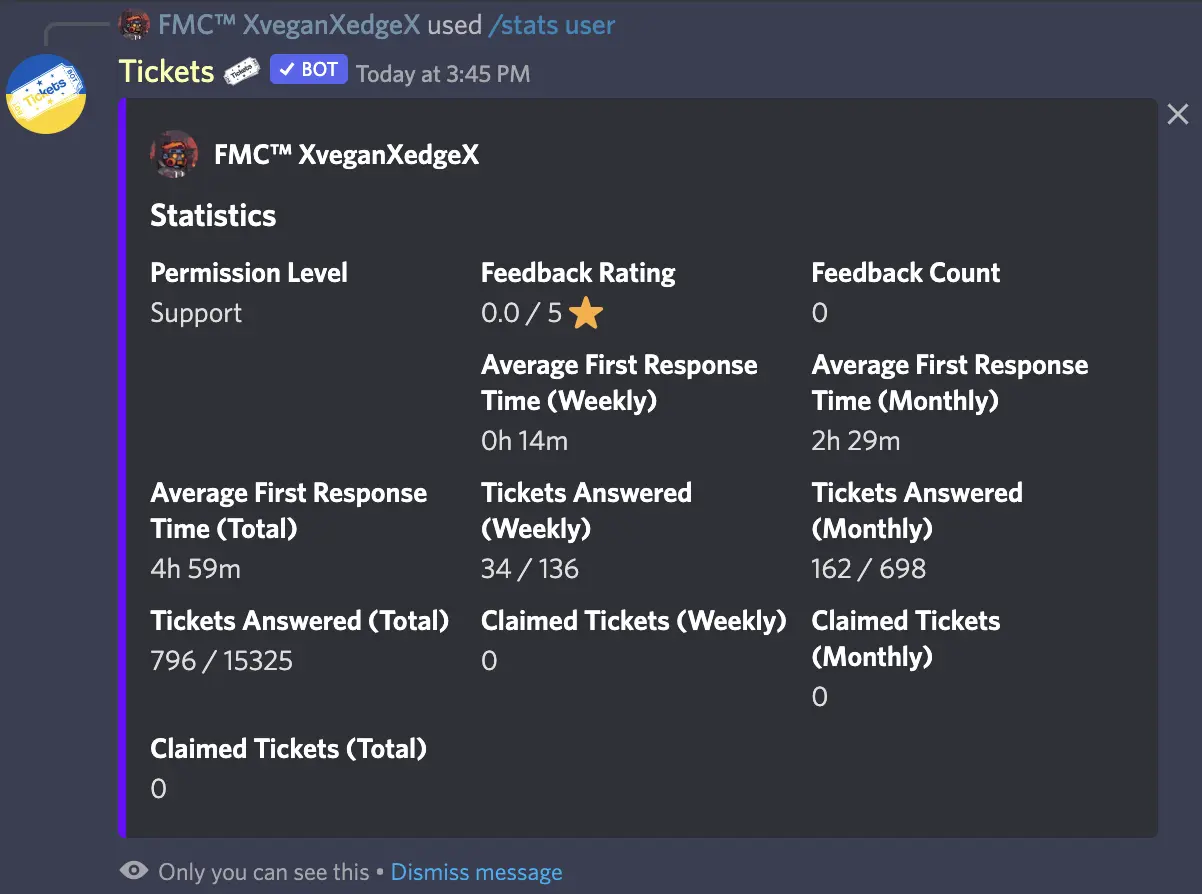
User Stats
If you are a premium subscriber, you can use /stats user to view the average rating on tickets claimed by a specific user:
Placeholders
You can include the following placeholders in your welcome message to display your feedback rating to users:
- %average_rating%
- %rating_count%
Note: View more placeholders by clicking here.
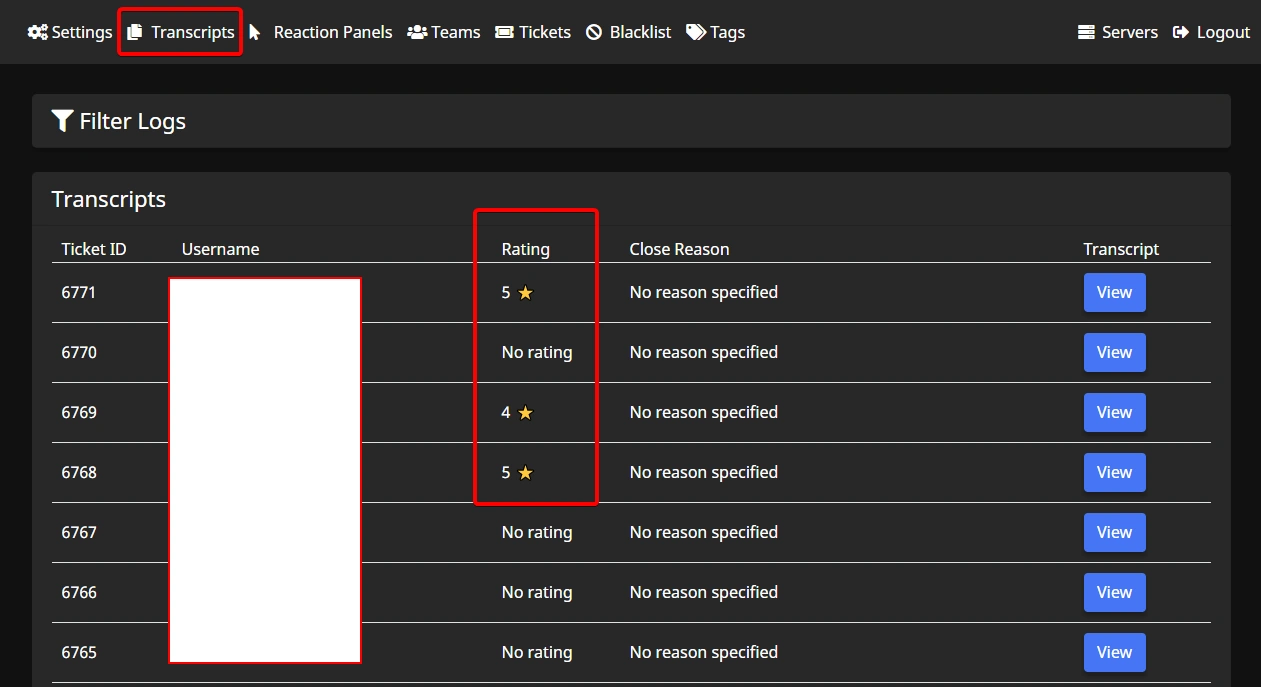
Viewing Individual Ticket Ratings
You can view the ratings of individual tickets by navigating to the transcripts page on the dashboard. Next to each ticket, the rating given by the user will be shown:
Thread Mode
We now support using private threads for tickets! This is a new optional mode for the bot that drastically changes how tickets operate.
Instead of the whole support team being added to a ticket when it is opened, the thread starts out with no staff members. A button is then sent to your ticket notification channel which staff members click to be added to the thread:

Channel vs Thread Comparison
| Channels | Threads |
|---|---|
| Tickets cannot be reopened once closed | Tickets can be reopened |
| Transcripts only viewable on dashboard | Transcripts viewable on dashbord, and within Discord |
| Limited to 500 channels total, and only 50 channels in a single category | Unlimited threads |
| All staff on support team added to ticket | Staff members must press button to join ticket |
| Tickets can be claimed | Ticket claiming is unsupported 1 |
/switchpanel changes the ticket panel of an existing ticket | /switchpanel is unsupported 2 |
| No concept of on-call staff | Staff can be marked as on-call to automatically be pinged and added to tickets |
| No spaces in channel names | Spaces in channel names permitted: e.g. Ticket 1234 |
| Can use /notes for a private thread for staff to talk in | Cannot use /notes due to Discord limitation |
Staff members must individually click a button to join the ticket, so the behaviour is replicated
This is due to Discord's permission management internals being very different for threads
On-Call
Thread mode introduces a new command: /on-call. When a staff member runs this command, they will be assigned roles marking them as on call, until they run the command again. When a new ticket is opened, the on call roles are pinged in the ticket, instantly adding all currently on call staff members to the ticket.
Note: When a staff member becomes on call, they will not be added to any existing tickets. They must join them via the ticket notification channel as normal.
How do I enable thread mode?
You can enable threads directly within Discord, by using the command /setup use-threads, like so:

Alternately, you can enable threads via the settings page of the dashboard:

FAQ
Which mode should I use?
If you run a server with a small team, we would likely recommend sticking with channel mode. If you run a server with a heavy focus on 1-on-1 support or claiming, we would recommend thread mode. Nevertheless, if you require any of the additional features like reopening tickets, you must use thread mode.
Why can't the bot add the support team to the thread straight away?
Permission management capability on threads has been heavily limited by Discord. It is not possible to add or remove members in bulk.
Will channel mode be removed?
No, both modes will be supported forever. Thread mode is completely optional.
My users can't type in their support tickets!
You must grant the "Send Messages in Threads" permission to your @everyone role in the panel channel:


Placeholders
Welcome Message Placeholders
Built-in
| Placeholder | Description |
|---|---|
| %user% | Mentions the user |
| %username% | Display the user's name |
| %ticket_id% | Display the ticket's numeric ID |
| %open_tickets% | Display the number of open tickets in the server |
| %total_tickets% | Display the number of tickets that have ever been opened in the server |
| %user_open_tickets% | Display the number of tickets that the user currently has open in the server |
| %user_total_tickets% | Display the number of tickets that the user has ever opened in the server |
| %ticket_limit% | Display the server's ticket limit |
| %channel% | Mention the channel |
| %rating_count% | Amount of feedback ratings you have received |
| %average_rating% | Your average feedback rating |
| %time% | Display the current time |
| %date% | Display today's date |
| %datetime% | Display the current date and time |
| * %first_response_time_weekly% | Staff average first response time to tickets this week |
| * %first_response_time_monthly% | Staff average first response time to tickets this month |
| * %first_response_time_all_time% | Staff average first response time to tickets since the beginning |
| %discord_account_creation_date% | The date and time that the user's Discord account was created |
| %discord_account_age% | How long ago the user's Discord account was created |
Placeholders marked with a * are premium features. Learn more about premium here.
Integrations
All integration placeholders are automatically active, you do not have to do anything special apart from include them in your welcome message.
Bloxlink
These placeholders are available if the user has linked their Roblox account via Bloxlink
| Placeholder | Description |
|---|---|
| %roblox_username% | The user's Roblox username |
| %roblox_id% | The user's numeric Roblox ID |
| %roblox_display_name% | The user's Roblox display name |
| %roblox_profile_url% | The full clickable URL to the user's Roblox profile |
| %roblox_account_age% | How long ago the user's Roblox account was created, e.g. 7 months ago |
| %roblox_account_created% | The date on which the user's Roblox account was created, e.g. 7 January 2019 |
Custom Naming Scheme Placeholders:
| Placeholder | Description |
|---|---|
| %id% | Display the unique ticket id# |
| %id_padded% | Display the unique ticket id# to 4 places |
| %username% | Display the user's name |
| %nickname% | Display the user's nickname |
Start Ticket From Message
Did you know that you can start a ticket from a channel using message context menus?
This is a similar functionality to Discord private threads. A common use case is for using tickets to perform moderation, where you can drag a user into a ticket to discuss a specific message with them.
How To Use
To start a ticket from a message, simply right click the message (or long press on mobile devices), hover over Apps, and select Start Ticket:

A new ticket will be created with the user who sent the message. The bot will send a message quoting the user, as well as providing a link to the message:

Configuration
Required Permission Level
To limit usage of this functionality to staff members: visit the web dashboard, select your server, and take a look at the Settings page.
You will see a dropdown menu labelled Required Permission Level under the Context Menu (Start Ticket Dropdown) heading. Adjust the setting to your wish, and then press the Submit button.

Add Message Sender To Ticket
If you are using this functionality for users to report messages, you may not wish to have the person who is being reported added to the ticket for anonymity.

This will also stop the Conversation moved to ticket message from being sent.
Use Settings From Panel
By default, tickets opened via the context menu use the /open command settings. If you wish to use the settings of a specific reaction panel, i.e. so you can use Mention On Open, select the panel you wish to use under the Use Settings From Panel dropdown.

Claiming
Note: Channel mode only. Discord does not allow threads to be claimed. For more differences between the two modes, click here.
Tickets can be claimed by a staff member, so other staff members cannot also reply to the ticket. The benefit of this is that tickets become less cluttered with many staff members talking at once. Alternatively, an admin could claim a ticket to keep the support team from seeing potentially sensitive issues.
Note: Those with Administrator permissions in your server will always have access to any claimed ticket, as well as the user who claimed it.
Commands Related to Claiming
- /claim - Assigns you to a ticket
- /transfer @User - Transfers a claimed ticket to another user
- /unclaim - Removes the claim on the current ticket
Claiming can be configured in 3 ways
- All staff members can see the ticket, but only the claimer can reply (Default)
- All staff members can see the ticket, and all staff members can reply
- Only the claimer can see the ticket
You can configure which methodology is used on the dashboard's settings tab:
Awaiting User Response
Setting a category for ticket channels which are awaiting the user's response to be moved to. This feature is highly useful for being able to tell which tickets require a response from staff members, and reduces clutter in your ticket categories.
Note: Channel mode only. Discord does not allow threads to be moved. For more differences between the two modes, click here.
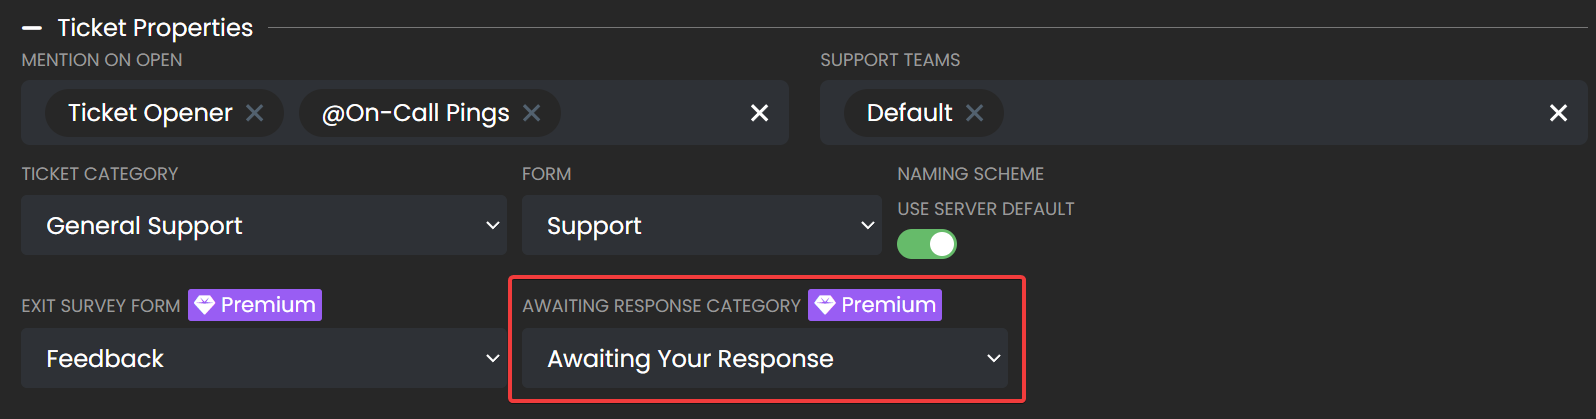
This setting is toggleable for each panel. You can find them under the Ticket Panel tab. 10 minutes after the last response from a staff members, the ticket channel will be moved to the awaiting response category.
Due to Discord limitations, a channel can only be updated twice every 10 minutes, so it is not possible to change how quickly the channel gets moved to the awaiting response category.
Note This feature is only for servers that have premium activiated. Learn more about premium here.
Transcripts
Upon opening the Transcripts menu, you'll have two cards displayed to you:
- Filter Logs
- Transcripts
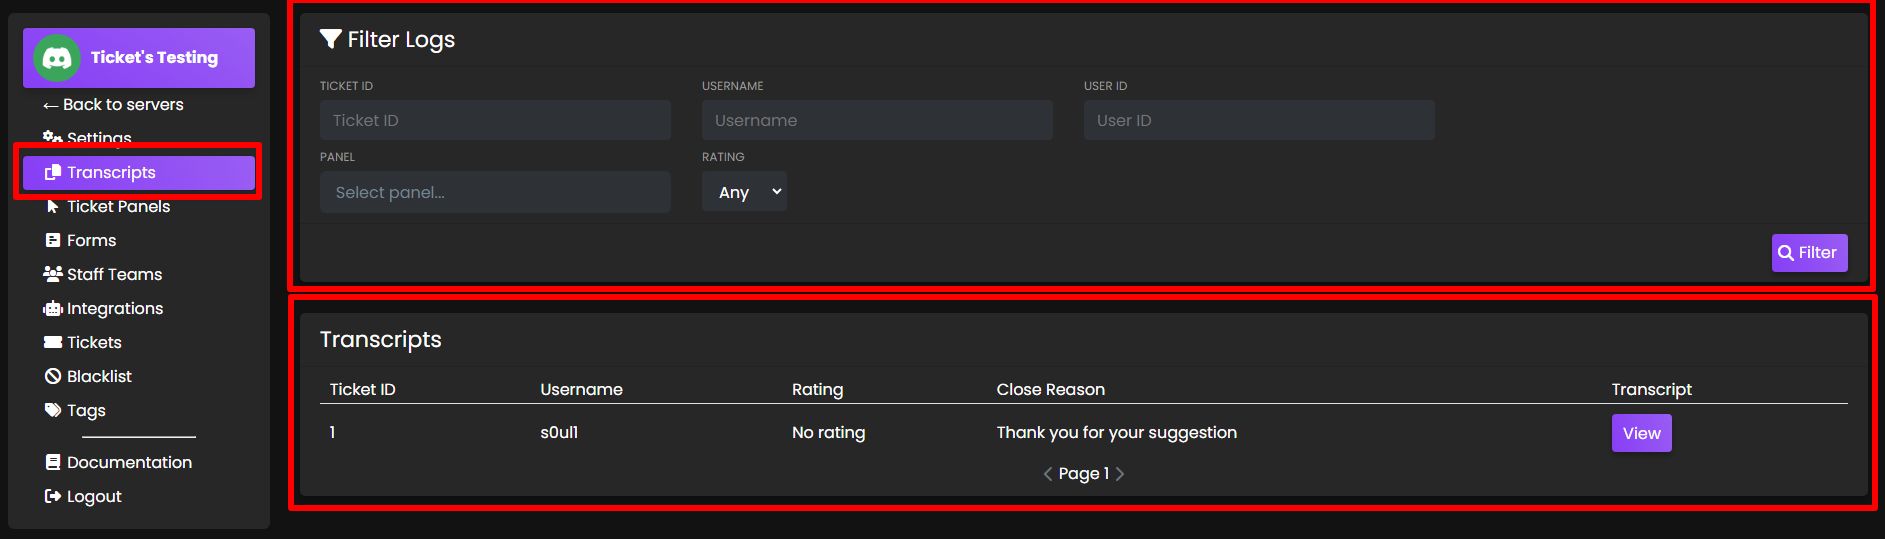
Filter Logs
Here you can filter the transcripts shown down in the other section.
Fill out the inputs as you desire and click Filter button.
Transcripts
Here you can view transcripts of closed tickets.
Ticket ID
This unique ticket number cannot be reset or changed.
Username
Discord username of the ticket opener.
Rating
If user feedback is enabled, the feedback rating given by ticket opener will display.
- Learn more about User Feedback here.
Close Reason
If close with reason button was selected (or /close was used and a reason was input), it will display. Otherwise, it will display "No reason specified."
Transcript
Click to view the transcript.
Panels
Basic Video Walkthrough
Creating A Panel
In order to create a reaction panel, head over to the web dashboard and select your server. If unfamiliar with how to do that, read our guide on the web dashboard here.
Once on your server's main settings page, select Ticket Panels in the navigation bar to be taken to the ticket panel configuration page which looks as follows:

Focus on the left side of the screen. The right side are settings for combining different panels into a single message.
Draw your attention to the New Panel card. Configure the panel's appearance here:

Panel Title
The panel title is the bold text at the top of the embed.
Note: The panel title has a maximum length of 255 characters, and by default, it is set to
Open a ticket!.
Panel Content
The panel content is the text in the long description of the embed. We recommend providing a general overview of how your support system works, such as which languages the support agents are fluent in.
Note: The panel content has a maximum length of 1024 characters.
Panel Colour
This is the colour on the left side of the embed. When clicked, a colour picker will open as shown below:

Panel Channel
This is the channel that the reaction panel will be sent in for users to react to. Therefore, this channel should be accessible to all members, and be the only message in the channel to avoid confusion.
Note: This should NOT be the same as your transcript channel.
Ticket Category
Designates the channel category that the ticket channel will be created under. If unsure of what a channel category is, Discord has a guide explaining them available here.
Reaction panels use different channel categories to the one configured on the main settings tab to allow for distinction when using multiple reaction panels - meaning it is possible to have each "type" of ticket open in it's own category for easier organization.
Form
Assign a form to the panel.
- Learn more about Forms here.
Button Colour
Choose the colour of the button.
Button Text
Enter the text that the button will contain.
Button Emoji
This is the emoji that users will click in order to open a ticket. The emoji can either be pasted directly into the box, for example: 📩, or the Discord name can be used, for example: envelope_with_arrow (colons are optional.)
Custom emojis from your server can be used by clicking the toggle to show green instead of grey. When toggled on, the input field will show you a list of your available emojis to choose from.
Advanced Settings
Upon clicking Toggle Advanced Settings, extra fields will be displayed:
Welcome Message
The server's welcome message can be overridden on a per-panel basis using this field. If left blank, the welcome message from the main settings page will be used.
Note: the message has a maximum limit of 4096 characters due to Discord limitations.
-
Placeholders can be used in the welcome message. View a list of placeholders here.
-
Discord message formatting can also be used to include links to channels, emojis, roles, or usernames in the welcome message.
- First, discord developer mode must be turned on - in your personal discord account settings > advanced > discord developer mode.
- Second, right click any channel name, username, message, etc and choose
Copy ID. - Third, use the
structuresection of discord's messge formatting chart to include it in the welcome message.
Naming Scheme
This toggle can be used to change the naming scheme of the ticket channels. If it's left on green, it will use the naming scheme set in the Settings portion of the Dashboard. If it's flipped to grey, a custom scheme can be setup.
- Placeholders can be used in the custom naming scheme. View a list of placeholders here.
Mention On Open
Specify a list of roles/users to mention after the ticket is opened.
Note: the message mentioning these roles/users will be deleted instantly, however the mention will still persist until they open the channel. This will not work for those who have their notification settings on mute.
Support Teams
Input which Staff Teams will handle tickets created from this reaction panel.
Large Image URL
Input a URL link to an image here, it will display underneath the welcome message.
- File path MUST end in .png - easy trick is to send the image as a message in a discord channel, then right click the message and choose "Copy Link." Paste link into the input.
Small Image URL
Input a URL link to an image here, it will display to the right of the welcome message.
- File path MUST end in .png - easy trick is to send the image as a message in a discord channel, then right click the message and choose "Copy Link." Paste link into the input.
Completion
Once the reaction panel has been configured, click Submit and the panel will be created in the server. A success message should be shown in the bottom right hand corner of the screen if successful, or an appropriate error message if there was a mistake:

- If any fields are left blank, the default values will be used.
Editing
Reaction panels can be edited at a later date. Simply click the Edit button in the list of panels and the editing modal will be opened:

A panel can also be deleted by clicking the Delete button, or deleting the message containing the panel in Discord. If only the message in Discord is deleted, the panel will continue to exist on the Web Dashboard and can be resubmitted to Discord if needed, by clicking the Resend button.
A panel can also be deleted by clicking the Delete button, or deleting the message containing the panel in Discord. If only the message in Discord is deleted, the panel will continue to exist on the Web Dashboard and can be resubmitted to Discord if needed, by clicking the Resend button.
Multi Panels
Multi-panels are the combination of 2 or more Reaction Panels in a single embed:
Creating A Multi-panel
In order to create a multi-panel, you'll need to head over to the web dashboard and select your server. If you're unfamiliar with how to do that, read our guide on the web dashboard here.
Once on your server's main settings page, select Reaction Panels in the navigation bar and you'll be taken to the reaction panel configuration page which looks as follows:
You'll want to focus on the right side of the screen. The left side are settings for individual panels (known as Reaction Panels.)
Draw your attention to the New Multi-Panel card. You'll configure the panel's appearance here:
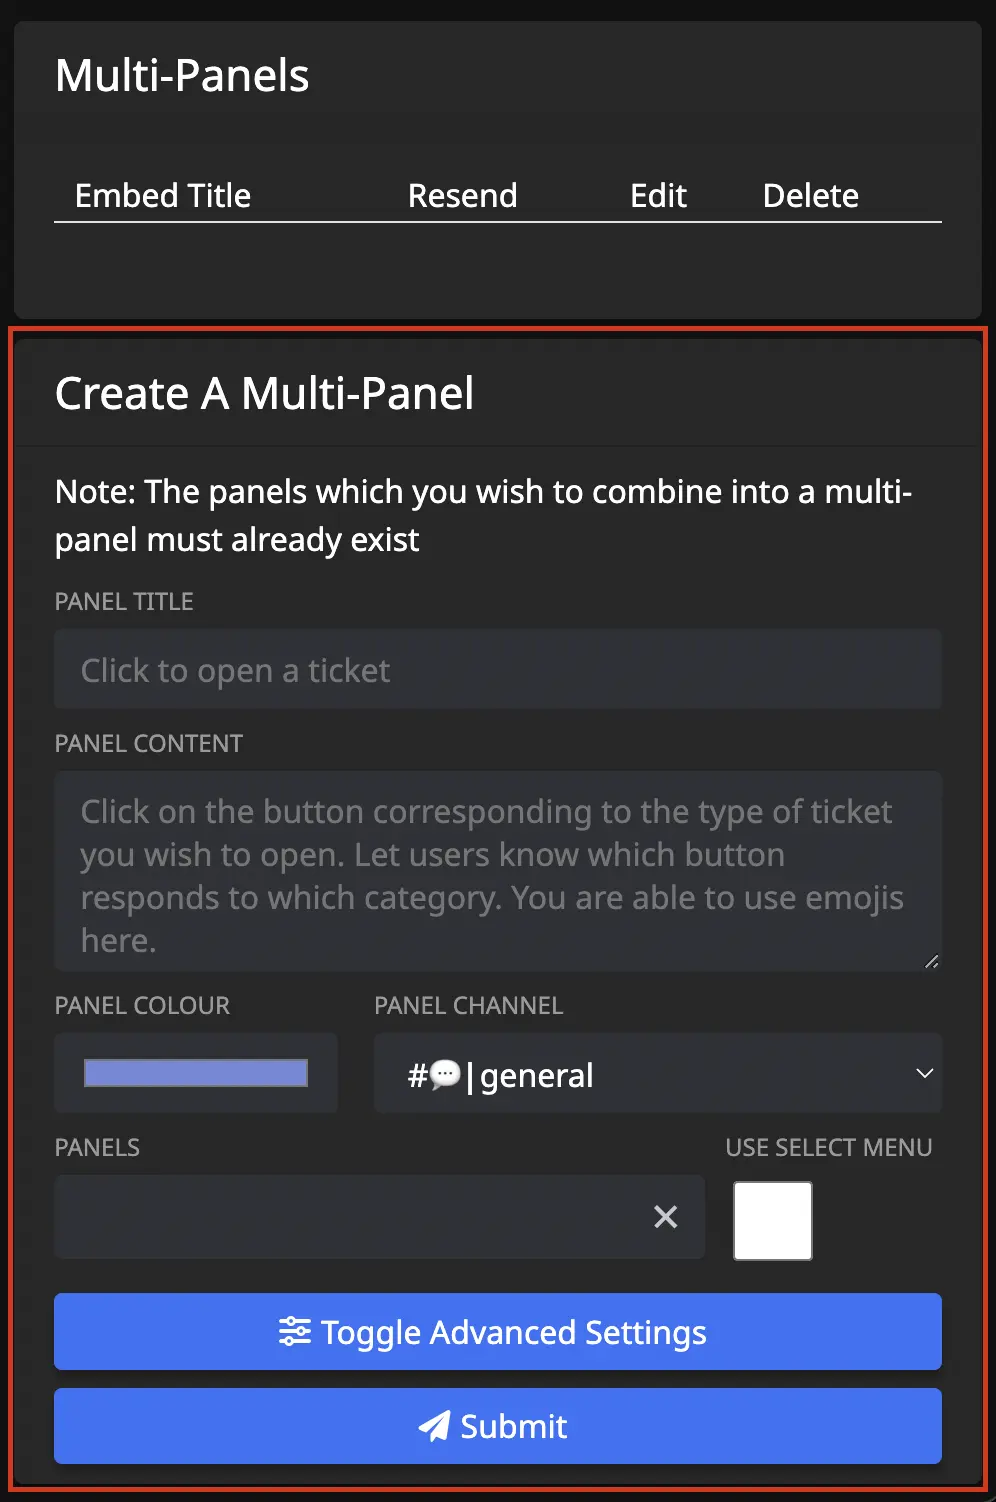
Panel Title
The panel title is the bold text at the top of the embed. The panel title has a maximum length of 255 characters. By default, we set the value to Open a ticket!
Panel Content
The panel content is the text in the long description of the embed. It has a maximum length of 1024 characters. We recommend providing a general overview of how your support system works, such as which languages you have support staff fluent in.
Panel Colour
This is the colour on the left side of the embed. When clicked, a colour picker will open as shown below:
Panel Channel
This is the channel that the multi-panel will be sent in for users to react to. Therefore, this channel should be accessible to your users, and be the only message in the channel to avoid confusion.
This should not be the same as your archive / transcript channel.
Panels
This input field is where you select which of your already made individual panels you'd like to include in the multi-panel.
Use Select Menu
- Unchecked = Ticket options appear as clickable buttons.
- Checked = Ticket options appear as a dropdown menu.
Advanced Settings
Upon clicking Toggle Advanced Settings, you'll have extra fields displayed to you:
Large Image URL
Input a URL link to an image here, it will be shown underneath the welcome message.
- File path MUST end in .png - easy trick is to send the image as a message in a discord channel, then right click the message and choose "Copy Link." Paste link into the input.
Small Image URL
Input a URL link to an image here, it will be shown to the right of the welcome message.
- File path MUST end in .png - easy trick is to send the image as a message in a discord channel, then right click the message and choose "Copy Link." Paste link into the input.
Completion
Once you have configured the multi-panel to your liking, click Submit and the panel will be created in your server. You should be shown a success message in the bottom right hand corner of your screen if successful, or an appropriate error message if you made a mistake:
- If you leave any fields blank, the default values will be used.
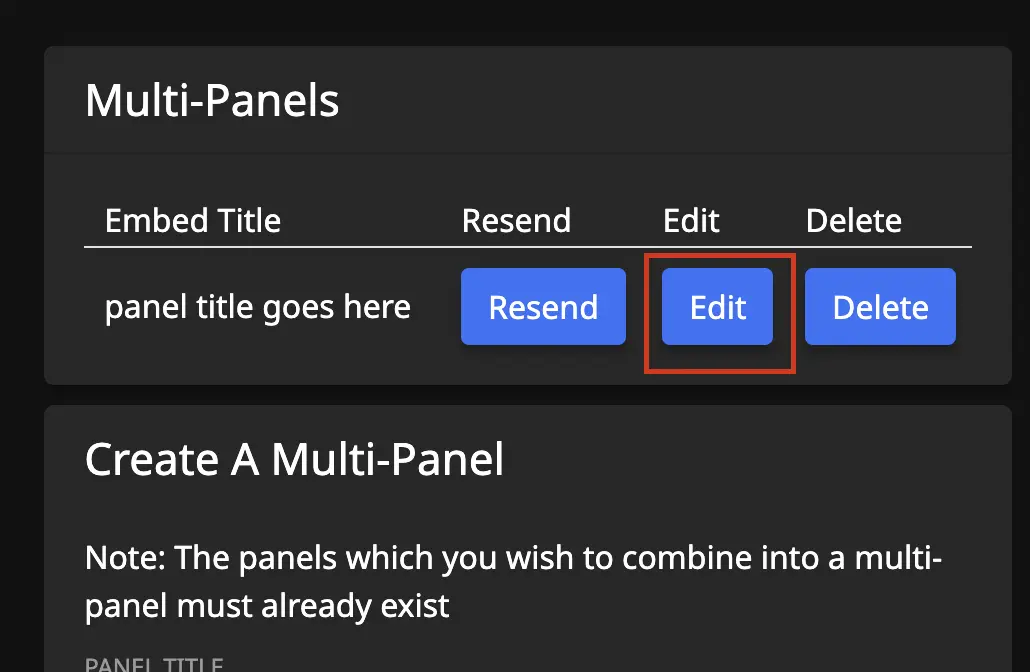
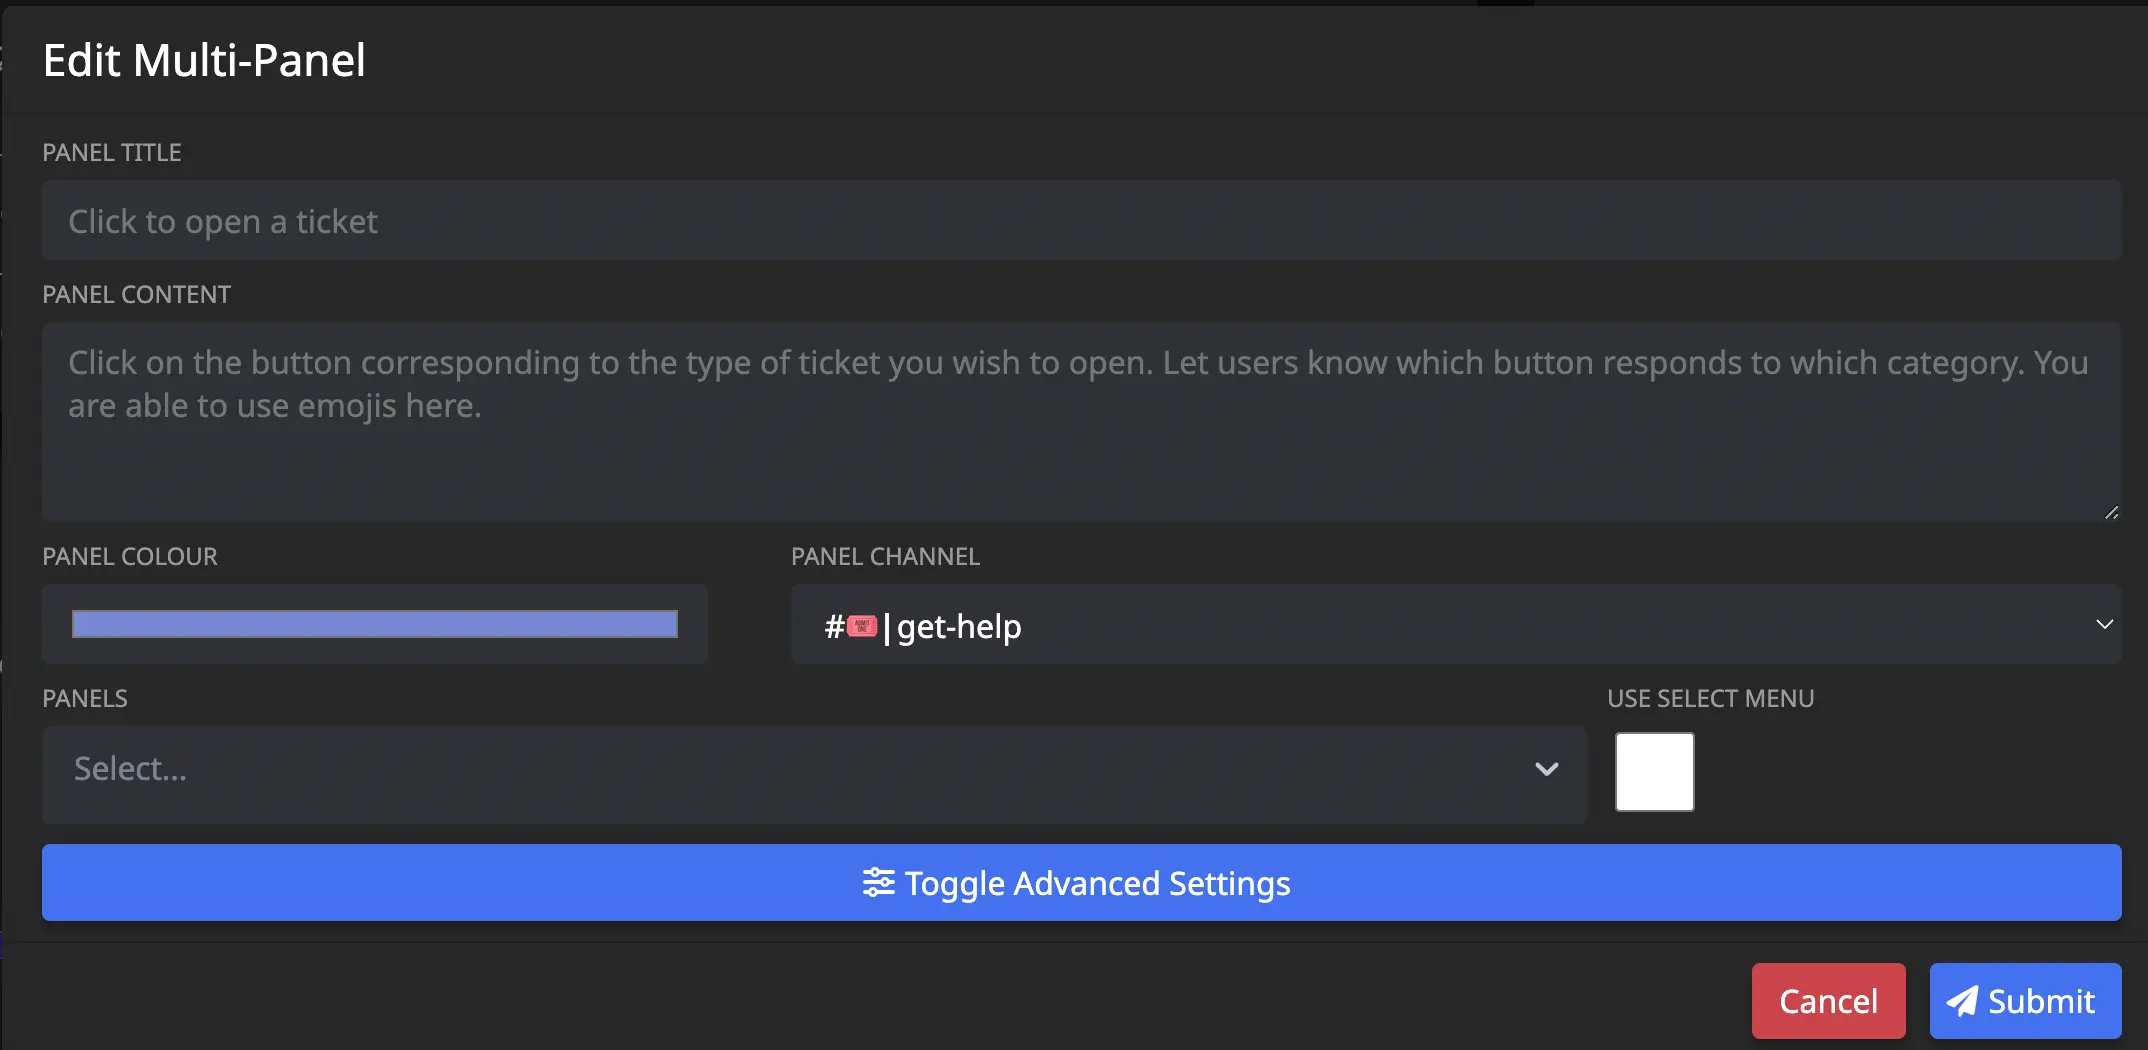
Editing
If you wish to update a multi-panel at a later date, simply click the edit button in the list of multi-panels and the editing modal will be opened:
You can also delete a multi-panel by clicking the Delete button, or deleting the message containing the multi-panel in Discord. If you only delete the message in Discord, the multi-panel will continue to exist on your Dashboard and you can resubmit it to Discord if needed.
Forms
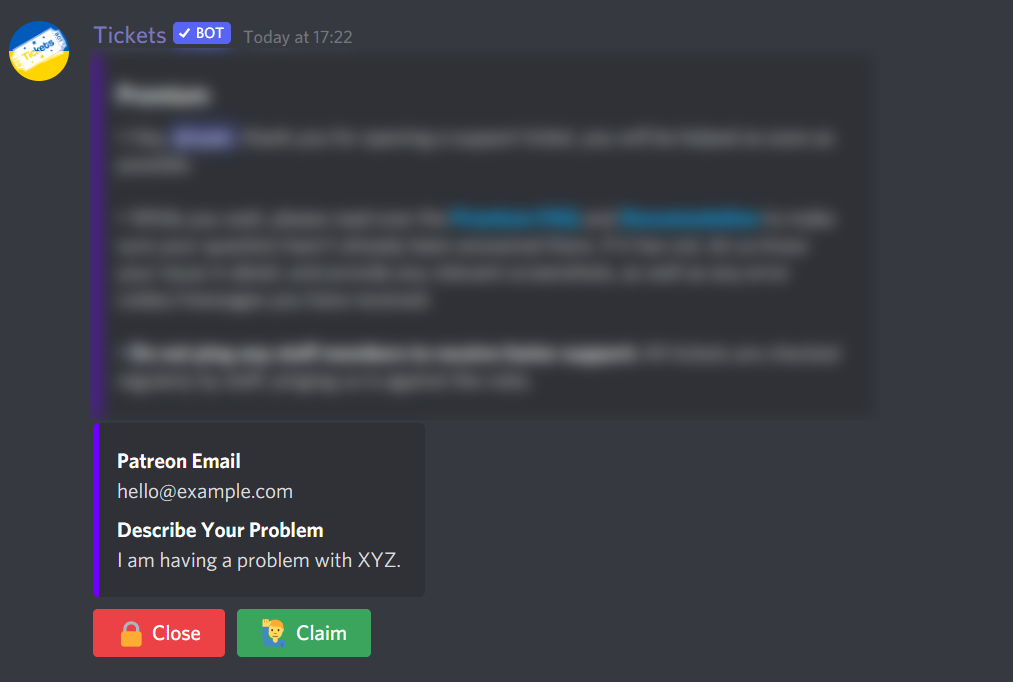
Tickets has the ability to prompt users for answers to pre-defined questions when opening a ticket:

To set this up, you must first create a form, and then apply the form to your reaction panel. This way, you can assign a single form to multiple different types of tickets, if you choose.
Basic Video Walkthrough
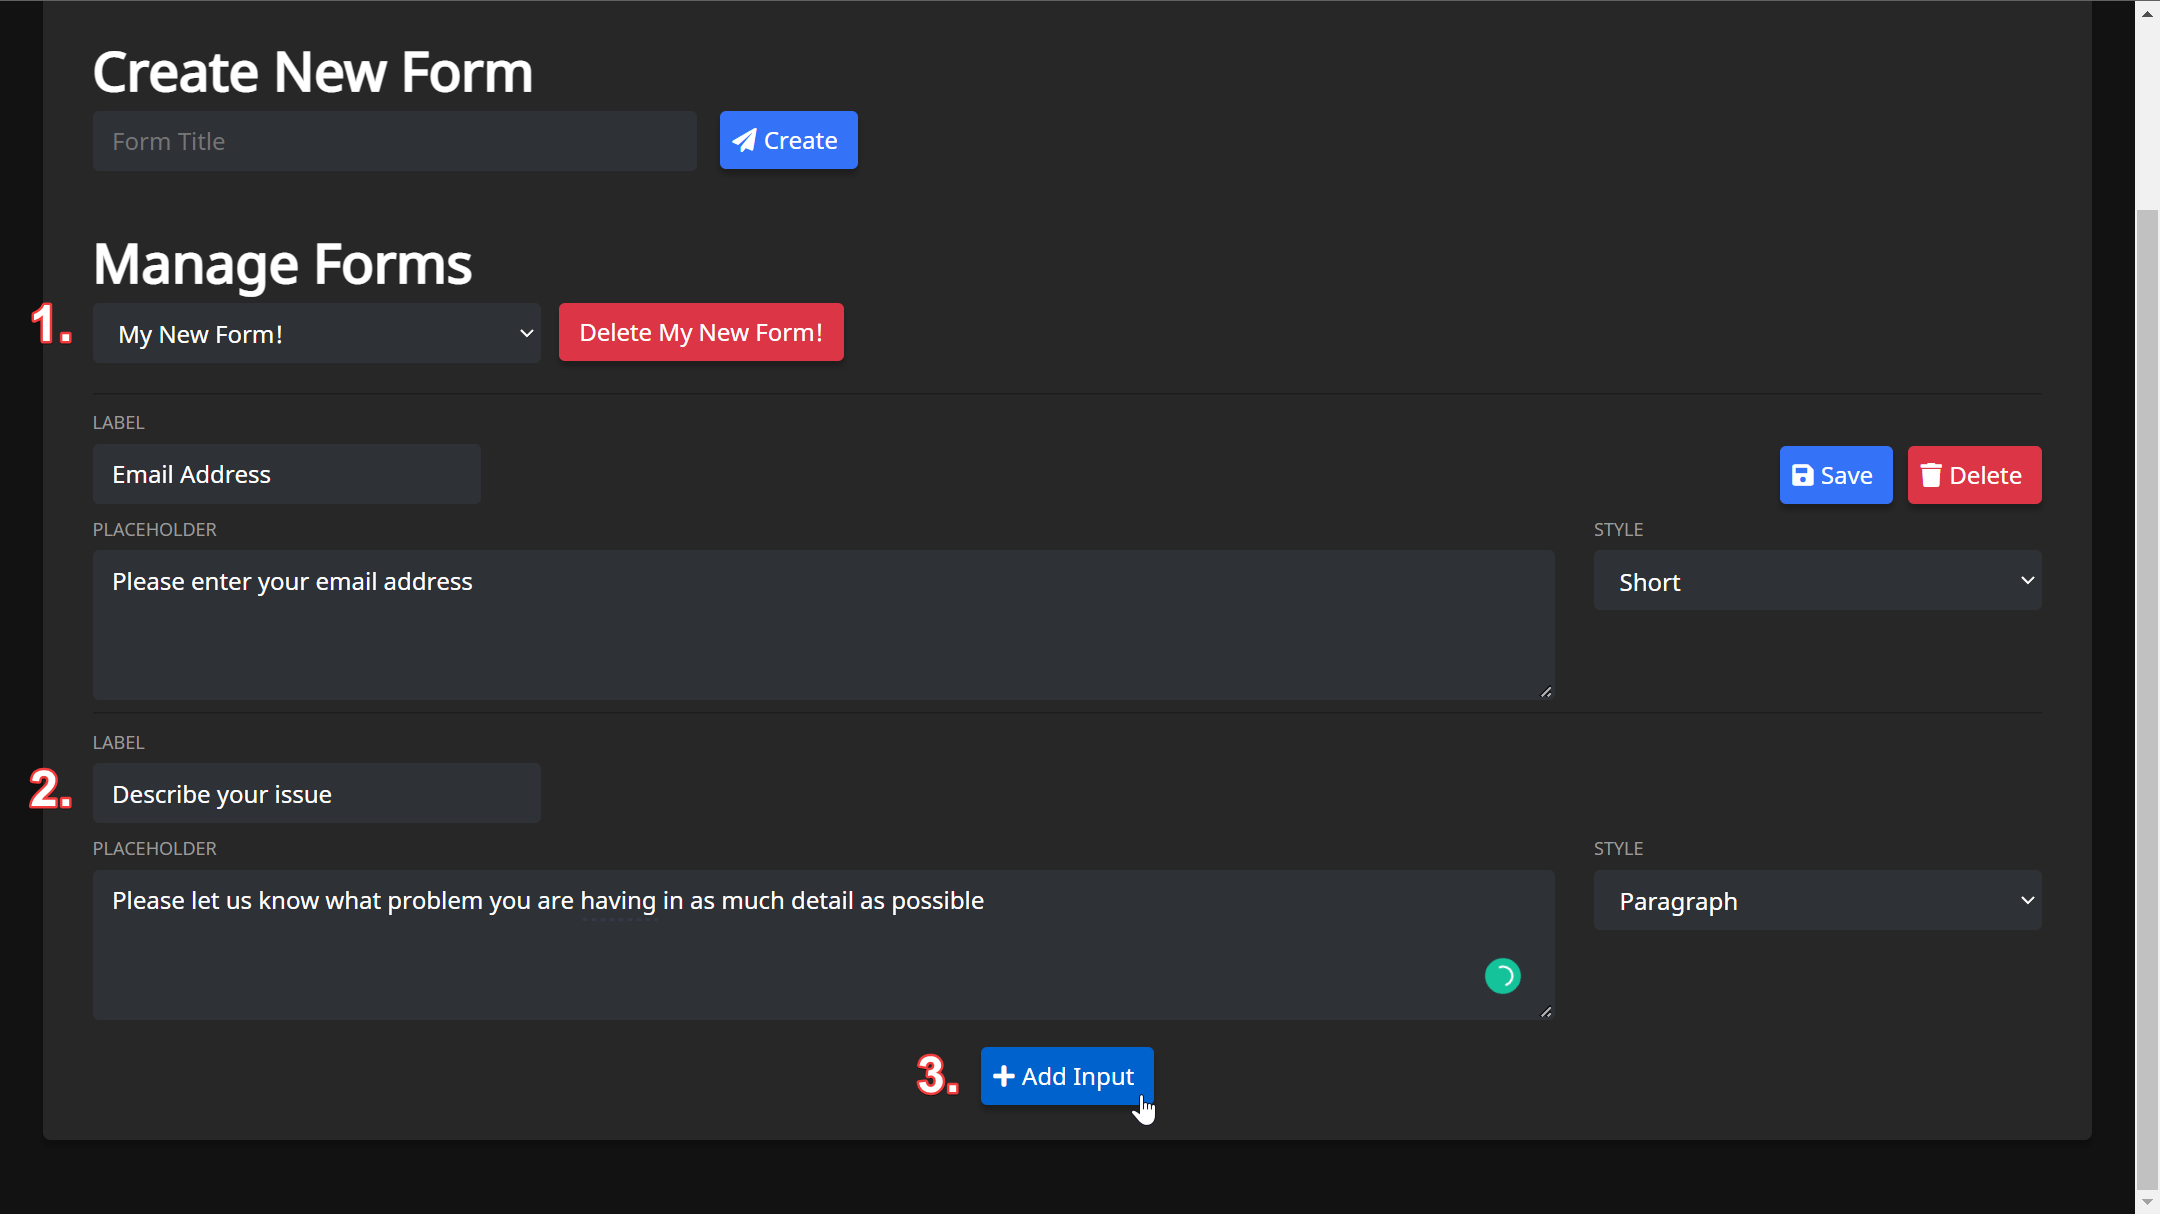
Creating the Form
First, head over to the dashboard and select your server.
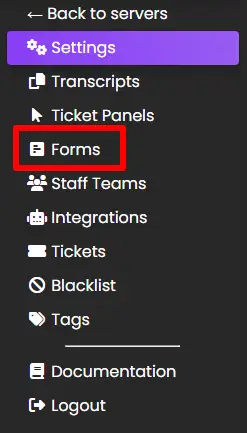
Then, select the Forms tab in the navigation bar:
You can now create your first form. Enter a name for it, and press Create:
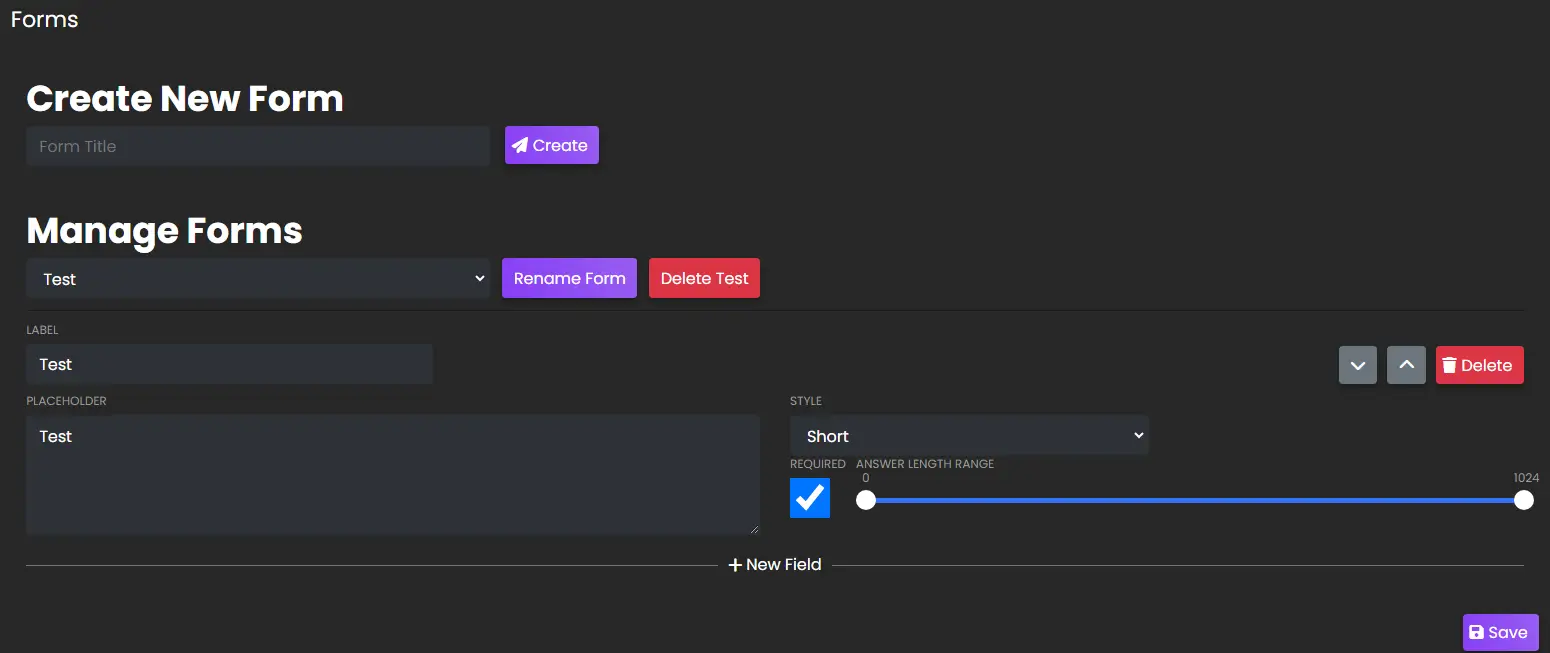
Next, select your form from the Manage Forms dropdown list, and add up to 5 inputs. Enter a label for the question, some placeholder text, and select the type of input:
Note the discord imposed limitations for forms:
- Maximum of 5 inputs per form
- Currently only supports text input style
- Maximum character limits
- Name - 45
- Labels - 45
- Placeholder - 100
Make sure to save your inputs. Your form has now been created. In order to show it to users, you must assign it to a ticket panel.
Assign Form to a Panel
Head over to the Reaction Panels page of the dashboard via the top navigation bar, as shown in the panels documentation.
Either create a new ticket panel, or choose an existing one to edit. You will notice a dropdown labeled Form. Expand this dropdown, and select your new form:
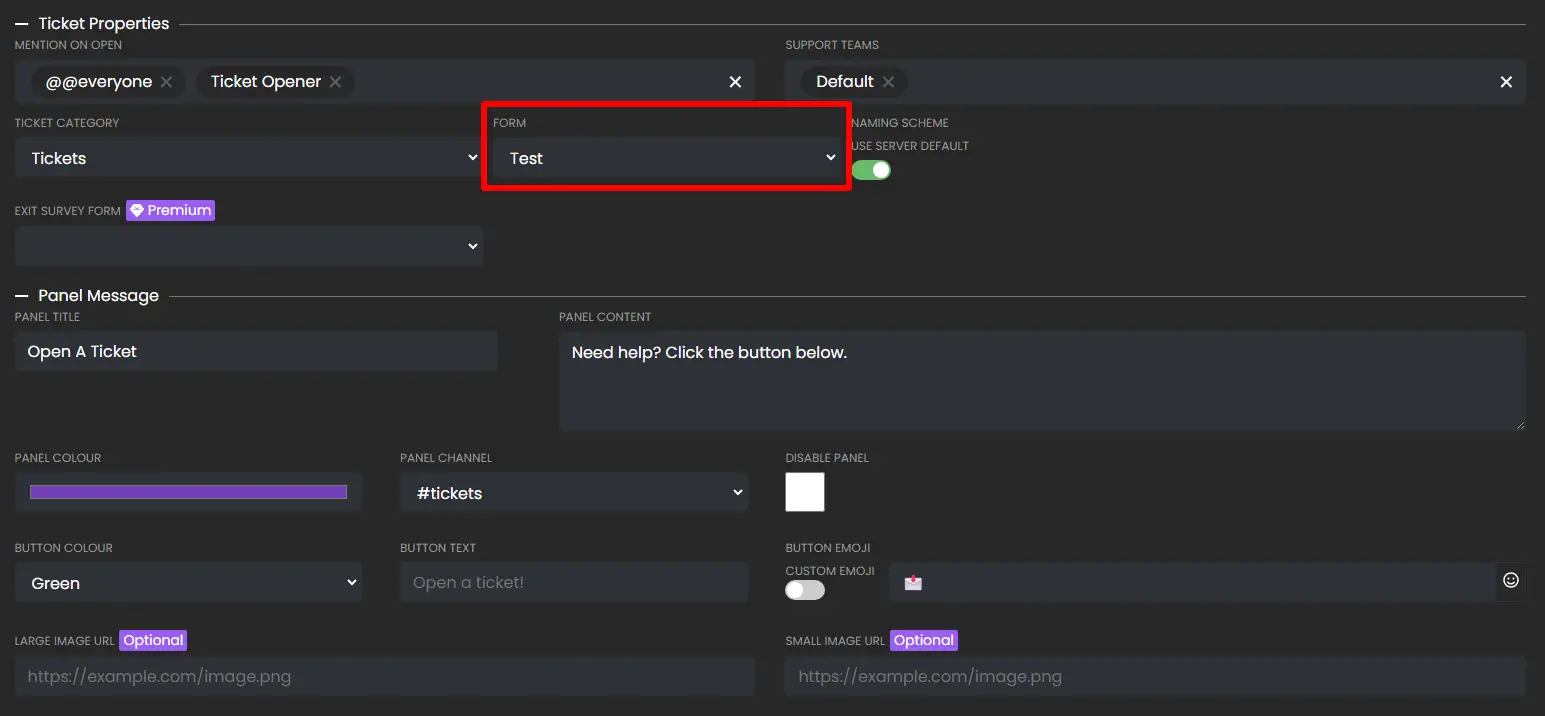
Save your changes, and then test it out!
Multipanels
When using multi-panels (different types of tickets combined into 1 message with multiple buttons), the form shown to the user is the form associated to the panel of the button clicked.
Limitations (Discord imposed)
- Maximum of 5 questions per form
- Currently only supports text input type - no radio buttons, or checkboxes
- Form Labels have a max length of 45 characters
- Form Placeholders have a max length of 100 characters
Staff Teams
Staff Teams can be used to further customize which of your staff members can see, claim, respond to, and close specific types of tickets. This is possible because Staff Teams get linked to individual reaction panels however you see fit. Click to learn more about reaction panels or the support teams input.
Basic Video Walkthrough
Primary View
Upon opening the Staff Teams menu, there will be two main areas displayed:
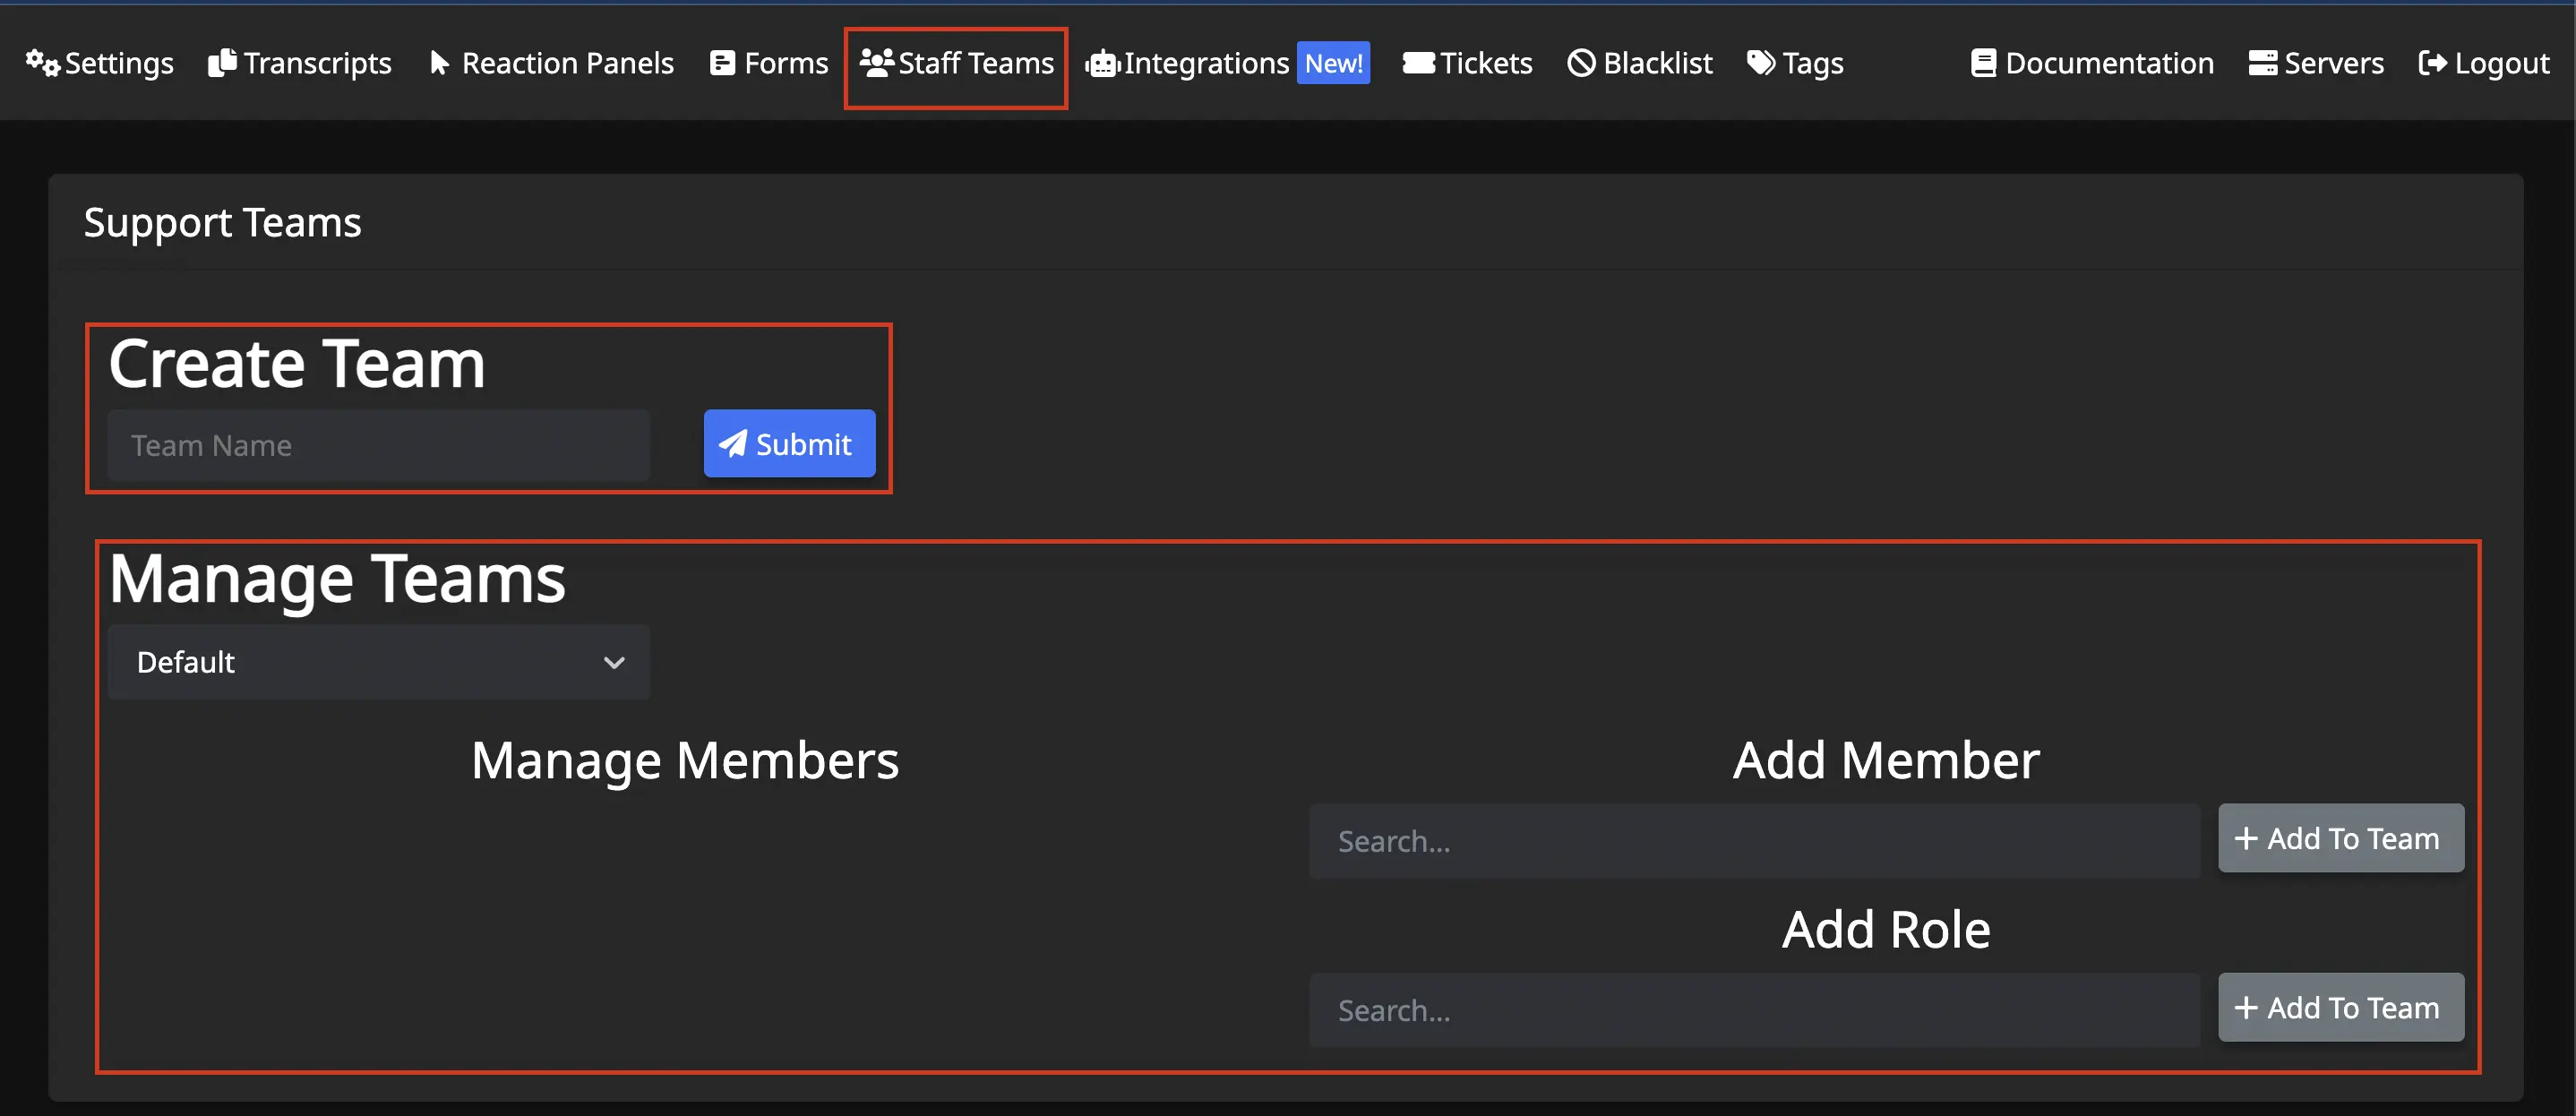
Create Team
Create new Staff Teams here by typing in a team name and clicking Submit.
- A team must exist before it can be managed.
Manage Teams
Options for managing a team:
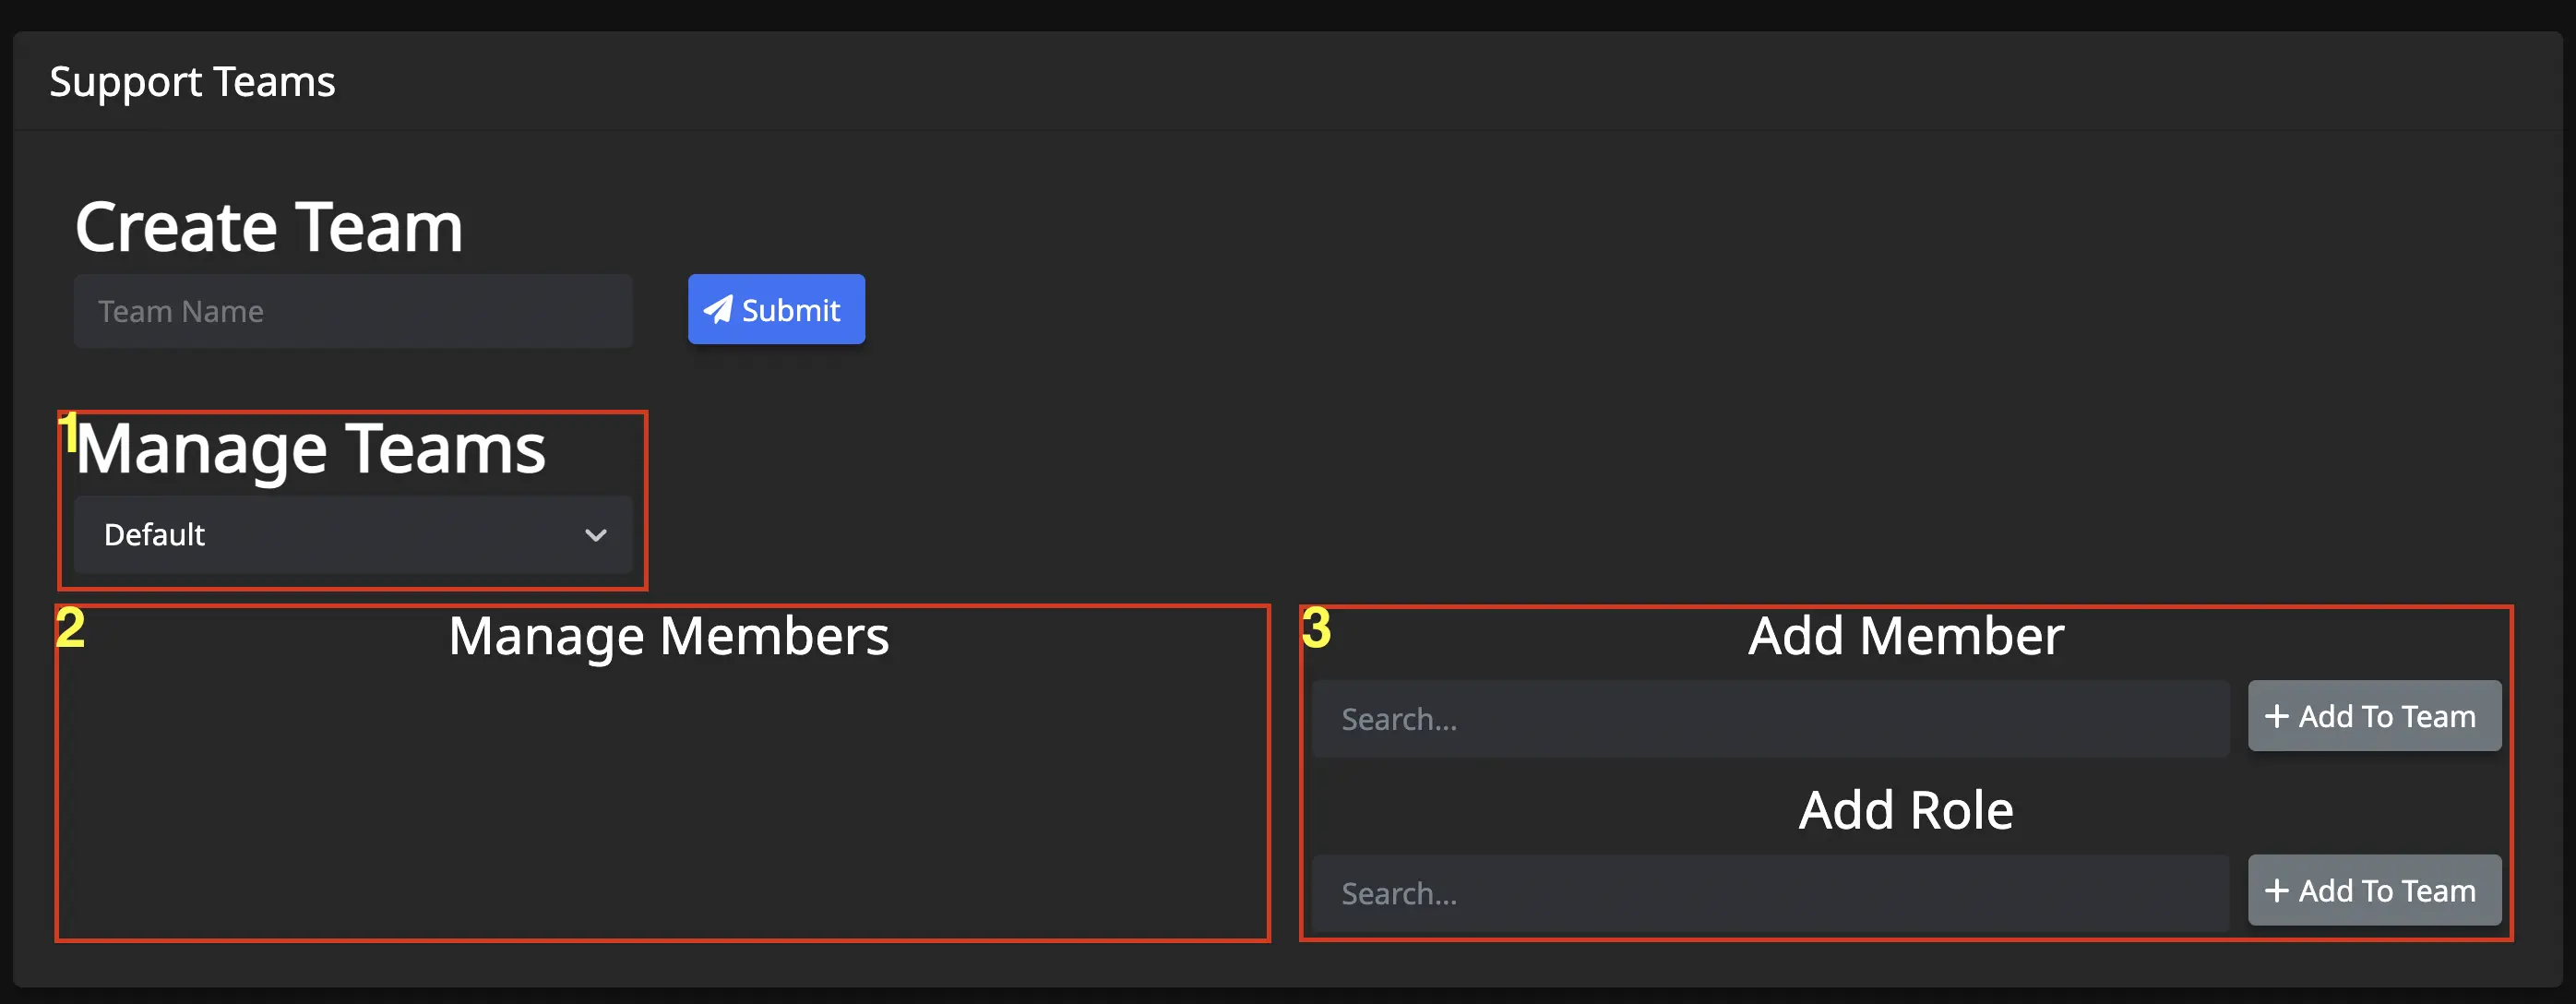
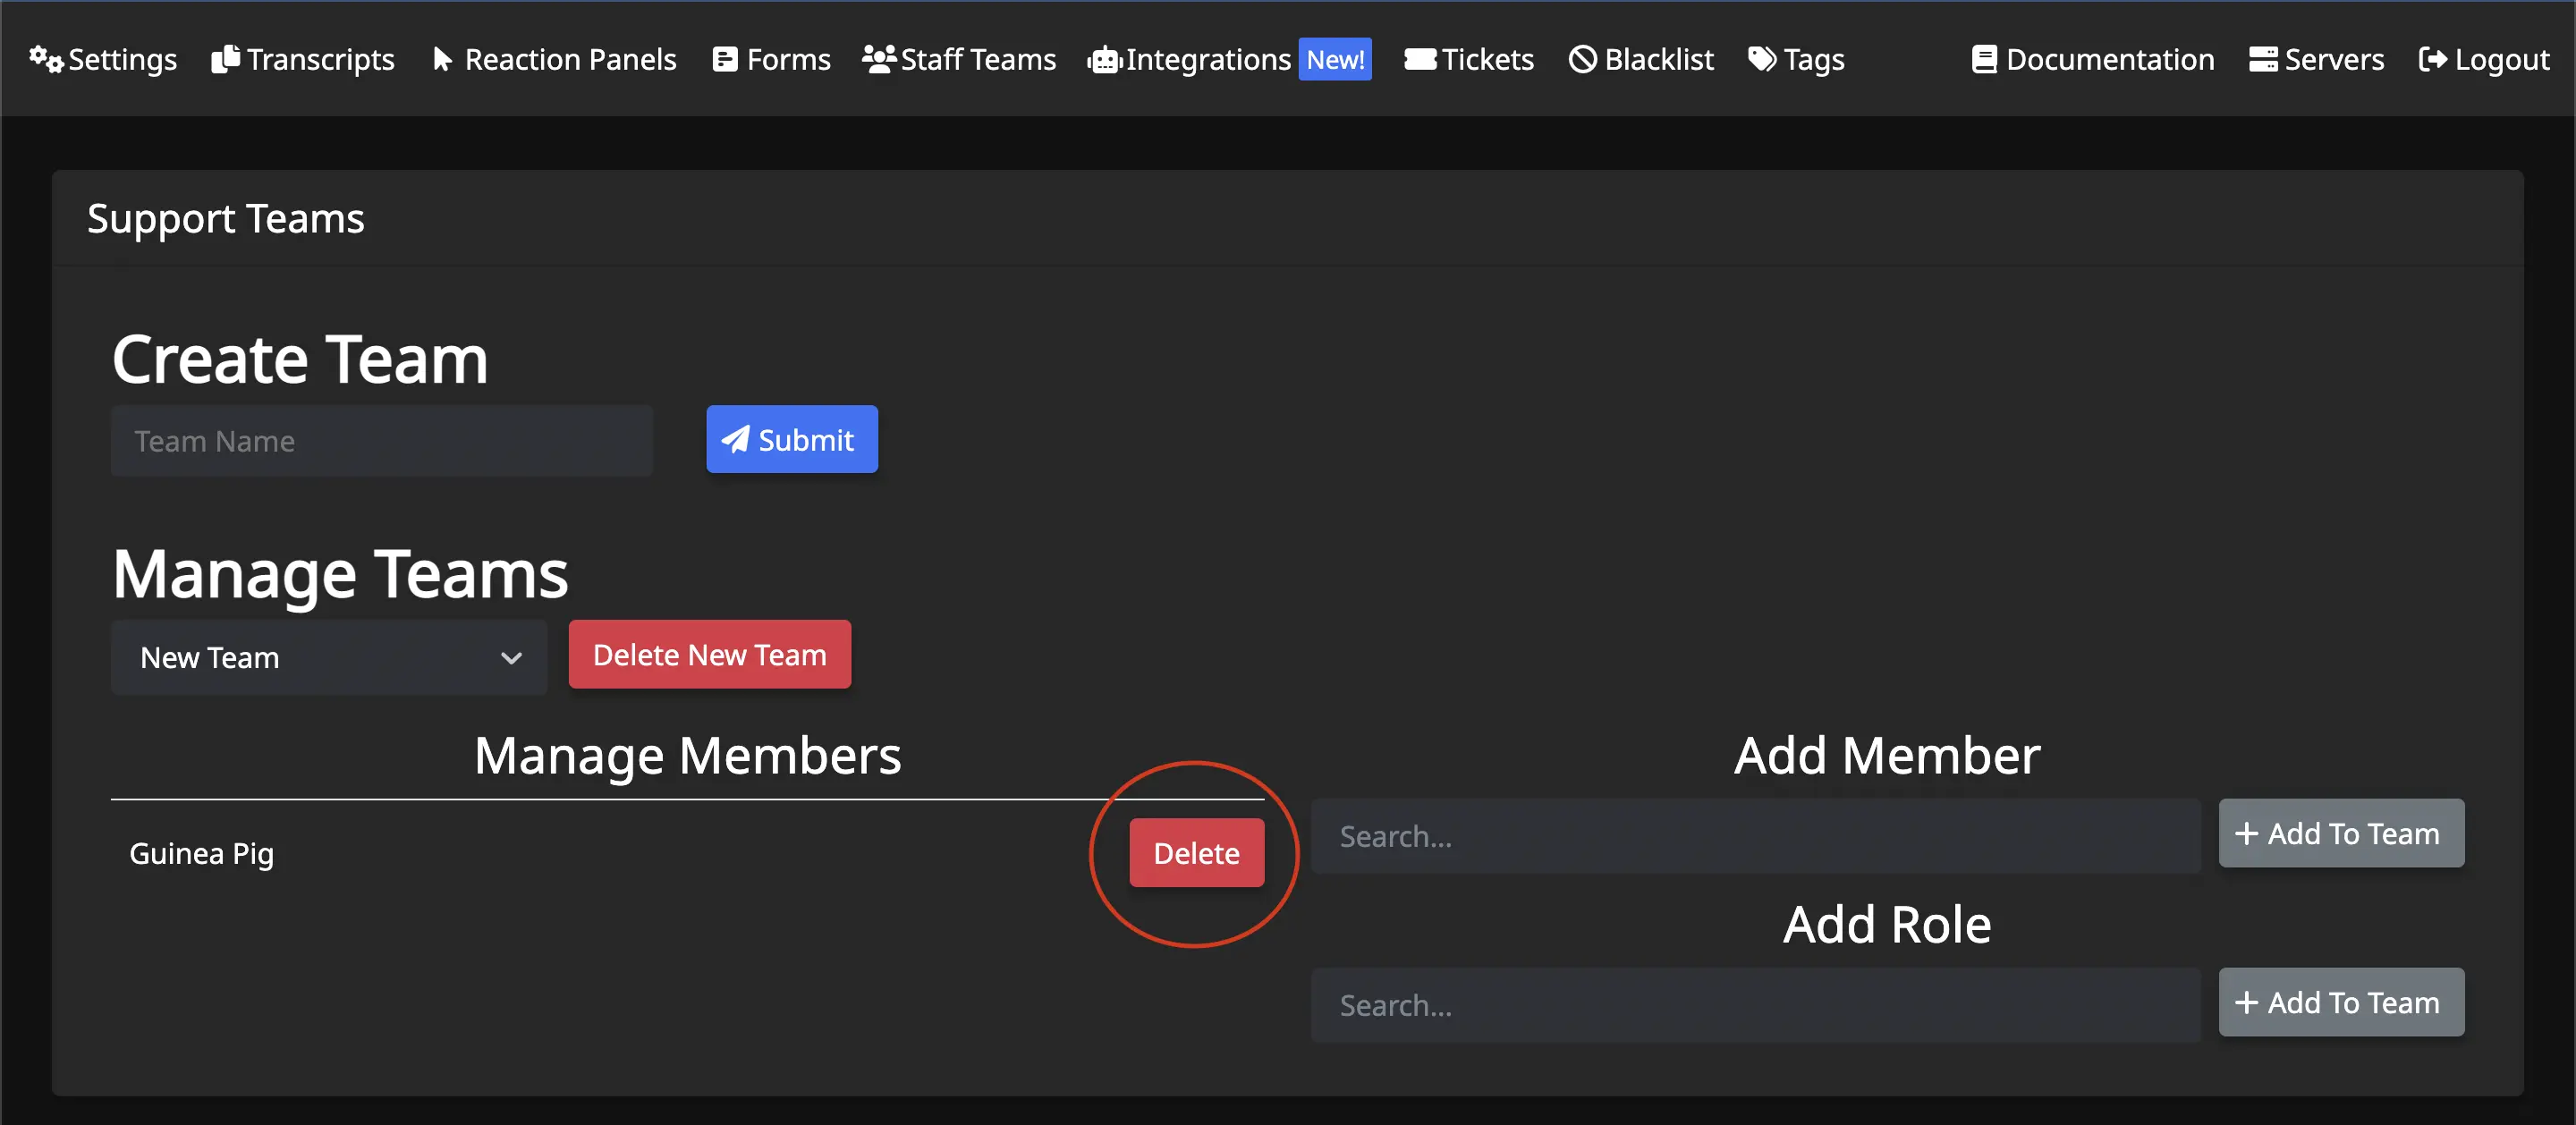
Delete a Staff Team
Select the team you wish to delete, and a red Delete button will appear next to #1 of photo above.
Add Members / Roles to a Staff Team
- Select the team in which you wish to add the members/roles (#1)
- Search for the member or role you wish to add (#3) and click
+ Add To Team - Member/Role will appear in area #2 of photo above
Remove Members / Roles from a Staff Team
- Select the team in which you wish to remove the members/roles (#1)
- Click
Deletebutton next to the name of member/role to remove, in area #2 of photo above
Default Team
The Default team cannot be deleted. Those members/roles added with the /addadmin and /addsupport commands get added to this team automatically.
Integrations
This chapter provides information regarding integrations, and how to build them.
Use the sidebar to navigate this chapter.
Build Integrations
Integrations let you include information retrieved from your own web server, or 3rd party APIs, directly in the welcome messages of your tickets!
In this guide, we'll build an integration from scratch together, from start to finish.
What can I use integrations for?
If you run a service that incorporates Discord OAuth, you have a use case for integrations! Since your user objects are linked to Discord accounts, you can expose an API endpoint that Tickets can request to include information about the user in the ticket.
A simple example would be a forum! When a user opens a ticket in your Discord server, you could include the user's forum username automatically.
Another example is our built-in Bloxlink integration, which allows you to include the Roblox usernames, profile URLs and more in tickets.. The Bloxlink integration is automatically enabled in all servers. You can view the welcome message placeholders available through it here.
Integrations do not necessarily need to fetch information about a user either! In the next tutorial, we show you how we built the cryptocurrency price integration.
Background Setup
Let's say we run a game, where users link their accounts to their Discord accounts. Users have usernames, scores and other metadata which we wish to display in the welcome message when a user opens a ticket.
The following is some simple code that serves some example JSON data that we will be using for this tutorial. Let's say that this code is running on a web server, accessible at https://example.ticketsbot.net:
const express = require("express");
const app = express();

let users = {
  "585576154958921739": {
    online_status: "Online",
    user: {
      username: "Ryan",
      account_created_year: 2019,
      scores: {
        high_score: 3000,
        last_score: 400,
      },
    },
  },
};

app.get("/lookup", (req, res) => res.json(users[req.query.user] || {}));

app.listen(process.env.PORT, () => console.log("Listening..."));
The server responds with the user object stored in the users dictionary if it exists, or alternatively with an empty JSON object, {}.
For example, sending a request to https://example.ticketsbot.net/lookup?user=585576154958921739:
$ curl https://example.ticketsbot.net/lookup?user=585576154958921739 | jq .
{
  "online_status": "Online",
  "user": {
    "username": "Ryan",
    "account_created_year": 2019,
    "scores": {
      "high_score": 3000,
      "last_score": 400
    }
  }
}
Your integration MUST return a JSON response. Parsing other data formats is not supported. You may return the data structured in any way you want, as long as it is valid JSON.
All data types are supported, except for JSON arrays. You should pre-process your arrays and join them to strings.
Creating Your Integration
Now that we have somewhere to pull data from, we can start linking it up with Tickets!
First, head over to our web dashboard, select any server, and then navigate to the Integrations tab in the navbar. From there, you will be able to press the "Create Integration" button:

Then, fill out some basic information about your integration: its name, description, and optionally logo image URL and privacy policy. It is recommended to set a privacy policy if you are creating a public integration. You will be able to see a preview on the right-hand side as you type. Once completed, press the "Continue" button.

HTTP Request
You will be then be prompted to enter information about how the integration works. Lets focus on the "HTTP Request" section first:

Upon a ticket being opened, we will send a HTTP request to the provided request URL, to which you should respond with a JSON object that we can extract values of your choice from. You can use the placeholder %user_id% in the URL, which will be replaced with the user ID of the user who opened the ticket. In our case, we set this to https://example.ticketsbot.net/lookup?user=%user_id%.
Requests can either be sent as GET or POST requests. POST requests are sent with a JSON body with information about the ticket. An example body is as follows:
{
  "guild_id": "508392876359680000",
  "user_id": "508391840525975553",
  "ticket_id": 30,
  "ticket_channel_id": "508392988985262090",
  "is_new_ticket": true,
  "form_data": {
    "What is your question?": "I have a problem with XYZ",
    "What is your email address?": "[email protected]"
  }
}
The is_new_ticket denotes whether the request is being made due to a new ticket being created. Placeholders are supported in tags and other places, in which case is_new_ticket would be false.
The form_data field is only included for private integrations. There is not reason for public integrations to include form data, as forms are specific to the server.
Headers and Secrets
It is recommended that you add some kind of authentication to your API- or if you are making an integration that requests a public API, you will definitely be required to use authentication. Thankfully, you can add HTTP headers to your integration requests!
Let's say our example app now requires an API key to be sent in the Authorization header. Simply press the Add Additional Header button, and enter the header name and value, like so:

This functionality can be further extended by using secrets: You can ask users to supply their own secret values, such as API keys, when adding your integration to their server. For example, we may want users to register an application on our own site, generate them an API key, and make them input it when adding your integration. Let's take a look at an example:

We have created a secret, called api_key, which we are able to use in either headers, or the URL itself, via %api_key%. When a user adds your integration to their server, they will be prompted to enter their API key:

Secret Validation
Sometimes, users may provide a secret value in an invalid format, or otherwise incorrect way. You may optionally define a validation URL that we will send an HTTP POST to every time a user adds your integration to a server to dynamically validate their secrets. The request will contain a JSON body containing the user's secret values:
{
  "secret_name": "value",
  "secret2_name": "abcde"
}
If the values satisfy your constraints, simply respond with any 2XX status code. The response body does not matter, so it is recommended to use HTTP 204 No Content with an empty body.
If the value does not satisfy your constraints, then respond with any non-2XX status code - HTTP 400 Bad Request is well suited. You may also provide a JSON response body with a single "error" field containing a message to show to the user:
{
  "error": "Your API key is invalid."
}
Placeholders
Next, we are onto creating the placeholders themselves. Here, you define how each value in your JSON response should be mapped to the variables that can be used in welcome messages.
As a reminder, in our example application, we respond with the following JSON:
{
  "online_status": "Online",
  "user": {
    "username": "Ryan",
    "account_created_year": 2019,
    "scores": {
      "high_score": 3000,
      "last_score": 400
    }
  }
}
The JSON path is simply the path of keys to access a value. Nested objects can be accessed by splitting the path with a dot.
For example, the path online_status would yield Online, and user.username would yield Ryan.
Let's take a look at how we'd register these with the integration settings:

It should be obvious to see how the values are mapped. Note, your placeholder itself can be named completely separate from the JSON path.
You have now successfully configured your first integration! All that is left is to press the final "Create" button. After doing this, you should be taken to a preview page for your integration:

You can view the list of available placeholders on the right-hand side of the page. Don't forget to activate the integration in your server, by pressing the "Add to server" button!
Using Placeholders
Now that we have created out integration and added it to our server (don't forget this part), we can implement the placeholders!
You'll need to head over to the "Reaction Panels" tab of the dashboard for your server, press edit on a panel, and open the welcome message editor:

We can then insert our placeholders into the welcome message, like so:

Let's test it out!

As you can see, the placeholders have successfully been fetched from the web server, and replaced with the provided values!
Need Help?
If you're still not sure about creating integrations, we can help you! You may find it helpful to read our next guide, on how we created the cryptocurrency price integration. If you're still stuck, feel free to ask us in our Discord server!
Security
We have put significant effort into making sure integrations are safe, by ensuring requests are always proxied, and not sent to where they are not supposed to be, including through additional penetration testing.
Integration HTTP requests should be sent to your server via AS13335 (Cloudflare), and it should not be possible to send a request to a private IP.
However, in the case that you do find a vulnerability: we operate a bug bounty program. Join our Discord server and open a ticket to responsibly disclose. In general, we offer up to $1,000 per vulnerability, based on a combination of complexity and severity. Bounties are assessed on a case-by-case basis.
Regarding integrations, we are particularly interested in vulnerabilities related to:
- Accessing internal services
- Exposing the origin IPs of our nodes
- Accessing secret values of other servers
- Access the IP address of another user, via viewing integration logos
Integration logos are proxied by dedicated images proxy nodes running on AS16276 (OVH). These nodes are located outside of our internal network, and do not serve any other purpose. We are not concerned with hiding the IP addresses of these nodes. Note that integration logos viewed on the integration creation and updating pages are not proxied, as they are only viewable by the integration creator, and so would be classed as a self-attack.
When performing security research, please:
- Ensure that target assets are in-scope and operated by us (we utilise serverless functions on infrastructure not run by us). If you are unsure, open a ticket and ask.
- Do not use automated scanners
- Do not launch (D)DoS / resource exhaustion attacks
If you wish to perform static code analysis for your research, you can view the relevant open source code here:
- Integration Proxy
- Image Proxy
Using Cloudflare Workers
Sometimes services return data in a slightly different format than you want. Since Tickets integrations are only capable of reading exact JSON keys, some additional processing may be required.
For example, FiveM servers return data in the following format, which posed an issue when creating our FiveM integration:
{
	...
	"Data": {
		...
		"players": [
			...,
			{
				"id": 100,
				"identifiers": ["discord:111111111111111111", "license:abcdefg"],
				"name": "Username",
			},
			...
		]
	}
}
We are given a list of all players on the server, which we must search to find the player with the identifier discord:%user_id%.
Cloudflare Workers come in here.
What are Cloudflare Workers
Cloudflare Workers allow you to deploy serverless code (including JavaScript, and more), for free, with the click of a button. We can write a worker to listen to requests from Tickets, query the service we are integrating with, process the data, and return it to Tickets in an easy to read format.
Looking at the FiveM integration again, the integration sends a request to https://worker-name.xxxx.workers.dev/?serverid=%server_id%&user_id=%user_id. The worker extracts the server ID and user ID from the URL, and then sends a request to the FiveM API with the provided server ID. It then parses the response, finds the user object, and responds with a simple JSON object:
{
	"username": "Username",
	"steam_id": 123456,
	"steam_url": "https://steamcommunity.com/profiles/123456",
	...
}
If you want users to be able to include a URL in their welcome messages (e.g. Steam profile URL), a neat trick is to return the full URL as a placeholder, rather than making users construct it themselves in their welcome messages using just the Steam ID.
If you are serving data that does not frequently change, you can use the workers Key-Value Storage API to cache data, to reduce CPU time used.
The full Cloudflare worker documentation is available here.
Security
You should add an Authorization header to your requests, so that malicious people are not able to send extraneous requests to your worker. An example code snippet is as follows:
let authHeader = request.headers.get("Authorization");
if (!authHeader || authHeader !== AUTH_SECRET) {
	return respondWithCode(401, {error: "Invalid auth key"});
}
Using the FiveM Integration
If you run a FiveM server, you can use our FiveM integration to fetch the FiveM IDs, usernames, Steam IDs and more of users who open tickets in your server!
To activate the FiveM integration in your server, head over to our web dashboard and select your Discord server. Then, select the "Integrations" tab in the navbar, find the FiveM integration, and press "Add to server":

You will then be prompted for your FiveM server ID. This is the 6 character alphanumeric string assigned to your server. If you do not know it, you can find it on KeyMaster, or in the FiveM server list.

The integration is now active in your server! The last step is to insert the placeholders of your choice into the ticket welcome message. To do this, head over to the "Reaction Panels" page, press "Edit" on a ticket panel, expand advanced settings, and open the welcome message editor:
Then, customise the welcome message to your liking:

The placeholders provided by the FiveM integration are:
- %fivem_id%
- %fivem_username%
- %steam_id%
- %steam_profile_url%
- %fivem_license%
- %fivem_license2%
Finally, test it out by opening a ticket:

Limitations
- The user opening the ticket must be connected to your FiveM server at the time
- It is possible to not have a Steam account linked to a FiveM account
- It is possible to not have a Discord account linked to a FiveM account, meaning the integration will be unable to retrieve the data
Using the ChargeBee Intergration
Note: This is a community-made integration. This integration is not created, maintained or affiliated with Tickets Bot, and requests are processed by a third-party.
If you use Chargebee for billing/subscription management, the Chargebee Integration allows you to fetch customer info and basic subscription status in tickets.
To activate the Chargebee integration in your server, head over to our web dashboard and select your Discord server. Then, select the "Integrations" tab in the navbar, find the Chargebee integration, and press "Add to server":

Setup
You will need several things to get this setup:
- A Chargebee account https://app.chargebee.com/
- A read-only [API](Key https://www.chargebee.com/docs/2.0/api_keys.html)
- Your site name.
- Discord IDs stored in a field in the customer object. Any built-in or custom field will work.

The integration is now active in your server! The last step is to insert the placeholders of your choice into the ticket welcome message. To do this, head over to the "Reaction Panels" page, press "Edit" on a ticket panel, expand advanced settings, and open the welcome message editor:
Then, customize the welcome message to your liking:

The placeholders provided by the Chargebee integration are:
- %dashboard_link% - Link to customer in Chargebee Admin
- %is_subscribed% - Either "true" or "false"
- %chargebee_id%
- %first_name%
- %last_name%
- %company%
- %email%
- %promotional_credits%
- %unbilled_charges%
- %refundable_credits%
Finally, test it out by opening a ticket:

Note
The Chargebee integration was made by, and hosted by, @William_CTO#5415.
Data is processed in Cloudflare Workers and is never stored. Tickets Bot is not responsible for this integration.
Suggestions or bugs should be sent to @William_CTO#5415.
Ticket List
Upon opening the Tickets menu, there will be one main area that displays any open tickets in your discord server.
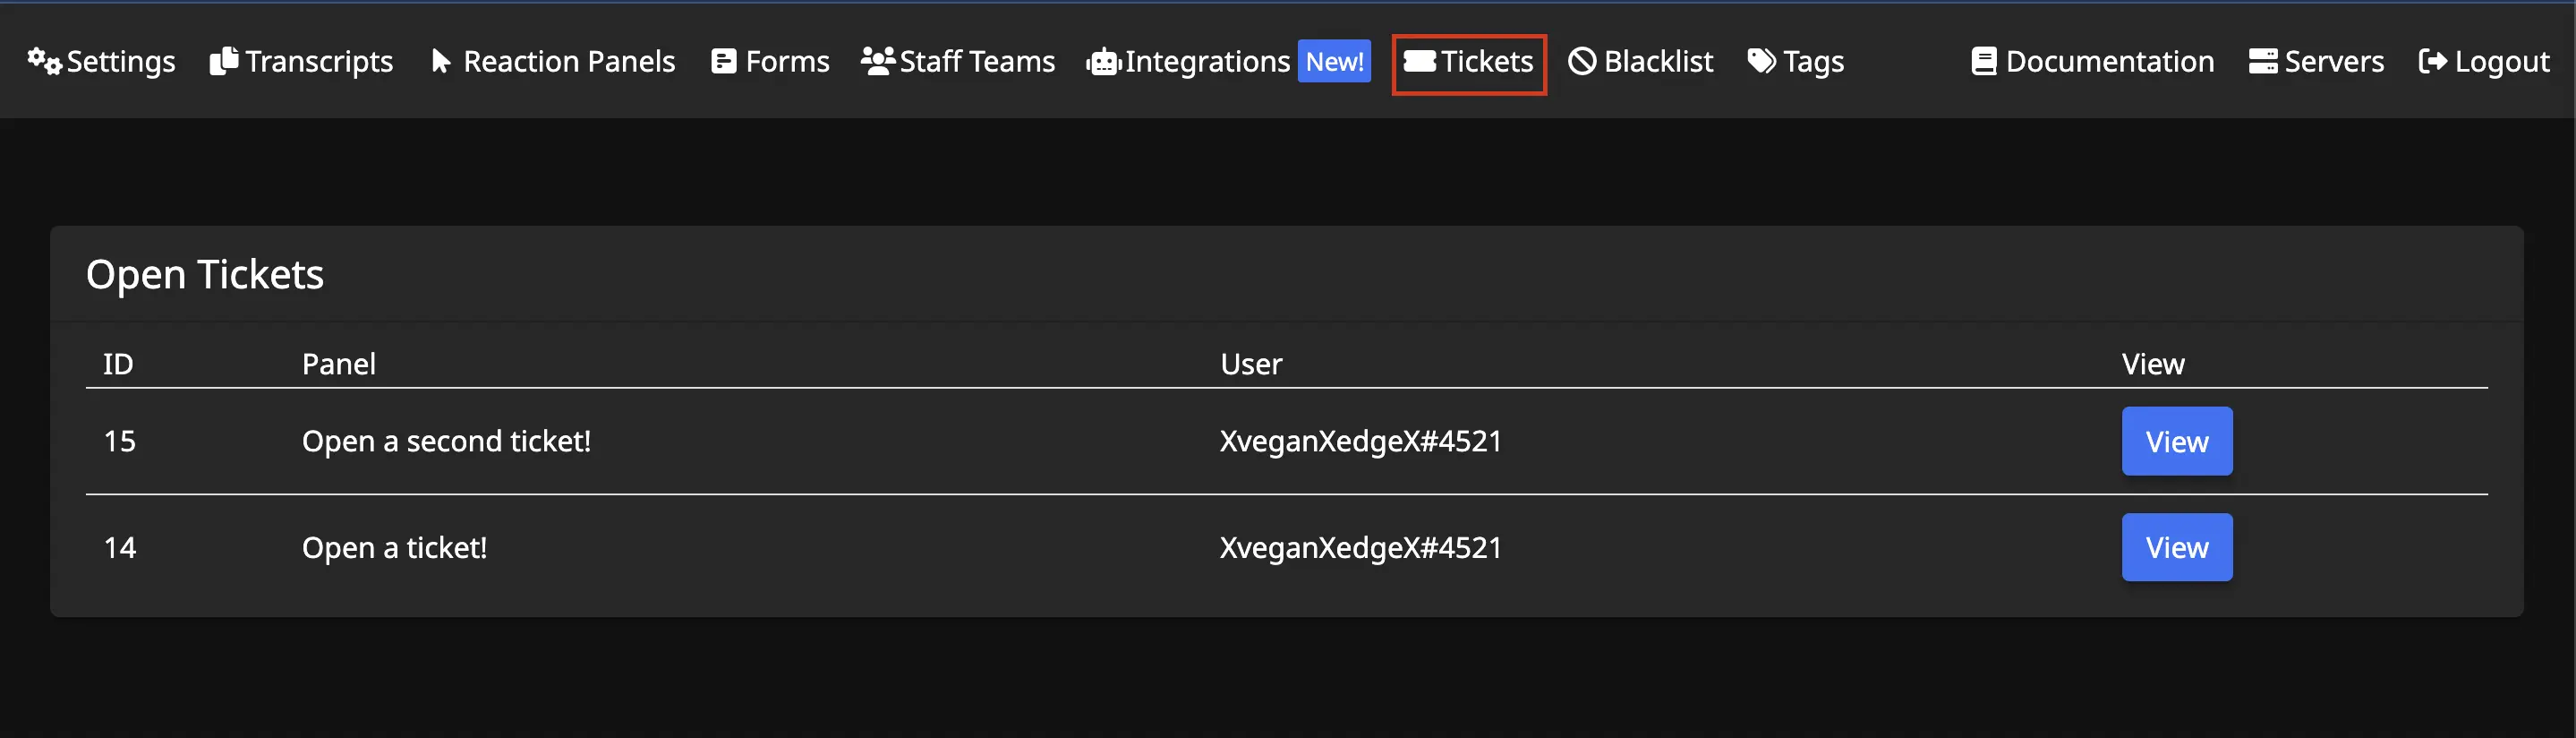
ID
The unique identification number of the ticket will display.
Panel
The reaction panel name of the ticket will display.
- Learn more about Reaction Panels here.
User
The user who opened the ticket will display.
View
Click to view the current state of the ticket.
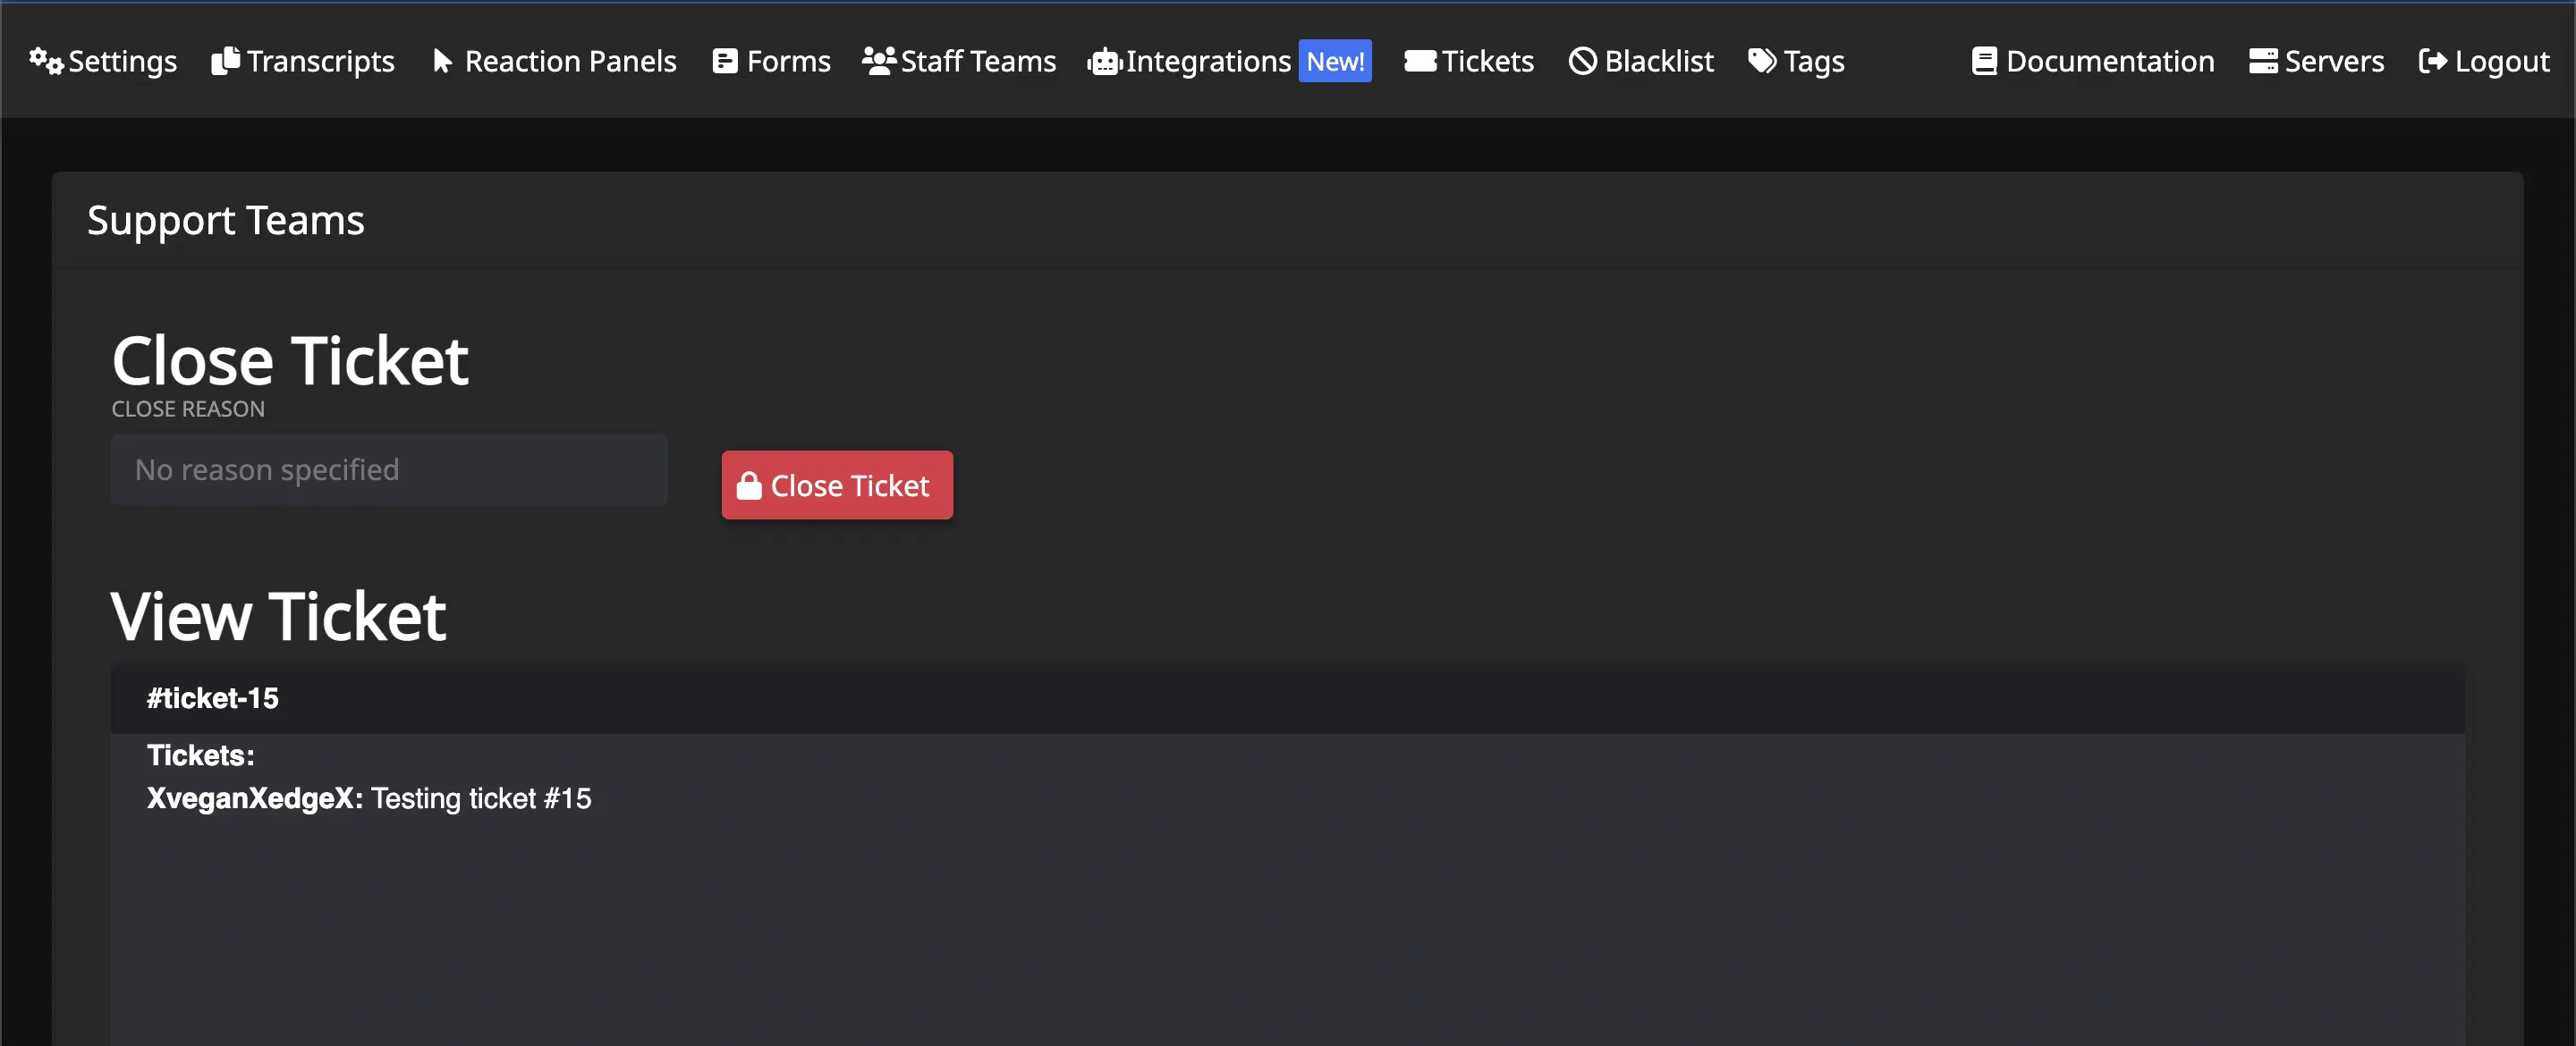
If we clicked View on ticket #15, this would be displayed:
For comparison, this is the current state of ticket #15 in the discord server:
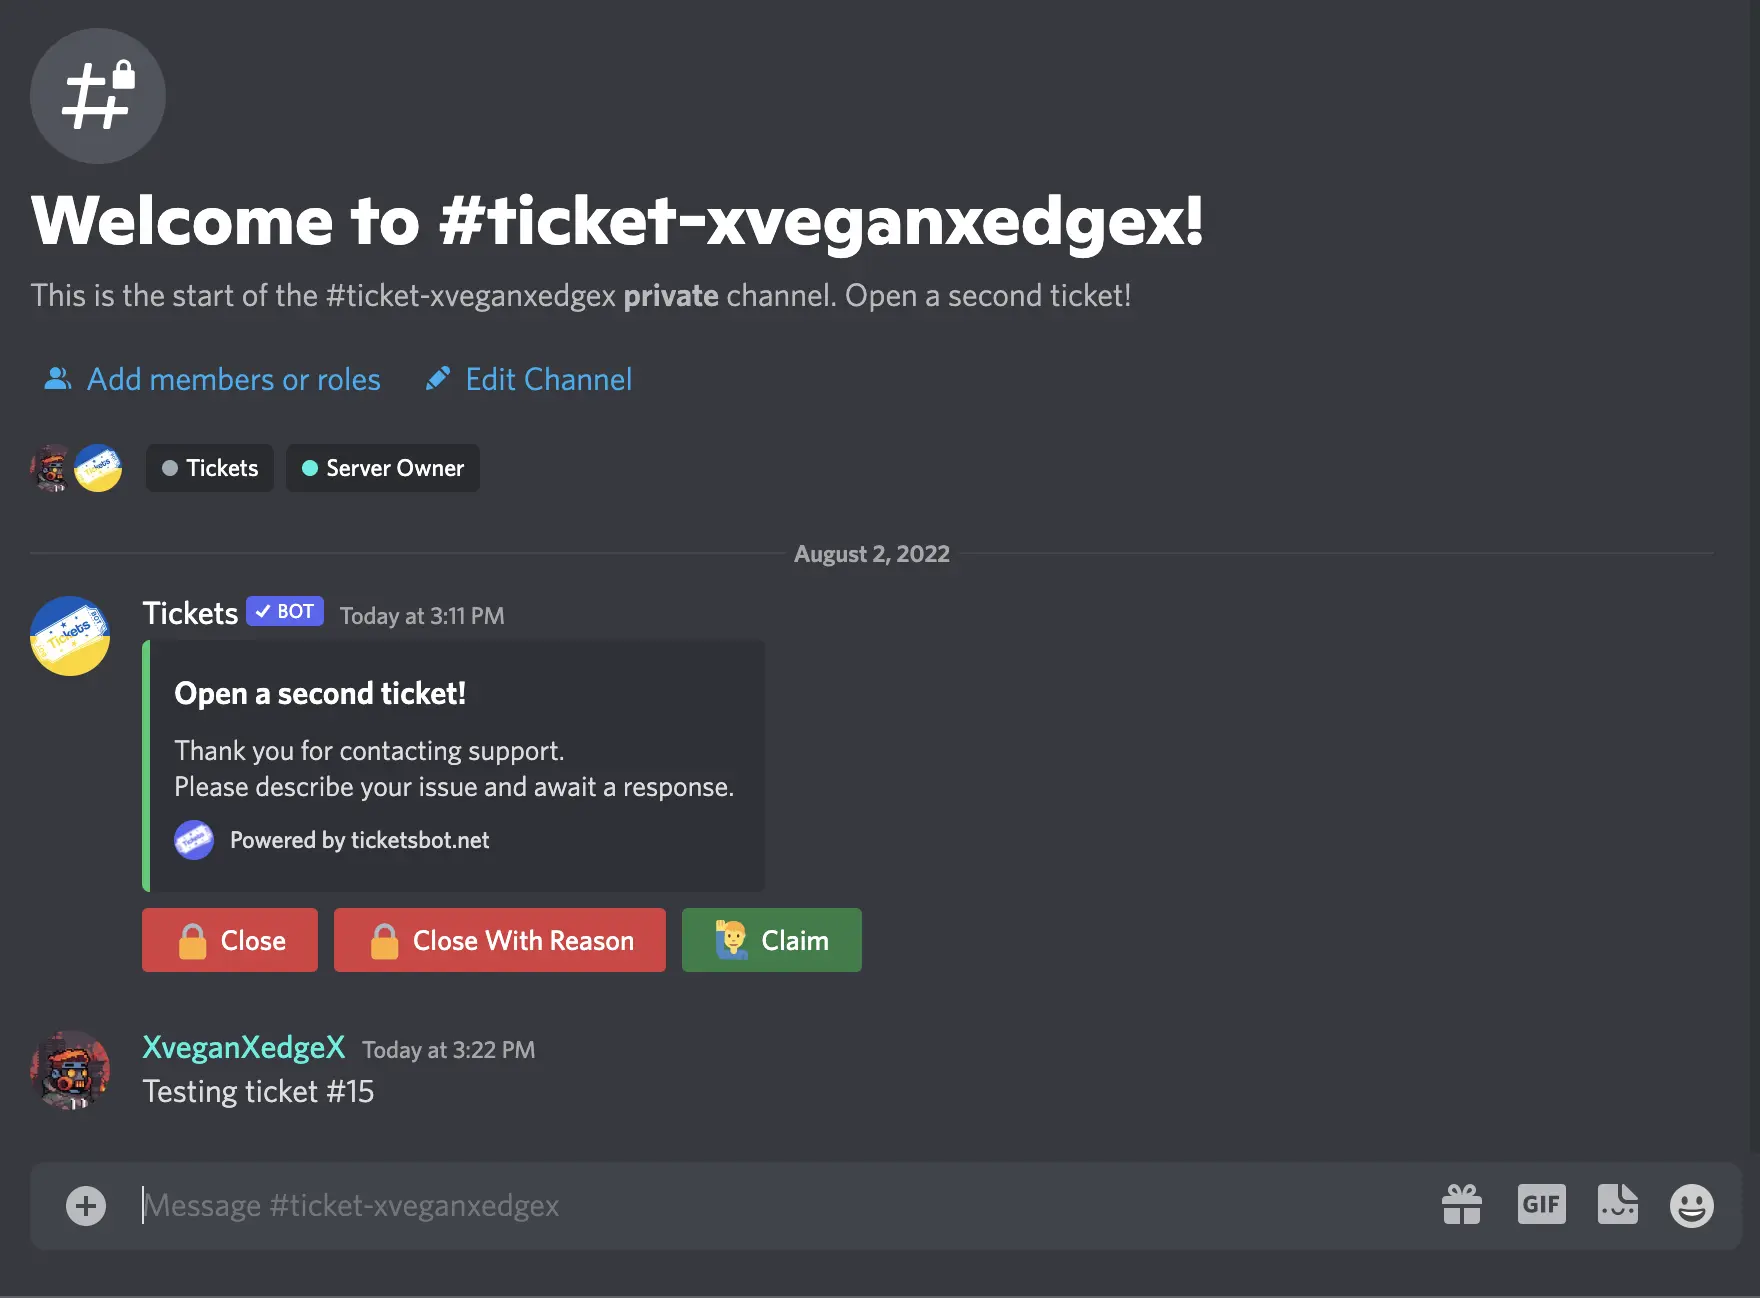
The ticket can be closed from this view, with or without a reason specified.
Premium Perks
Those with premium, will get real-time updates, be able to respond to messages, and close the ticket in this view.
- Learn more about premium here.
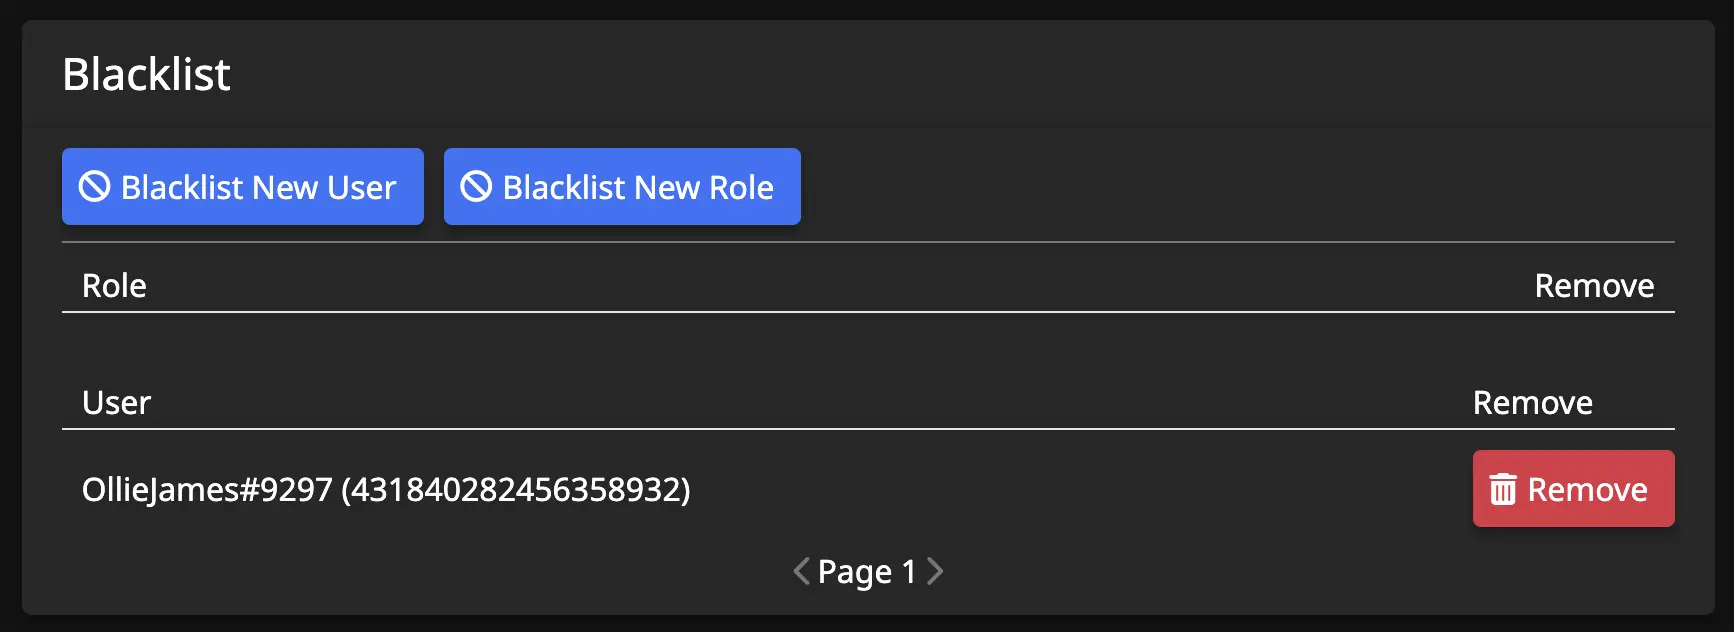
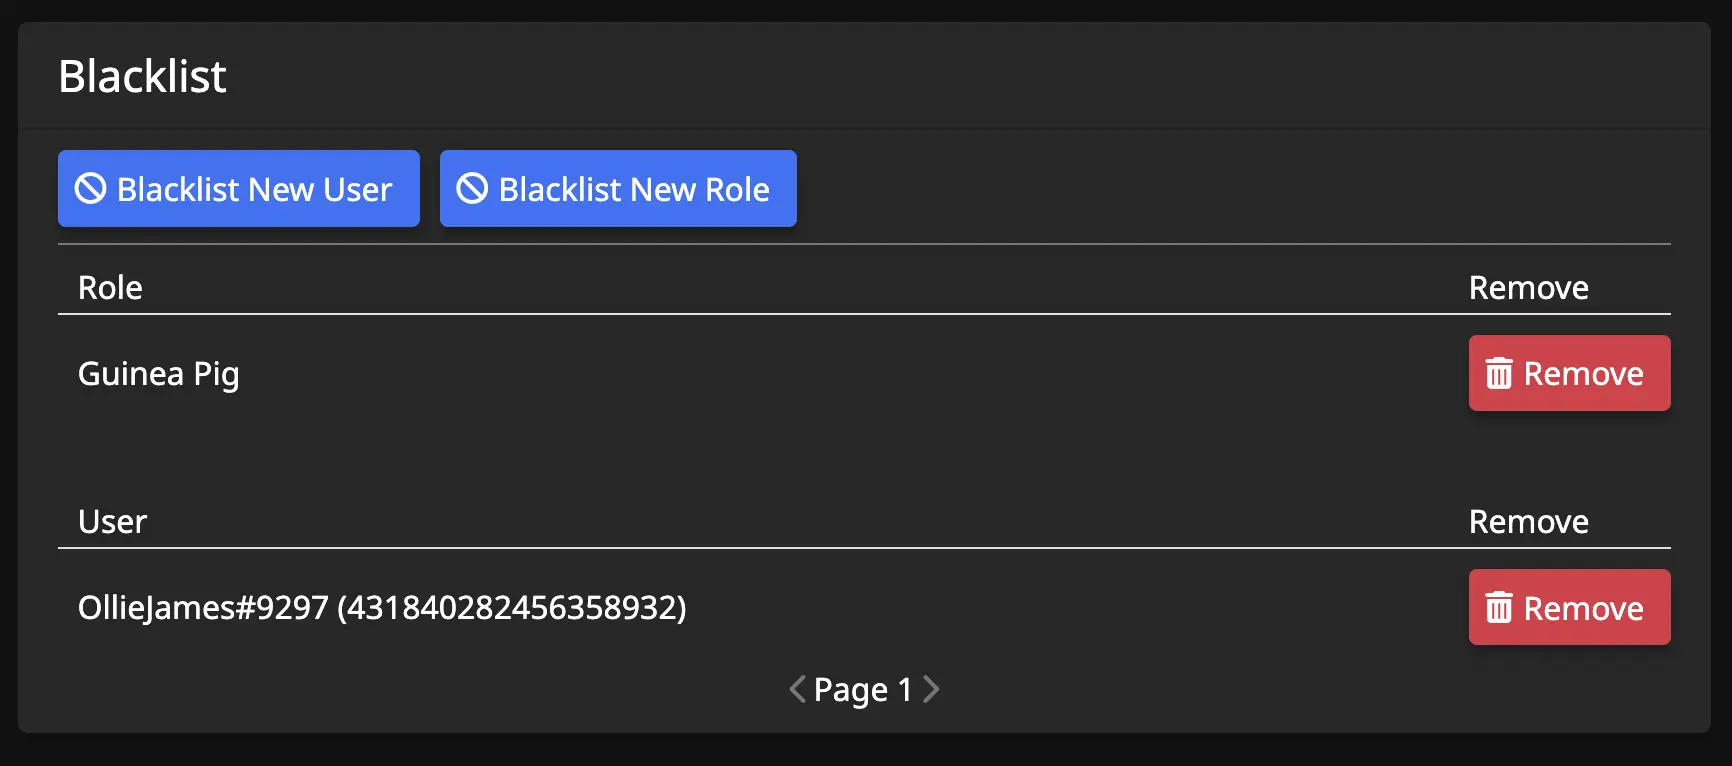
Blacklist
Upon opening the Blacklist tab, there will be one main area that displays two buttons and any users/roles that have been blacklisted in your discord server.
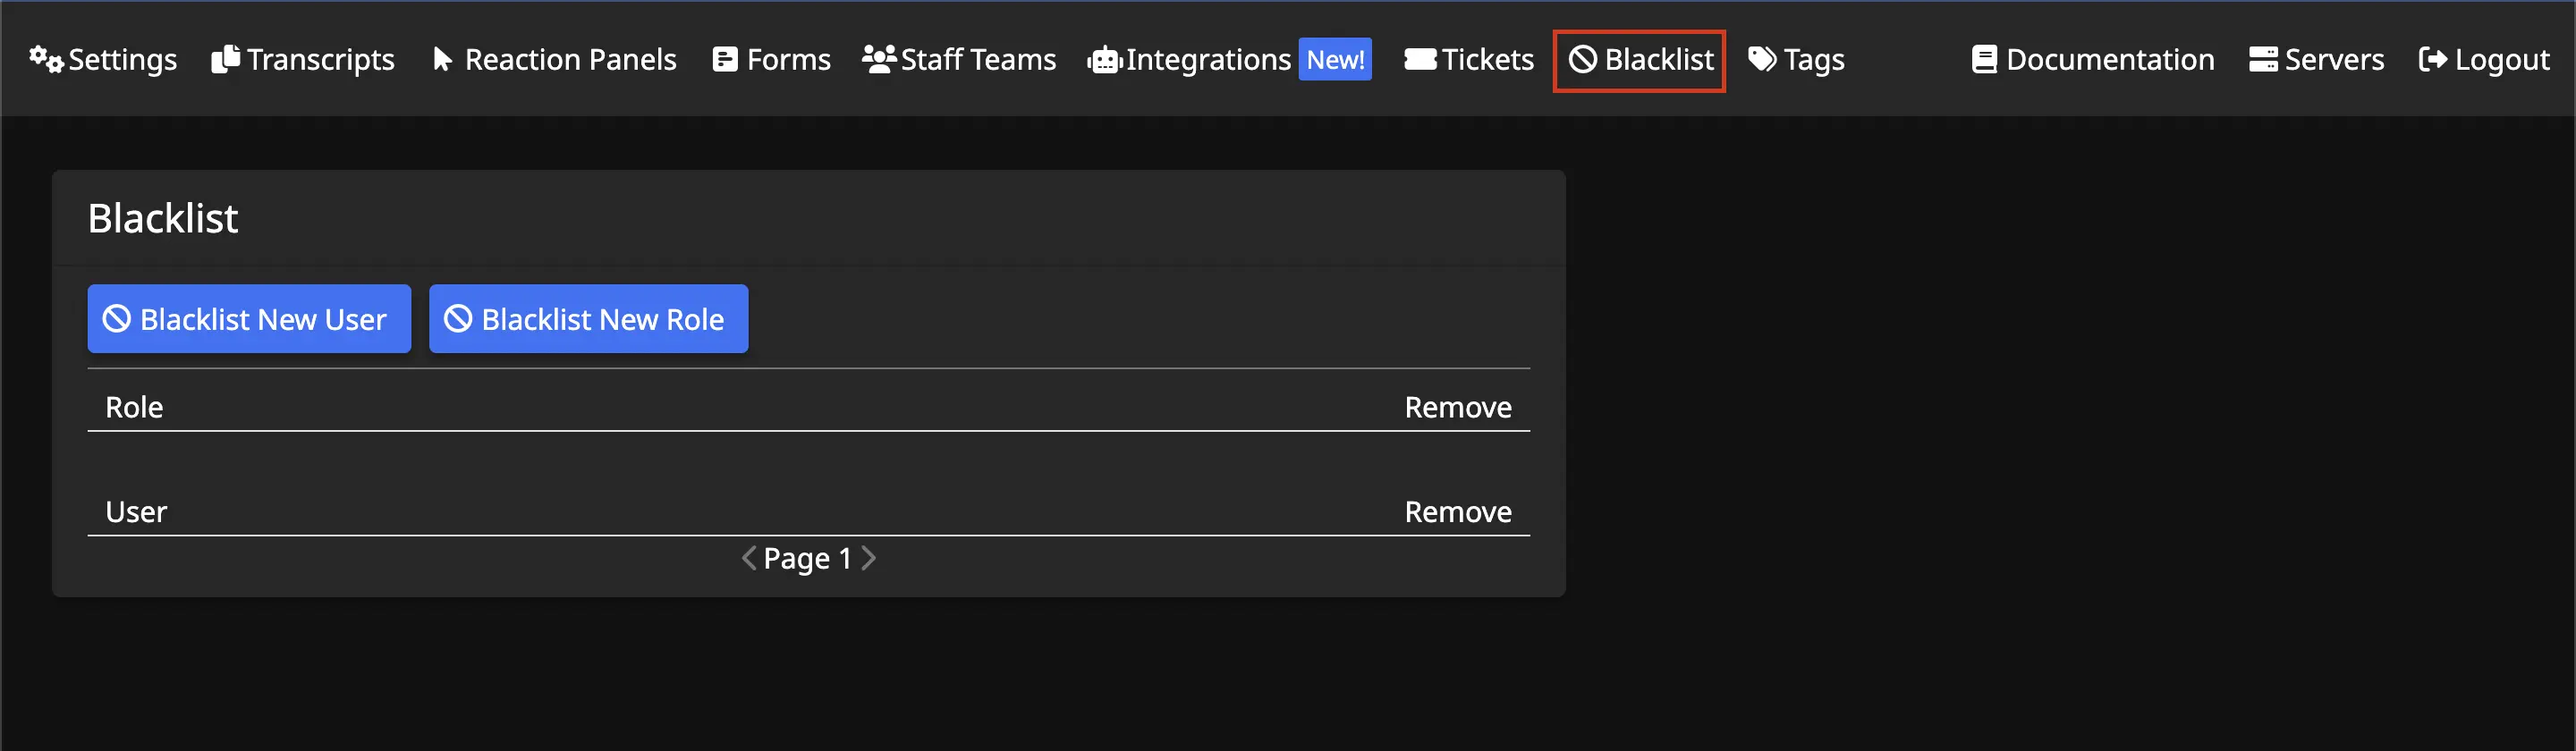
Blacklist New User
To blacklist an individual user from being able to open a ticket, use this button. Once clicked, a new window will appear with a search input.

Start typing the username here and select it when found.
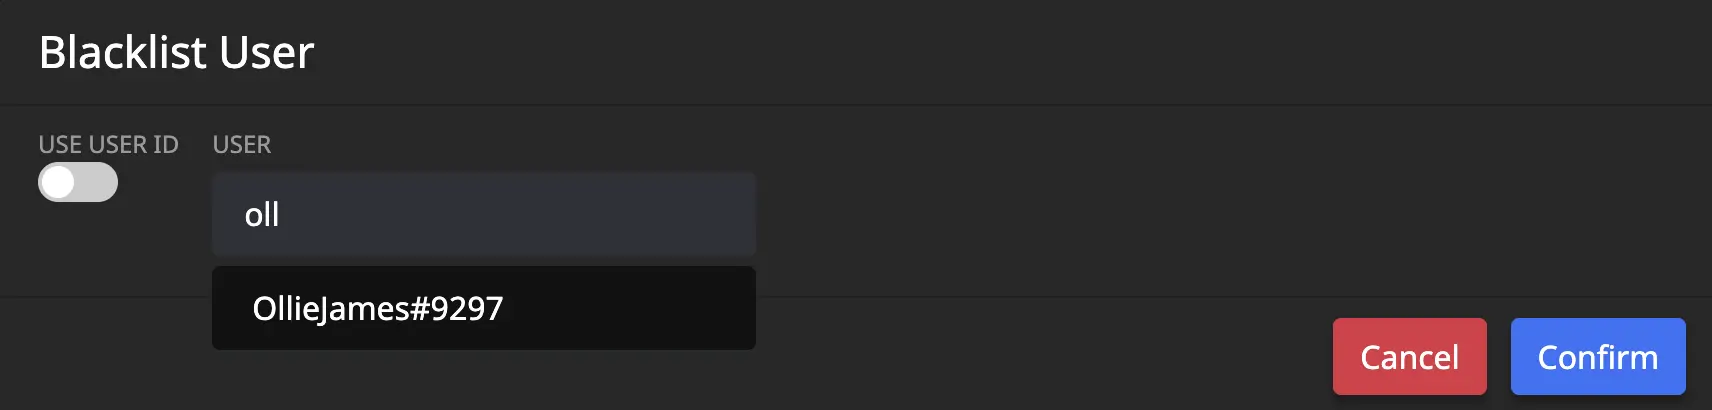
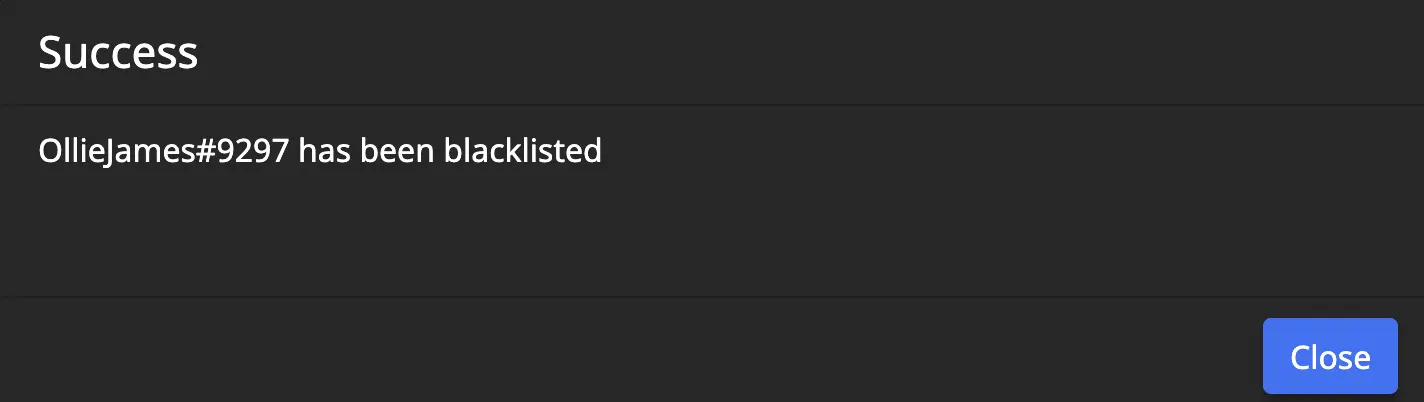
Once the selection is confirmed, a success message will display and the username and ID will be displayed under the Blacklisted User section.
Notes
- Users can also be found by their ID, rather than their username. The
USE USER IDtoggle can be flipped to green and the user ID search input will appear. Paste the user ID here and hitConfirmto blacklist. - User ID's can be found if you have turned on the Discord Developer Mode. This can be found in your user settings.
- Right click any username and choose
Copy ID
- Right click any username and choose

Blacklist New Role
To blacklist a role from being able to open a ticket, use this button. Once clicked, a new window will appear with a search input.
- This is very similar to blacklisting an individual user.
Role / User
Those who have been blacklisted will appear in these sections.
- Any role/user can be allowed to make tickets again by removing them from the blacklist by clicking the corresponding
Removebutton next to the role/username.
Tags
Tags are pre-defined snippets of text sent by the bot. These can be useful for quickly sending responses to commonly asked questions or concerns.
Primary View
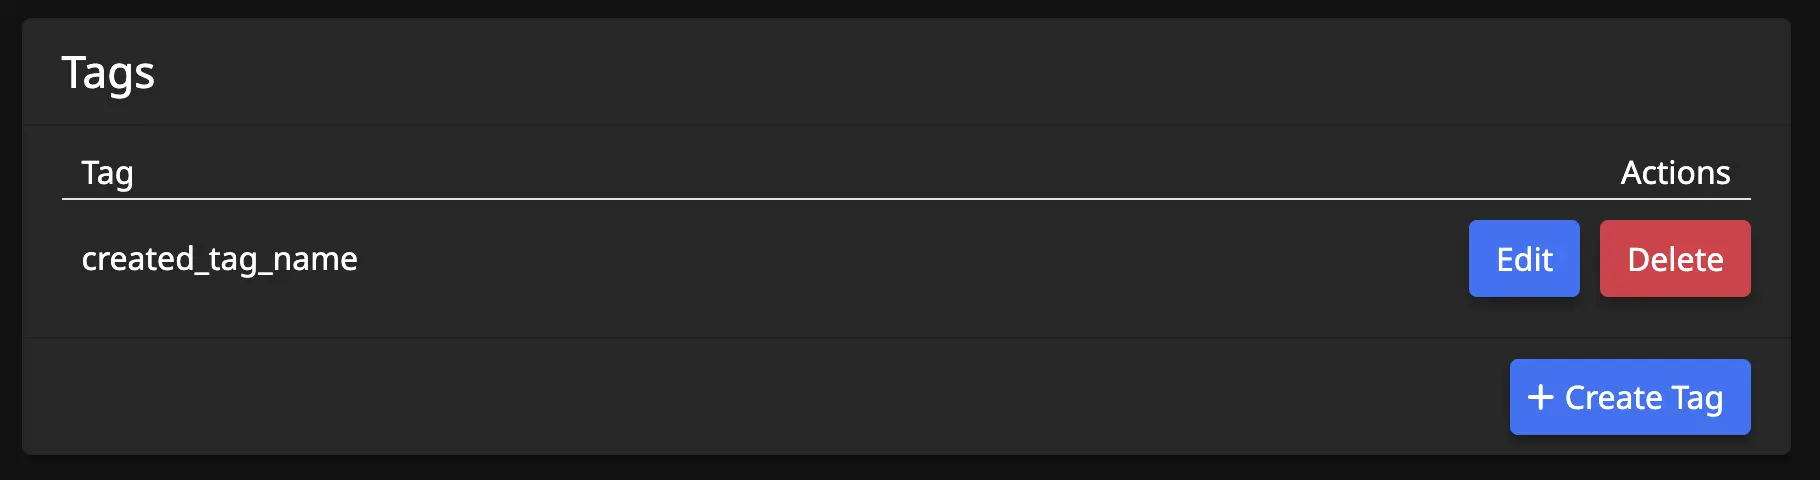
Upon opening the Tags menu, there will be one main area that displays any tags that have been created and a button to create new tags.
When there are created tags, each tag name will show and some action buttons - Edit and Delete
Creating a Tag
Clicking the + Create Tag button will bring up the Tag Editor.
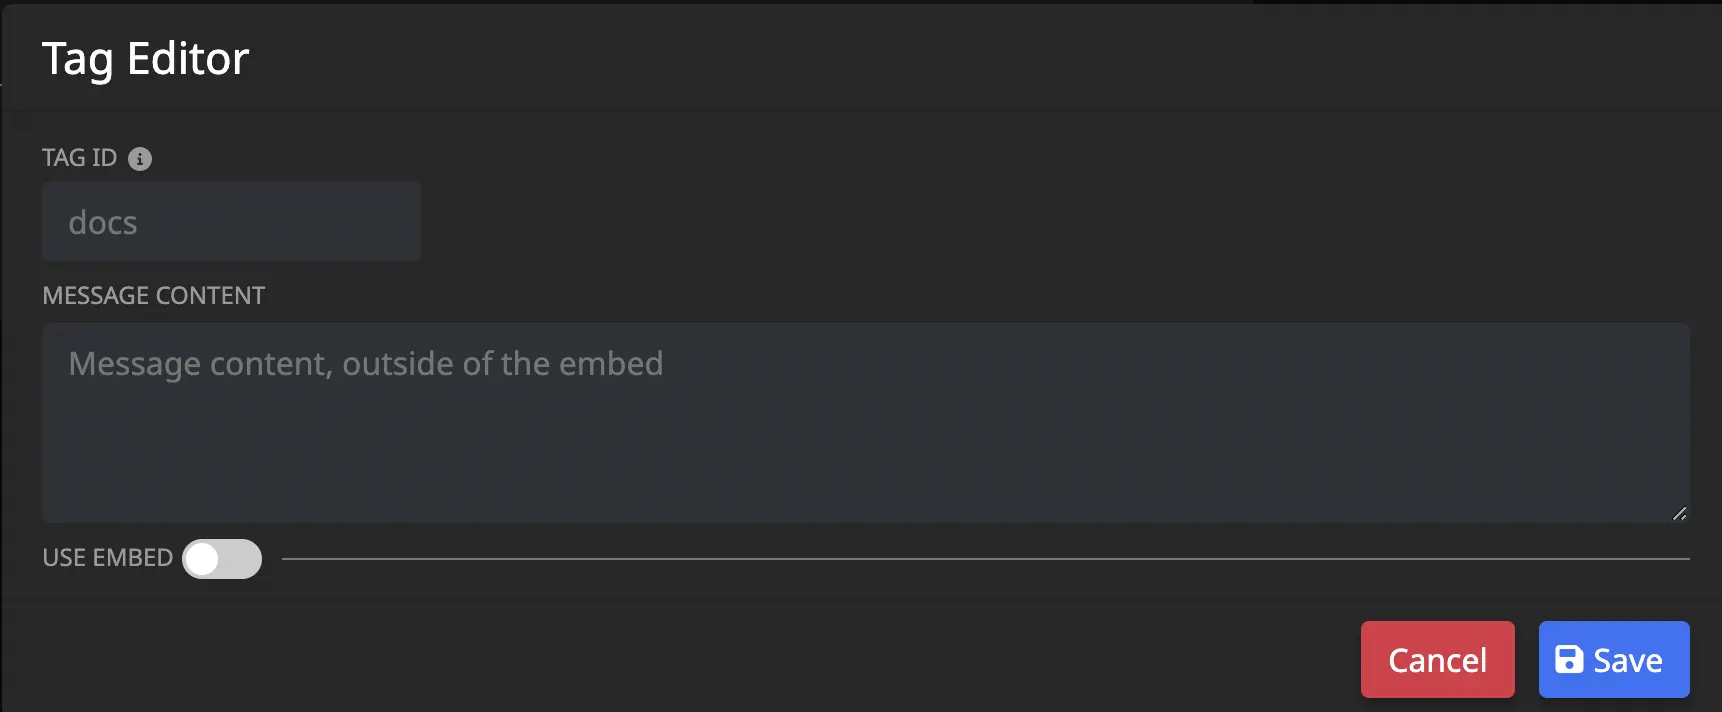
Tag ID
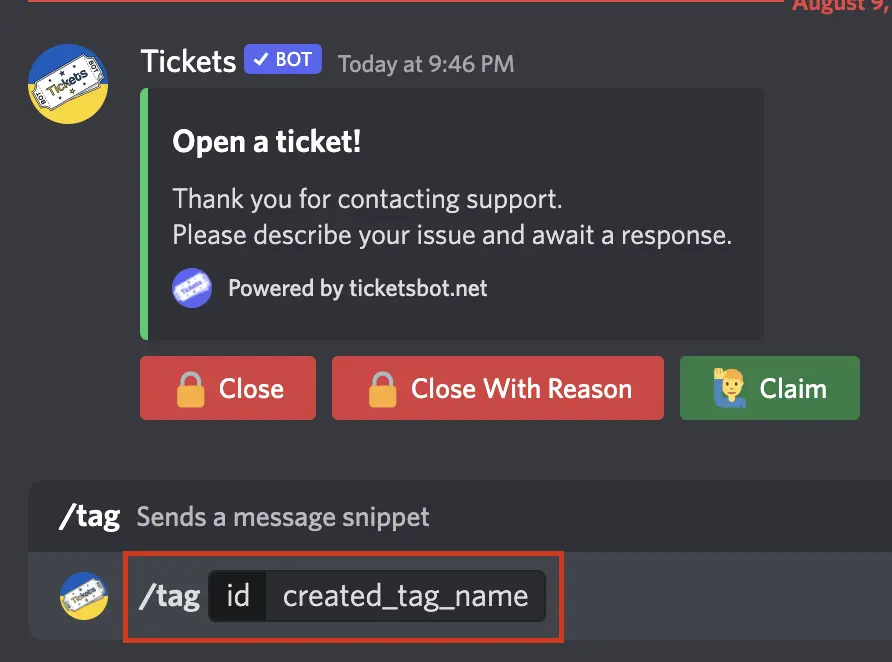
This is the "name" of the tag and what will be used in the command (i.e. if ID is "docs", command is /tag docs.)
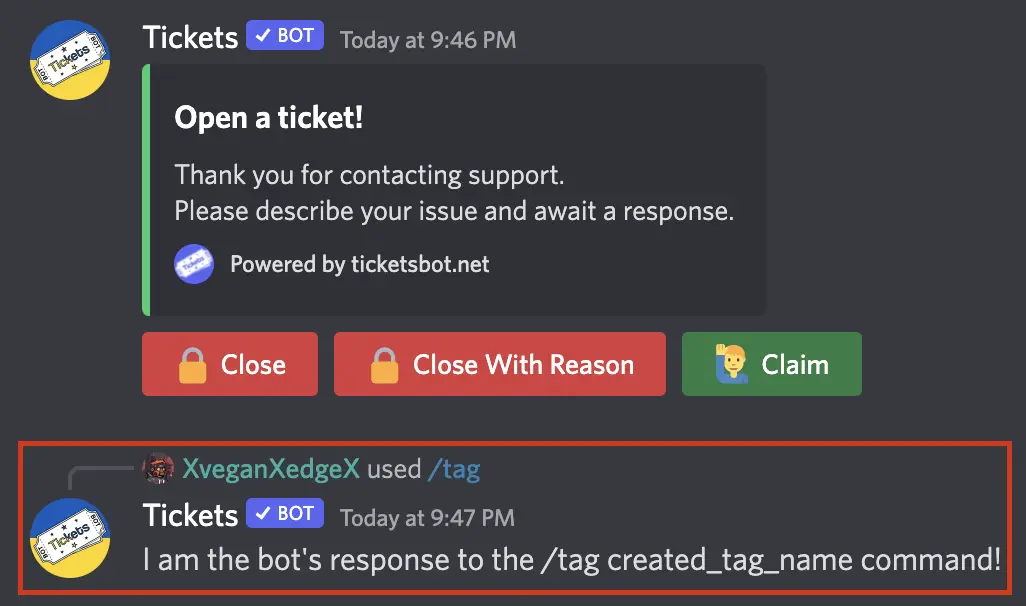
Message Content
This is how the bot will respond when the command is used.
Use Embed
- Bot responses may also be in customisable embeds complete with images, if desired.
Flipping the Use Embed toggle to green will display some more sections:
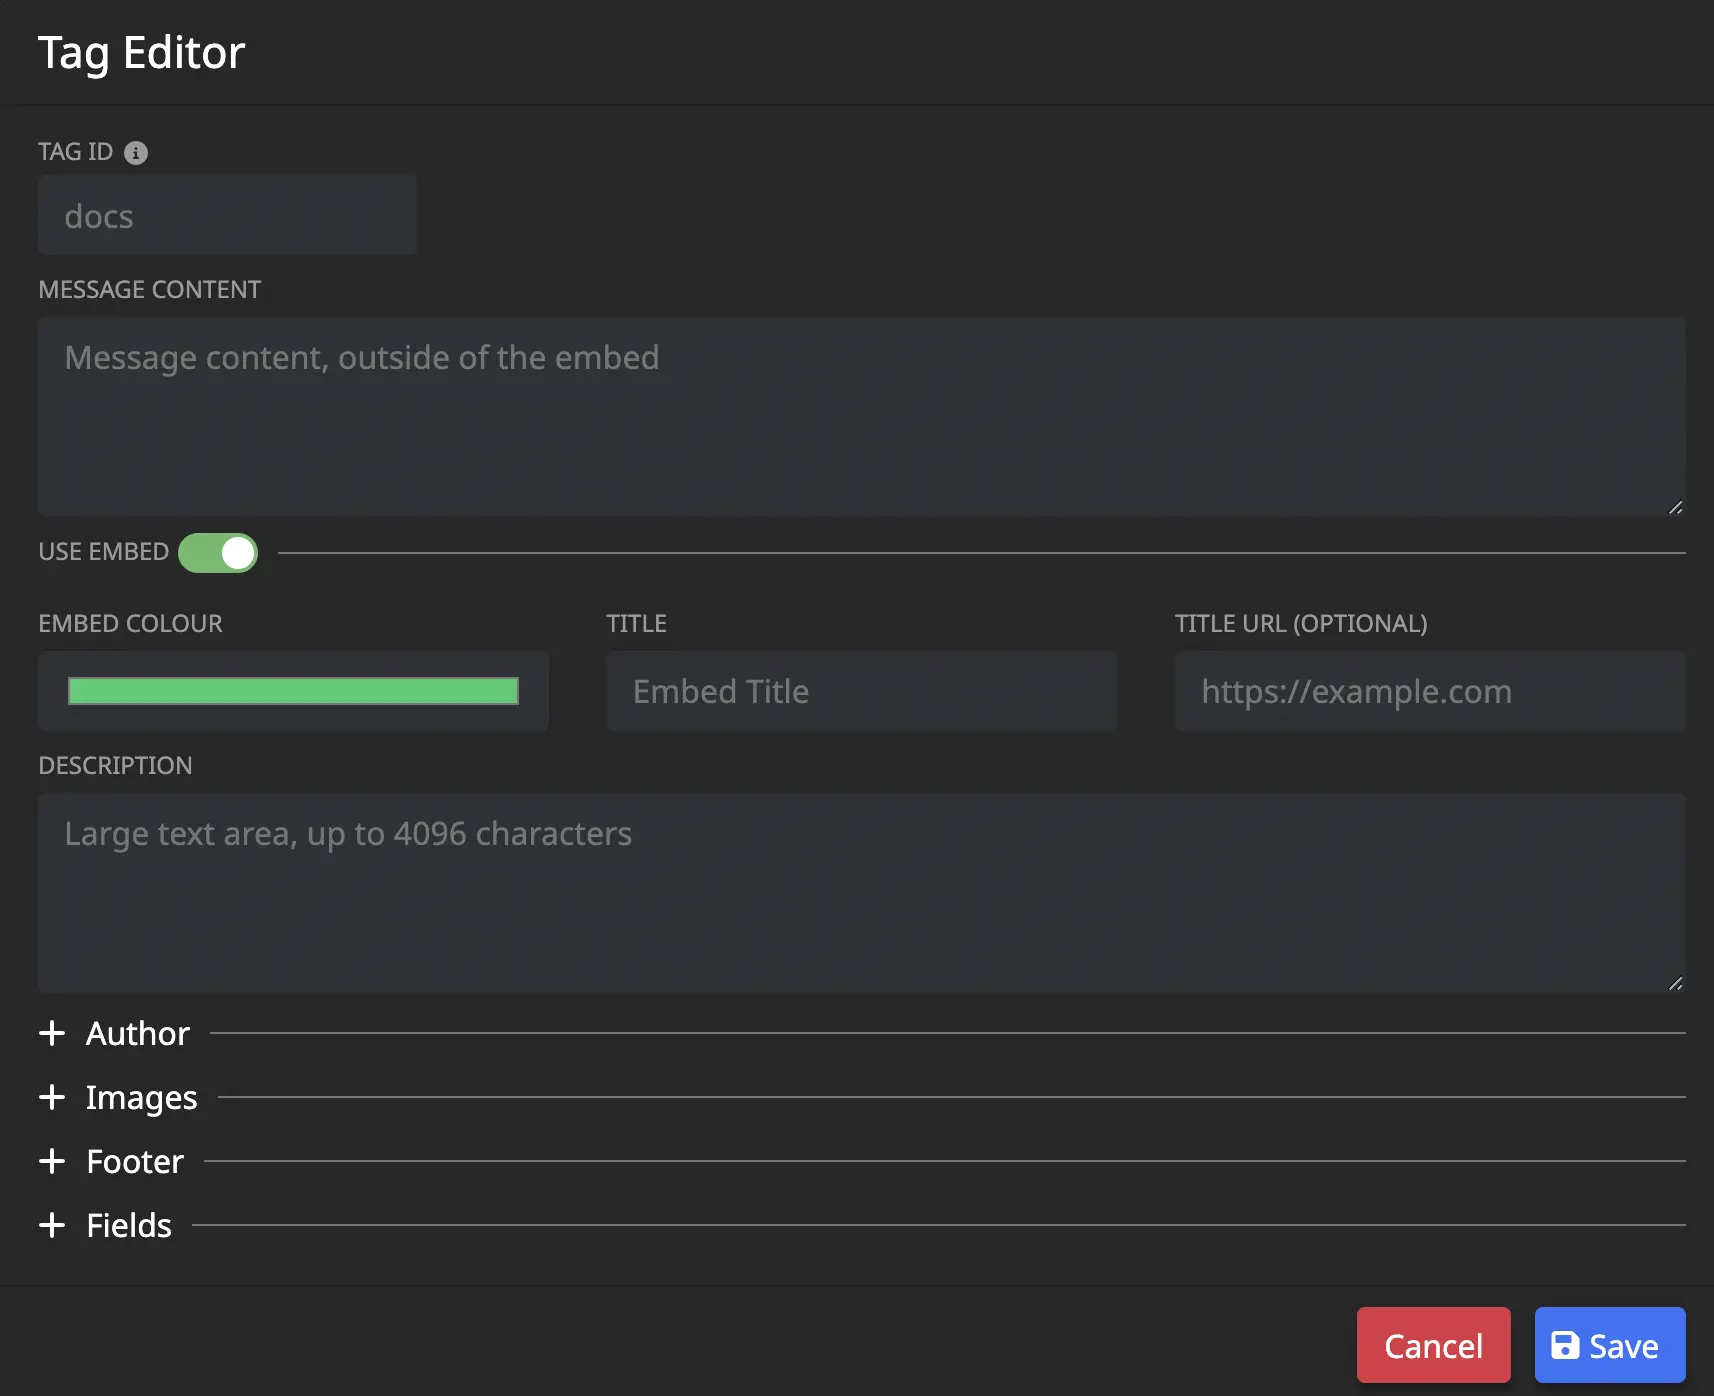
Embed
- Embed Colour This is the colour on the left side of the embed. When clicked, a colour picker will open as shown below:
-
Title The embed title is the bold text at the top of the embed. The embed title has a maximum length of 255 characters.
-
Title URL (optional) The embed title can be turned into a hyperlink to a webpage by filling out this input.
-
Description This is the message content of the embed.
Author
-
Author Name This will display above the embed title.
-
Author Icon URL (optional) This will display to the left of the author name.
-
Author URL (optional) The author name can be turned into a hyperlink to a webpage by filling out this input.
Images
-
Large Image URL Input a URL link to an image here, it will display at the bottom of the embed.
- File path MUST end in .png - easy trick is to send the image as a message in a discord channel, then right click the message and choose "Copy Link." Paste link into the input.
-
Small Image URL Input a URL link to an image here, it will display at the top right of the embed.
- File path MUST end in .png - easy trick is to send the image as a message in a discord channel, then right click the message and choose "Copy Link." Paste link into the input.
Footer
-
Footer Text Will display below the Large Image at the bottom of the embed. This text is a little smaller than the Description.
-
Footer Icon URL (optional) Input a URL link to an image here, it will display to the left of the Footer Text.
- File path MUST end in .png - easy trick is to send the image as a message in a discord channel, then right click the message and choose "Copy Link." Paste link into the input.
-
Footer Timestamp (optional) Choose a date here, it will display after the Footer Text.
Fields
Additional fields can be added to the embed. Think of these as sections. The field name will appear in bold (as a title to the section), and the Field Value is the text within the section.

Example tag embed with Fields not inline
-
Field Name This is the title of the new field section that will appear in the embed. It will display in bold.
-
Inline Checked = Fields display horizontally (columns on the same row)
Unchecked = Fields display vertically -
Field Value This is the description section of the new field that will appear in the embed.

Example tag embed with Fields inline
Using a Tag
Within Discord, use the /tag command by typing /tag and selecting the tag ID from menu, or type the full /tag [tagname]
Premium
This chapter provides information regarding the premium tiers offered for the bot.
Use the sidebar to navigate this chapter.
Tier Comparison
| Feature | Free | Voting Premium | Premium | Whitelabel |
|---|---|---|---|---|
| Unlimited Tickets | X | X | X | X |
| Automatic Ticket Archives | X | X | X | X |
| Forms | X | X | X | X |
| Ticket Claiming | X | X | X | X |
| Max Ticket Panels | 3 | 3 | Unlimited | Unlimited |
| Access to Statistics | - | X | X | X |
| Message Footer Branding Removal | - | X | X | X |
| Access to Autoclose | - | - | X | X |
| Exit Surveys | - | - | X | X |
| Customise Embed Colour | - | - | X | X |
| Live Message Updates on the Dashboard | - | - | X | X |
| Send Messages Directly from the Dashboard | - | - | X | X |
| Customize Bot Name | - | - | - | X |
| Customize Bot Avatar | - | - | - | X |
| Customize Bot Status | - | - | - | X |
Whitelabel Setup Guide
Thanks for purchasing whitelabel and supporting us!
Please follow this guide very carefully. If you skip a single step, the process will not work. The setup should not take more than 10 minutes, and will only need to be done once.
(Step 1 of 6) Link Patreon Account
If you haven't done so already, you'll need to link your Patreon and Discord accounts on this page.
Patreon has a longer guide on how to do this here.
(Step 2 of 6) Create A Bot
Next, we'll need to create your custom bot that Tickets will run under.
To do this, visit the Discord developer portal and press New Application in the top right:

Enter a name for your bot and press create.
From here, you can change your bot's avatar:

(Step 3 of 6) Tweak Settings
Next, we need to edit some very important settings.
Switch to the Bot tab in the sidebar:

(Step 4 of 6) Starting The Bot
Next, head over to the Tickets dashboard and select the Whitelabel tab on the sidebar.
First, we have to submit the bot's token. This is like a password to the bot. Never send this token to anyone, even in our support server.
Head back over to the bot tab on the Discord developer portal and copy the token:

Then in the Whitelabel tab of the Tickets dashboard (link), paste the token into the Bot Token field and press Submit:

You will then be presented with a message saying that the bot is now online.
If you receive an error, make sure that you copied the token fully (not the client secret.) Additionally, refresh the page and check the Error Log table for any errors.
(Step 5 of 6) Inviting The Bot To Your Server
Before you can invite the bot to your server, you must kick the main Tickets#6981 bot from your server. It is extremely important that you do this before inviting your custom bot to your server. If you do not do this, you risk data loss.

To invite your whitelabel bot to your server, click the Generate Invite Link button under the Manage Bot section.
Upon clicking the button, you will be taken to the normal bot invite page - select your server and authorise. It is important that you grant the bot all the permissions that it asks for.

(Step 6 of 6) Activating Premium Perks
The last mandatory step is to activate the premium perks that come with whitelabel for your server.
Go to your discord server and run the command /premium. You must select the command when it displays to you after typing. Make sure to choose patreon since that is how you paid for the whitelabel bot. Giveaway Key is not used here.
- If
Patreonis not a selectable option, then your premium perks are already applied to the server.

And you're done! There are a few more optional steps if you wish to take them.
Optional: Custom Status
You can optionally change your custom bot's status. Simply enter the new status on the dashboard and press Submit.
Playing, Listening, and Watching are all currently available.

Privacy Policy & ToS
On the General Information tab of the Discord developer portal, you may have noticed Terms Of Service URL and Privacy Policy URL fields.
You should enter our policies here to inform users of how their data may be used.
Terms Of Service: https://ticketsbot.net/terms-of-service
Privacy Policy: https://ticketsbot.net/privacy

Features
This chapter provides some details about the core features of the bot.
Use the sidebar to navigate this chapter.
Thread Mode
We now support using private threads for tickets! This is a new optional mode for the bot that drastically changes how tickets operate.
Instead of the whole support team being added to a ticket when it is opened, the thread starts out with no staff members. A button is then sent to your ticket notification channel which staff members click to be added to the thread:

Channel vs Thread Comparison
| Channels | Threads |
|---|---|
| Tickets cannot be reopened once closed | Tickets can be reopened |
| Transcripts only viewable on dashboard | Transcripts viewable on dashbord, and within Discord |
| Limited to 500 channels total, and only 50 channels in a single category | Unlimited threads |
| All staff on support team added to ticket | Staff members must press button to join ticket |
| Tickets can be claimed | Ticket claiming is unsupported 1 |
/switchpanel changes the ticket panel of an existing ticket | /switchpanel is unsupported 2 |
| No concept of on-call staff | Staff can be marked as on-call to automatically be pinged and added to tickets |
| No spaces in channel names | Spaces in channel names permitted: e.g. Ticket 1234 |
| Can use /notes for a private thread for staff to talk in | Cannot use /notes due to Discord limitation |
Staff members must individually click a button to join the ticket, so the behaviour is replicated
This is due to Discord's permission management internals being very different for threads
On-Call
Thread mode introduces a new command: /on-call. When a staff member runs this command, they will be assigned roles marking them as on call, until they run the command again. When a new ticket is opened, the on call roles are pinged in the ticket, instantly adding all currently on call staff members to the ticket.
Note: When a staff member becomes on call, they will not be added to any existing tickets. They must join them via the ticket notification channel as normal.
How do I enable thread mode?
You can enable threads directly within Discord, by using the command /setup use-threads, like so:

Alternately, you can enable threads via the settings page of the dashboard:

FAQ
Which mode should I use?
If you run a server with a small team, we would likely recommend sticking with channel mode. If you run a server with a heavy focus on 1-on-1 support or claiming, we would recommend thread mode. Nevertheless, if you require any of the additional features like reopening tickets, you must use thread mode.
Why can't the bot add the support team to the thread straight away?
Permission management capability on threads has been heavily limited by Discord. It is not possible to add or remove members in bulk.
Will channel mode be removed?
No, both modes will be supported forever. Thread mode is completely optional.
My users can't type in their support tickets!
You must grant the "Send Messages in Threads" permission to your @everyone role in the panel channel:


Forms
Tickets has the ability to prompt users for answers to pre-defined questions when opening a ticket:

To set this up, you must first create a form, and then apply the form to your reaction panel. This way, you can assign a single form to multiple different types of tickets, if you choose.
Basic Video Walkthrough
Creating the Form
First, head over to the dashboard and select your server.
Then, select the Forms tab in the navigation bar:

You can now create your first form. Enter a name for it, and press Create:

Next, select your form from the Manage Forms dropdown list, and add up to 5 inputs. Enter a label for the question, some placeholder text, and select the type of input:

Note the discord imposed limitations for forms:
- Maximum of 5 inputs per form
- Currently only supports text input style
- Maximum character limits
- Name - 45
- Labels - 45
- Placeholder - 100
Make sure to save your inputs. Your form has now been created. In order to show it to users, you must assign it to a ticket panel.
Assign Form to a Panel
Head over to the Reaction Panels page of the dashboard via the top navigation bar, as shown in the panels documentation.
Either create a new ticket panel, or choose an existing one to edit. You will notice a dropdown labeled Form. Expand this dropdown, and select your new form:

Save your changes, and then test it out!

Multipanels
When using multi-panels (different types of tickets combined into 1 message with multiple buttons), the form shown to the user is the form associated to the panel of the button clicked.
Limitations (Discord imposed)
- Maximum of 5 questions per form
- Currently only supports text input type - no radio buttons, or checkboxes
- Form Labels have a max length of 45 characters
- Form Placeholders have a max length of 100 characters
Multi Panels
Multi-panels are the combination of 2 or more Reaction Panels in a single embed:

Creating A Multi-panel
In order to create a multi-panel, you'll need to head over to the web dashboard and select your server. If you're unfamiliar with how to do that, read our guide on the web dashboard here.
Once on your server's main settings page, select Reaction Panels in the top navigation bar and you'll be taken to the reaction panel configuration page which looks as follows:

You'll want to focus on the right side of the screen. The left side are settings for individual panels (known as Reaction Panels.)
Draw your attention to the Create Multi-Panel card. You'll configure the panel's appearance here:

Panel Title
The panel title is the bold text at the top of the embed. The panel title has a maximum length of 255 characters. By default, we set the value to Open a ticket!
Panel Content
The panel content is the text in the long description of the embed. It has a maximum length of 1024 characters. We recommend providing a general overview of how your support system works, such as which languages you have support staff fluent in.
Panel Colour
This is the colour on the left side of the embed. When clicked, a colour picker will open as shown below:

Panel Channel
This is the channel that the multi-panel will be sent in for users to react to. Therefore, this channel should be accessible to your users, and be the only message in the channel to avoid confusion.
This should not be the same as your archive / transcript channel.
Panels
This input field is where you select which of your already made individual panels you'd like to include in the multi-panel.
Use Select Menu
- Unchecked = Ticket options appear as clickable buttons.
- Checked = Ticket options appear as a dropdown menu.
Advanced Settings
Upon clicking Toggle Advanced Settings, you'll have extra fields displayed to you:
Large Image URL
Input a URL link to an image here, it will be shown underneath the welcome message.
- File path MUST end in .png - easy trick is to send the image as a message in a discord channel, then right click the message and choose "Copy Link." Paste link into the input.
Small Image URL
Input a URL link to an image here, it will be shown to the right of the welcome message.
- File path MUST end in .png - easy trick is to send the image as a message in a discord channel, then right click the message and choose "Copy Link." Paste link into the input.
Completion
Once you have configured the multi-panel to your liking, click Submit and the panel will be created in your server. You should be shown a success message in the bottom right hand corner of your screen if successful, or an appropriate error message if you made a mistake:

- If you leave any fields blank, the default values will be used.
Editing
If you wish to update a multi-panel at a later date, simply click the edit button in the list of multi-panels and the editing modal will be opened:


You can also delete a multi-panel by clicking the Delete button, or deleting the message containing the multi-panel in Discord. If you only delete the message in Discord, the multi-panel will continue to exist on your Dashboard and you can resubmit it to Discord if needed.
Start Ticket From Message
Did you know that you can start a ticket from a channel using message context menus?
This is a similar functionality to Discord private threads. A common use case is for using tickets to perform moderation, where you can drag a user into a ticket to discuss a specific message with them.
How To Use
To start a ticket from a message, simply right click the message (or long press on mobile devices), hover over Apps, and select Start Ticket:
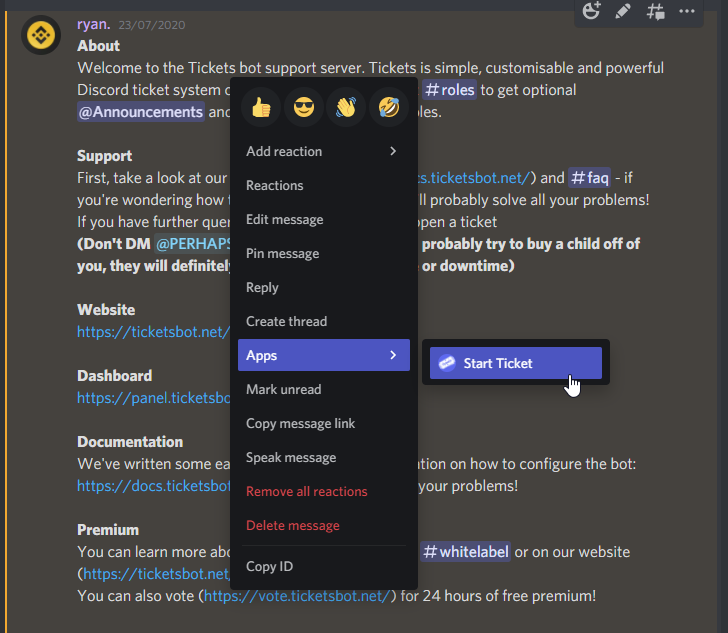
A new ticket will be created with the user who sent the message. The bot will send a message quoting the user, as well as providing a link to the message:
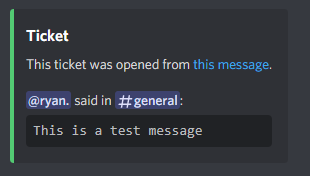
Configuration
Required Permission Level
To limit usage of this functionality to staff members: visit the web dashboard, select your server, and take a look at the Settings page.
You will see a dropdown menu labelled Required Permission Level under the Context Menu (Start Ticket Dropdown) heading. Adjust the setting to your wish, and then press the Submit button.
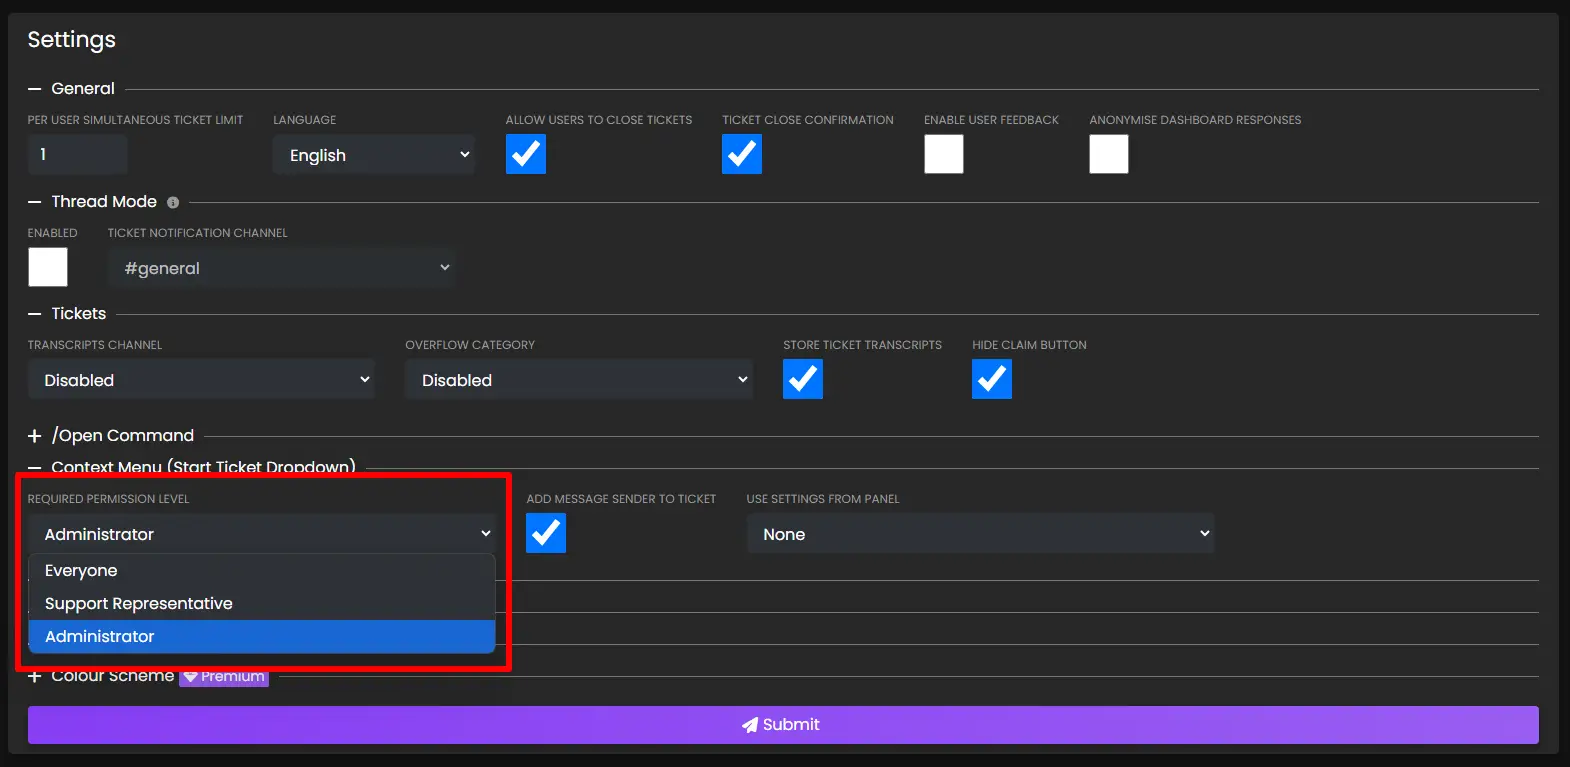
Add Message Sender To Ticket
If you are using this functionality for users to report messages, you may not wish to have the person who is being reported added to the ticket for anonymity.
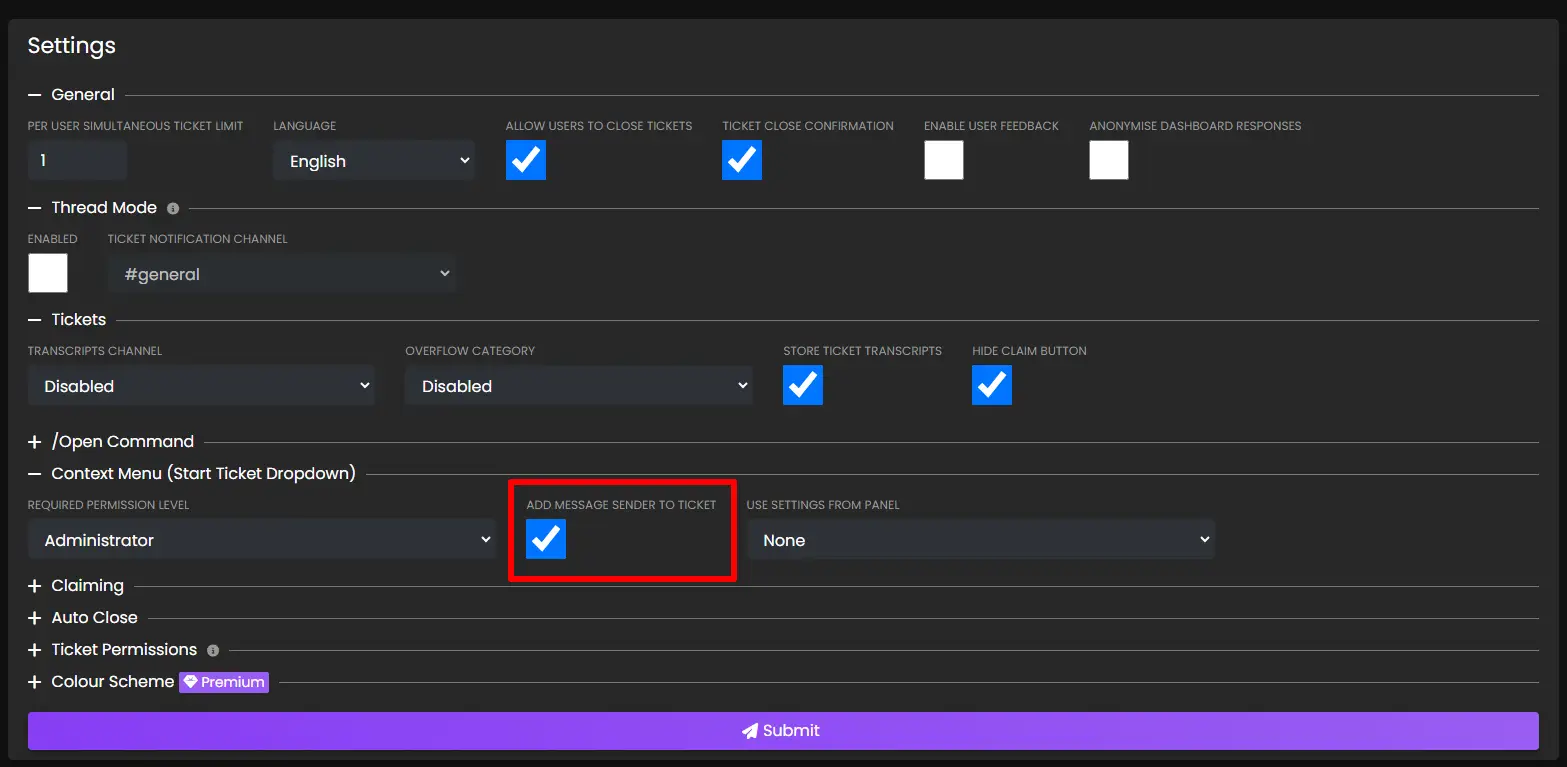
This will also stop the Conversation moved to ticket message from being sent.
Use Settings From Panel
By default, tickets opened via the context menu use the /open command settings. If you wish to use the settings of a specific reaction panel, i.e. so you can use Mention On Open, select the panel you wish to use under the Use Settings From Panel dropdown.
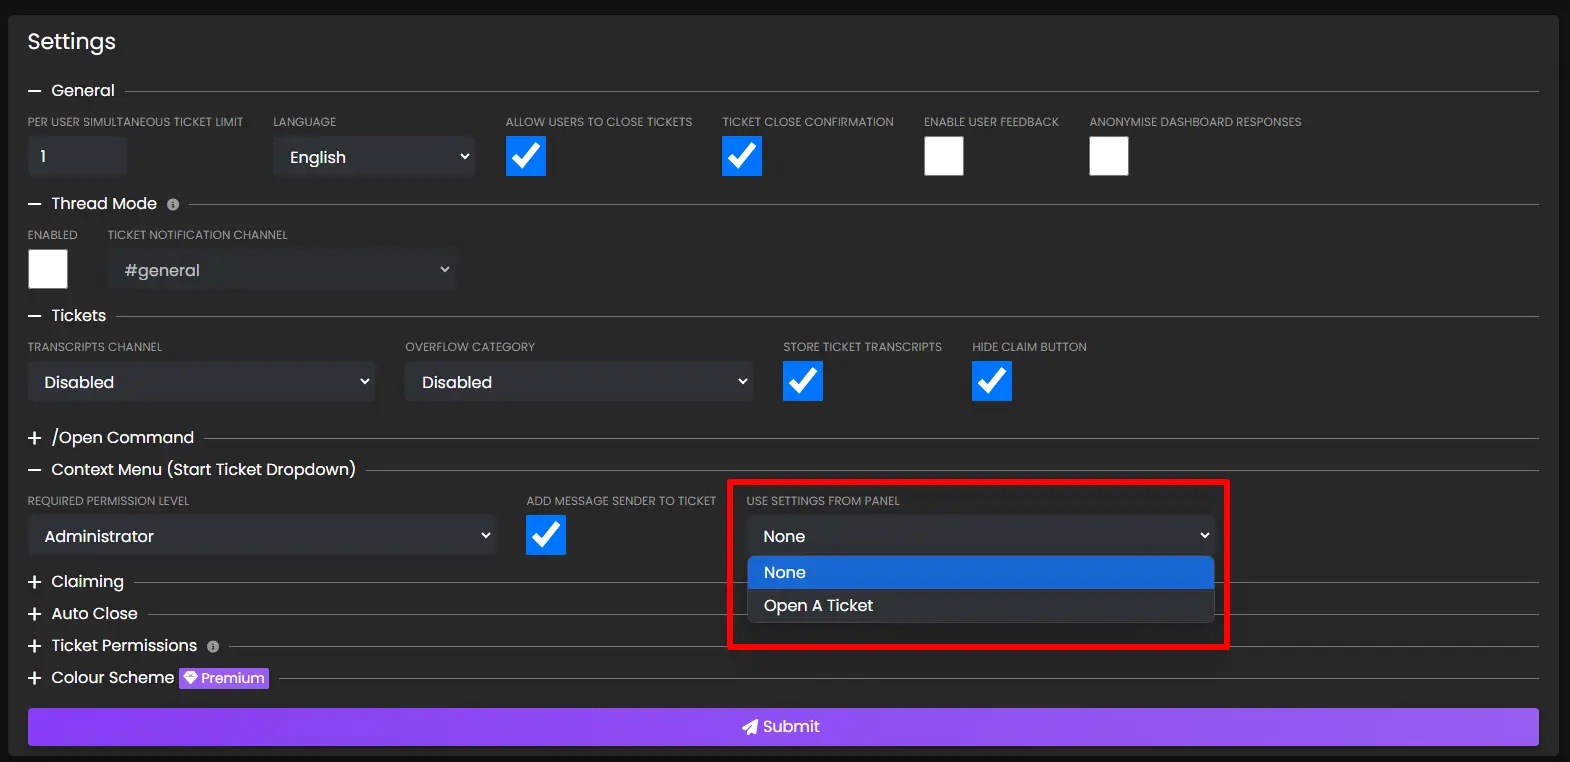
Close Requests
Another unique feature of Tickets is close requests.
When you feel a ticket is able to be closed, you can use the /closerequest command to ask the user to confirm they feel everything is resolved:

If the user chooses to deny the request, the message will be updated:

Timeouts
Additionally, you can specify a time (in hours) after which the ticket will be closed automatically if the user has not responded, and a reason for closure of the ticket:

If a close delay is not specified, the ticket will not be closed until the user accepts the request.
Notes
- If you exclude a ticket from being automatically closed via
/autoclose exclude, close request timeouts will not apply, even if provided.
Feedback
Tickets allows your users to provide feedback on the support they received:

Enabling Feedback
In order for users to be asked to rate your service, you must first enable feedback on the web dashboard.
Select your server and open the settings page:

Check the Enable User Feedback box and press submit.
Next time a user closes a ticket, they will be asked for feedback.
Viewing Feedback
There are several ways to view feedback:
Server Stats
If you are a premium subscriber, you can view your feedback statistics with /stats server:

User Stats
If you are a premium subscriber, you can use /stats user to view the average rating on tickets claimed by a specific user:

Placeholders
You can include the following placeholders in your welcome message to display your feedback rating to users:
- %average_rating%
- %rating_count%
Note: View more placeholders by clicking here.
Viewing Individual Ticket Ratings
You can view the ratings of individual tickets by navigating to the transcripts page on the dashboard. Next to each ticket, the rating given by the user will be shown:

Miscellaneous
This chapter contains all other documents which do not suit the other chapters.
Use the sidebar to navigate this chapter.
Official Links
Website
Invite The Bot
Dashboard
Documentation
Discord Support Server
Patreon Guides
How to Cancel Subscription
How to Link Discord and Patreon
Placeholders
Welcome Message Placeholders
Built-in
| Placeholder | Description |
|---|---|
| %user% | Mentions the user |
| %username% | Display the user's name |
| %ticket_id% | Display the ticket's numeric ID |
| %open_tickets% | Display the number of open tickets in the server |
| %total_tickets% | Display the number of tickets that have ever been opened in the server |
| %user_open_tickets% | Display the number of tickets that the user currently has open in the server |
| %user_total_tickets% | Display the number of tickets that the user has ever opened in the server |
| %ticket_limit% | Display the server's ticket limit |
| %channel% | Mention the channel |
| %rating_count% | Amount of feedback ratings you have received |
| %average_rating% | Your average feedback rating |
| %time% | Display the current time |
| %date% | Display today's date |
| %datetime% | Display the current date and time |
| * %first_response_time_weekly% | Staff average first response time to tickets this week |
| * %first_response_time_monthly% | Staff average first response time to tickets this month |
| * %first_response_time_all_time% | Staff average first response time to tickets since the beginning |
| %discord_account_creation_date% | The date and time that the user's Discord account was created |
| %discord_account_age% | How long ago the user's Discord account was created |
Placeholders marked with a * are premium features. Learn more about premium here.
Integrations
All integration placeholders are automatically active, you do not have to do anything special apart from include them in your welcome message.
Bloxlink
These placeholders are available if the user has linked their Roblox account via Bloxlink
| Placeholder | Description |
|---|---|
| %roblox_username% | The user's Roblox username |
| %roblox_id% | The user's numeric Roblox ID |
| %roblox_display_name% | The user's Roblox display name |
| %roblox_profile_url% | The full clickable URL to the user's Roblox profile |
| %roblox_account_age% | How long ago the user's Roblox account was created, e.g. 7 months ago |
| %roblox_account_created% | The date on which the user's Roblox account was created, e.g. 7 January 2019 |
Custom Naming Scheme Placeholders:
| Placeholder | Description |
|---|---|
| %id% | Display the unique ticket id# |
| %id_padded% | Display the unique ticket id# to 4 places |
| %username% | Display the user's name |
| %nickname% | Display the user's nickname |
Translate the Bot
Dashboard: "No Permission" Message
When the bot is first added to the server, you may receive a "No Permission" warning on the dashboard when trying to manage it.

This is because Tickets using its own permission management system, and ignores any permissions you may have in the Discord server itself.
In order to gain access to the web dashboard for your server, ask the server owner to add you as an administrator using the /addadmin @User command. You can read more about the /addadmin command in the command guide.