Build Integrations
Integrations let you include information retrieved from your own web server, or 3rd party APIs, directly in the welcome messages of your tickets!
In this guide, we'll build an integration from scratch together, from start to finish.
What can I use integrations for?
If you run a service that incorporates Discord OAuth, you have a use case for integrations! Since your user objects are linked to Discord accounts, you can expose an API endpoint that Tickets can request to include information about the user in the ticket.
A simple example would be a forum! When a user opens a ticket in your Discord server, you could include the user's forum username automatically.
Another example is our built-in Bloxlink integration, which allows you to include the Roblox usernames, profile URLs and more in tickets.. The Bloxlink integration is automatically enabled in all servers. You can view the welcome message placeholders available through it here.
Integrations do not necessarily need to fetch information about a user either! In the next tutorial, we show you how we built the cryptocurrency price integration.
Background Setup
Let's say we run a game, where users link their accounts to their Discord accounts. Users have usernames, scores and other metadata which we wish to display in the welcome message when a user opens a ticket.
The following is some simple code that serves some example JSON data that we will be using for this tutorial. Let's say that this code is running on a web server, accessible at https://example.ticketsbot.net:
const express = require("express");
const app = express();

let users = {
  "585576154958921739": {
    online_status: "Online",
    user: {
      username: "Ryan",
      account_created_year: 2019,
      scores: {
        high_score: 3000,
        last_score: 400,
      },
    },
  },
};

app.get("/lookup", (req, res) => res.json(users[req.query.user] || {}));

app.listen(process.env.PORT, () => console.log("Listening..."));
The server responds with the user object stored in the users dictionary if it exists, or alternatively with an empty JSON object, {}.
For example, sending a request to https://example.ticketsbot.net/lookup?user=585576154958921739:
$ curl https://example.ticketsbot.net/lookup?user=585576154958921739 | jq .
{
  "online_status": "Online",
  "user": {
    "username": "Ryan",
    "account_created_year": 2019,
    "scores": {
      "high_score": 3000,
      "last_score": 400
    }
  }
}
Your integration MUST return a JSON response. Parsing other data formats is not supported. You may return the data structured in any way you want, as long as it is valid JSON.
All data types are supported, except for JSON arrays. You should pre-process your arrays and join them to strings.
Creating Your Integration
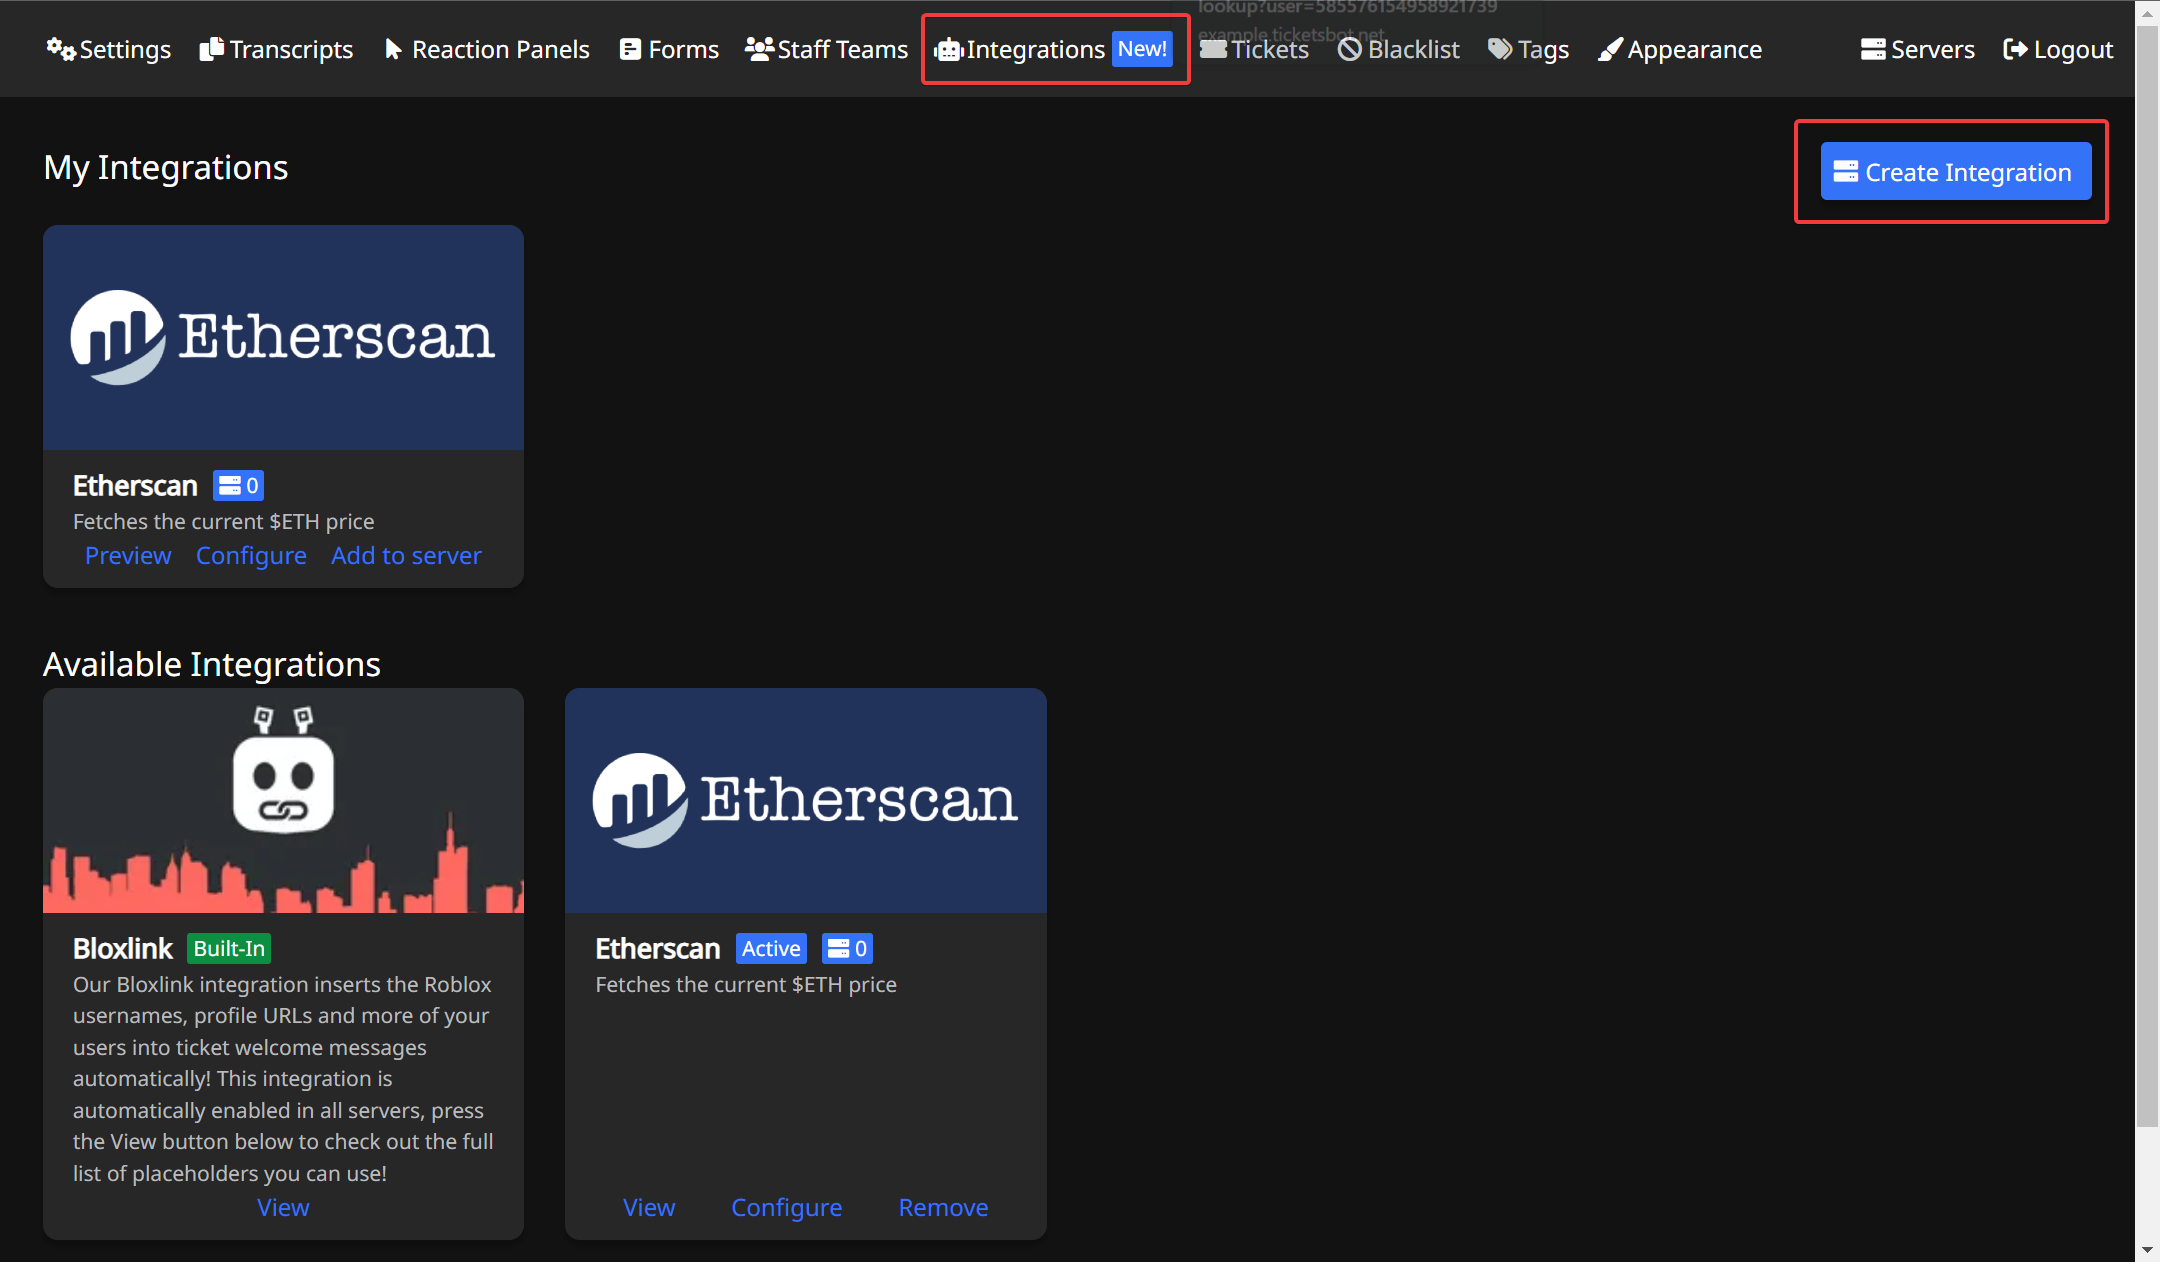
Now that we have somewhere to pull data from, we can start linking it up with Tickets!
First, head over to our web dashboard, select any server, and then navigate to the Integrations tab in the navbar. From there, you will be able to press the "Create Integration" button:
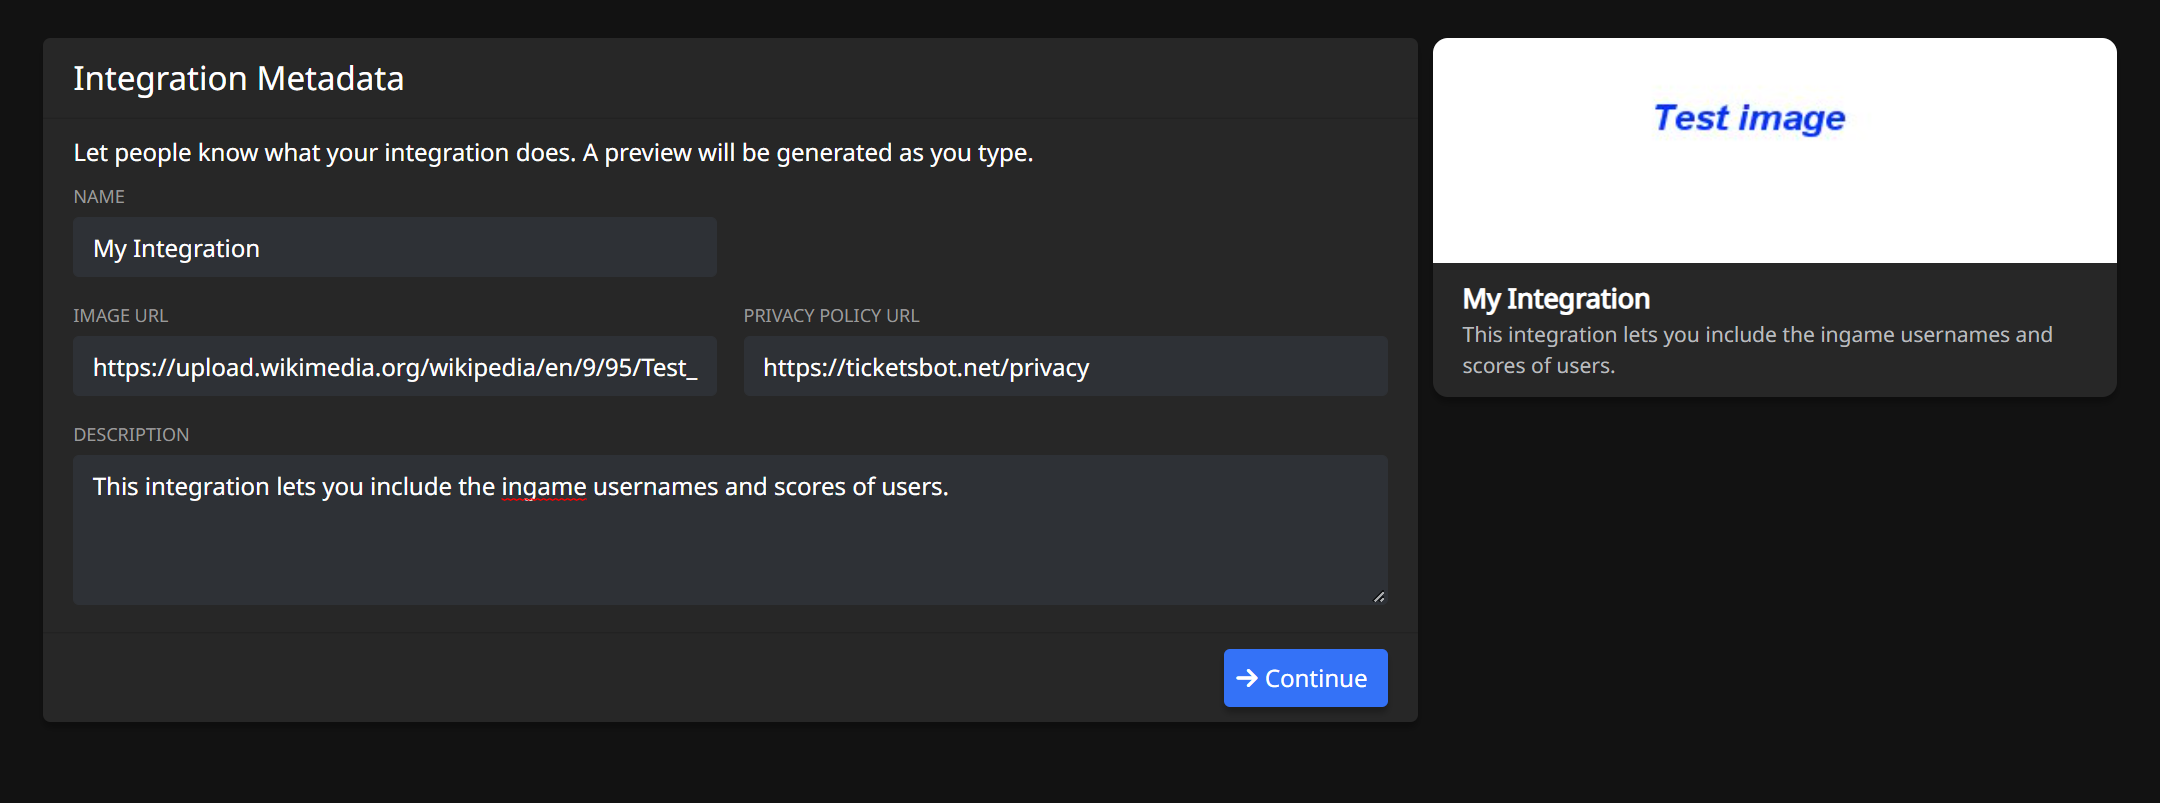
Then, fill out some basic information about your integration: its name, description, and optionally logo image URL and privacy policy. It is recommended to set a privacy policy if you are creating a public integration. You will be able to see a preview on the right-hand side as you type. Once completed, press the "Continue" button.
HTTP Request
You will be then be prompted to enter information about how the integration works. Lets focus on the "HTTP Request" section first:
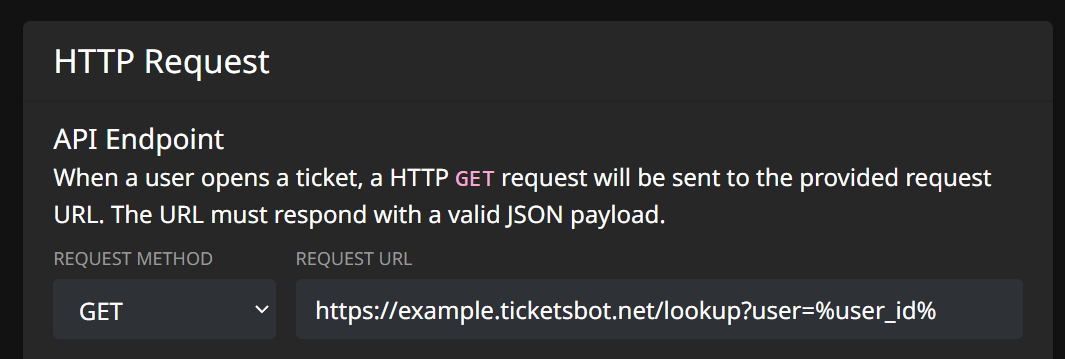
Upon a ticket being opened, we will send a HTTP request to the provided request URL, to which you should respond with a JSON object that we can extract values of your choice from. You can use the placeholder %user_id% in the URL, which will be replaced with the user ID of the user who opened the ticket. In our case, we set this to https://example.ticketsbot.net/lookup?user=%user_id%.
Requests can either be sent as GET or POST requests. POST requests are sent with a JSON body with information about the ticket. An example body is as follows:
{
  "guild_id": "508392876359680000",
  "user_id": "508391840525975553",
  "ticket_id": 30,
  "ticket_channel_id": "508392988985262090",
  "is_new_ticket": true,
  "form_data": {
    "What is your question?": "I have a problem with XYZ",
    "What is your email address?": "[email protected]"
  }
}
The is_new_ticket denotes whether the request is being made due to a new ticket being created. Placeholders are supported in tags and other places, in which case is_new_ticket would be false.
The form_data field is only included for private integrations. There is not reason for public integrations to include form data, as forms are specific to the server.
Headers and Secrets
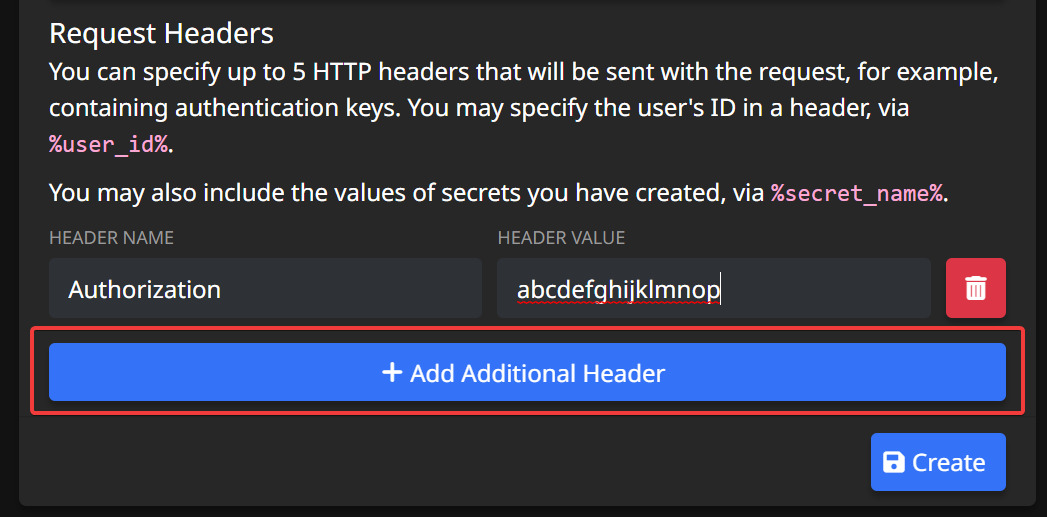
It is recommended that you add some kind of authentication to your API- or if you are making an integration that requests a public API, you will definitely be required to use authentication. Thankfully, you can add HTTP headers to your integration requests!
Let's say our example app now requires an API key to be sent in the Authorization header. Simply press the Add Additional Header button, and enter the header name and value, like so:
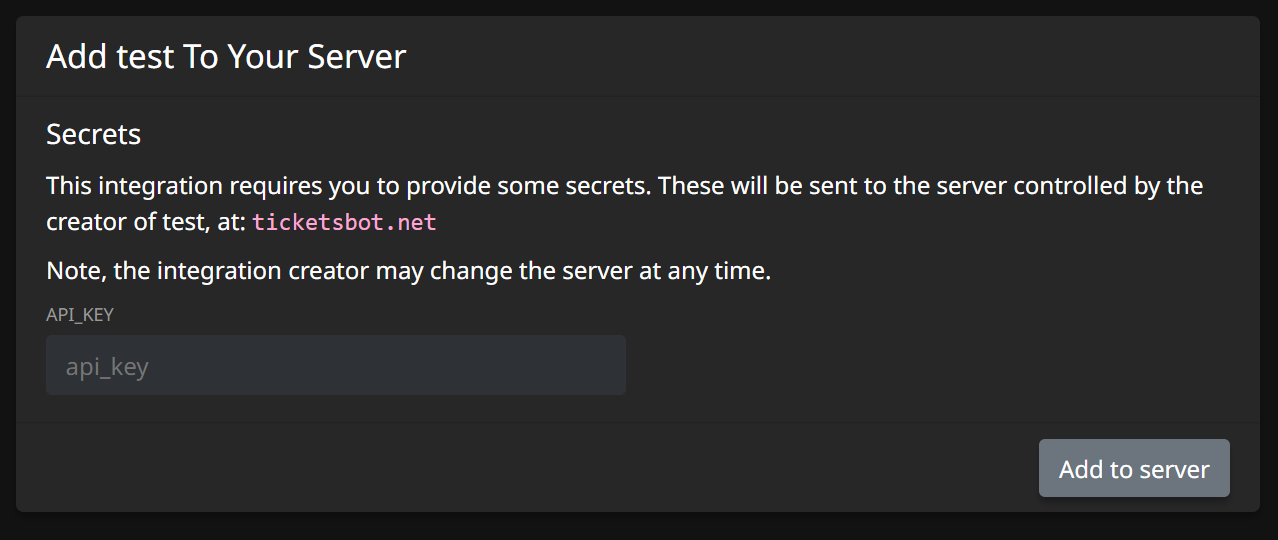
This functionality can be further extended by using secrets: You can ask users to supply their own secret values, such as API keys, when adding your integration to their server. For example, we may want users to register an application on our own site, generate them an API key, and make them input it when adding your integration. Let's take a look at an example:
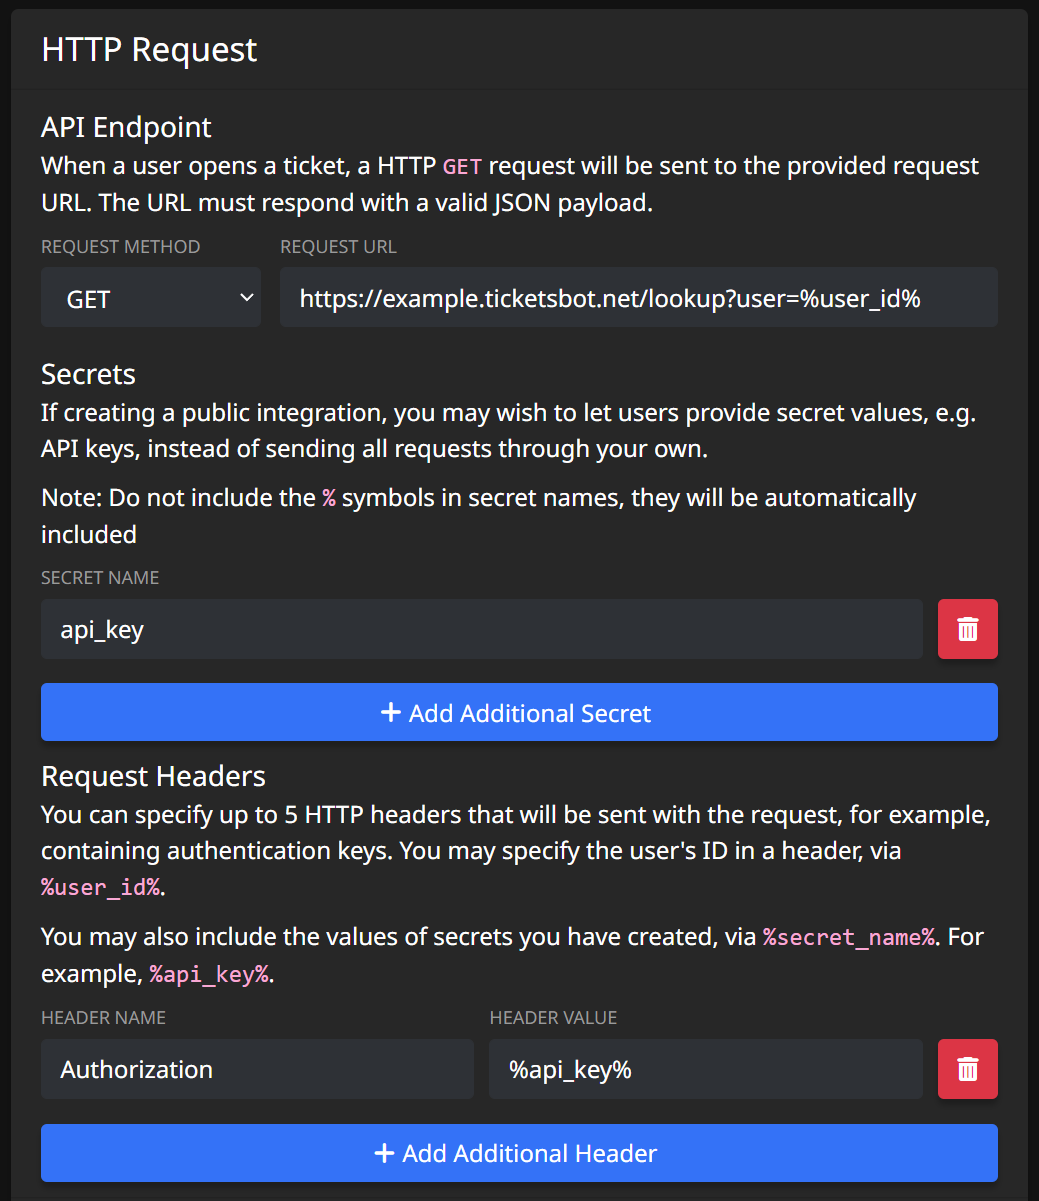
We have created a secret, called api_key, which we are able to use in either headers, or the URL itself, via %api_key%. When a user adds your integration to their server, they will be prompted to enter their API key:
Secret Validation
Sometimes, users may provide a secret value in an invalid format, or otherwise incorrect way. You may optionally define a validation URL that we will send an HTTP POST to every time a user adds your integration to a server to dynamically validate their secrets. The request will contain a JSON body containing the user's secret values:
{
  "secret_name": "value",
  "secret2_name": "abcde"
}
If the values satisfy your constraints, simply respond with any 2XX status code. The response body does not matter, so it is recommended to use HTTP 204 No Content with an empty body.
If the value does not satisfy your constraints, then respond with any non-2XX status code - HTTP 400 Bad Request is well suited. You may also provide a JSON response body with a single "error" field containing a message to show to the user:
{
  "error": "Your API key is invalid."
}
Placeholders
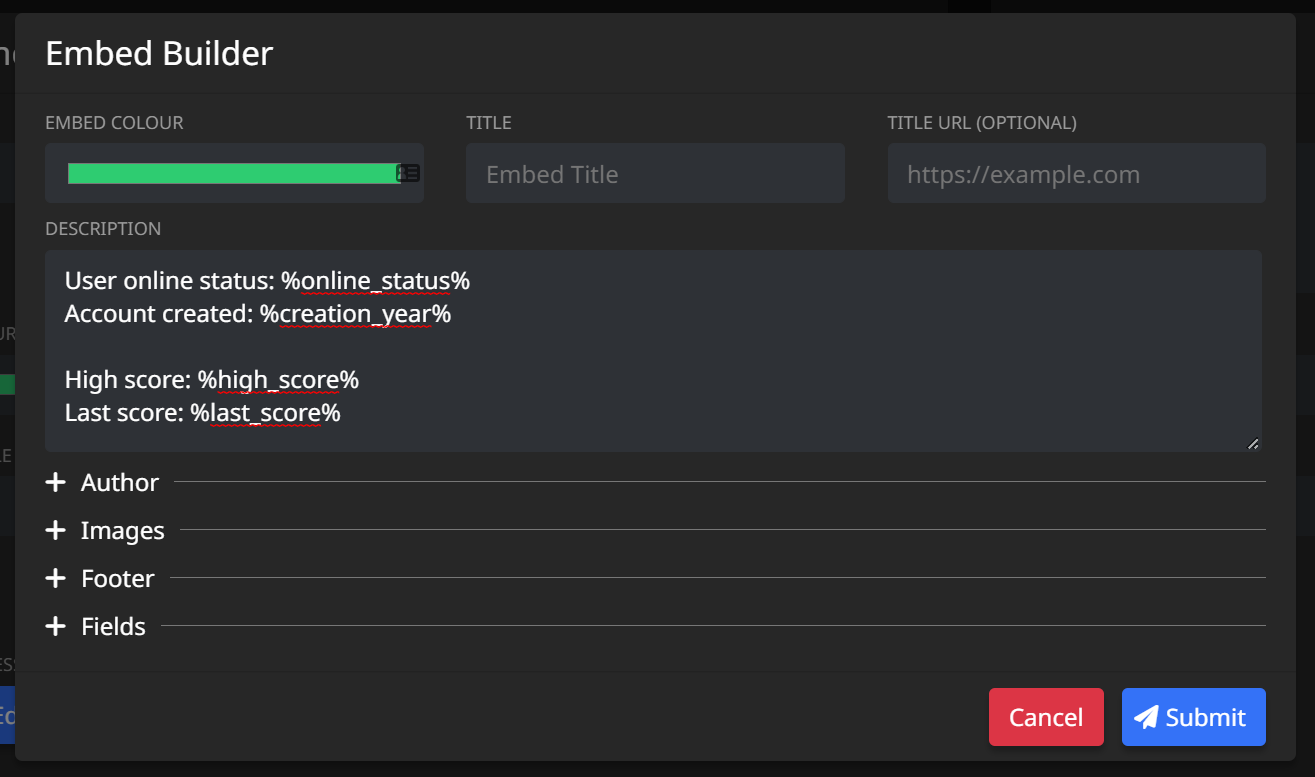
Next, we are onto creating the placeholders themselves. Here, you define how each value in your JSON response should be mapped to the variables that can be used in welcome messages.
As a reminder, in our example application, we respond with the following JSON:
{
  "online_status": "Online",
  "user": {
    "username": "Ryan",
    "account_created_year": 2019,
    "scores": {
      "high_score": 3000,
      "last_score": 400
    }
  }
}
The JSON path is simply the path of keys to access a value. Nested objects can be accessed by splitting the path with a dot.
For example, the path online_status would yield Online, and user.username would yield Ryan.
Let's take a look at how we'd register these with the integration settings:
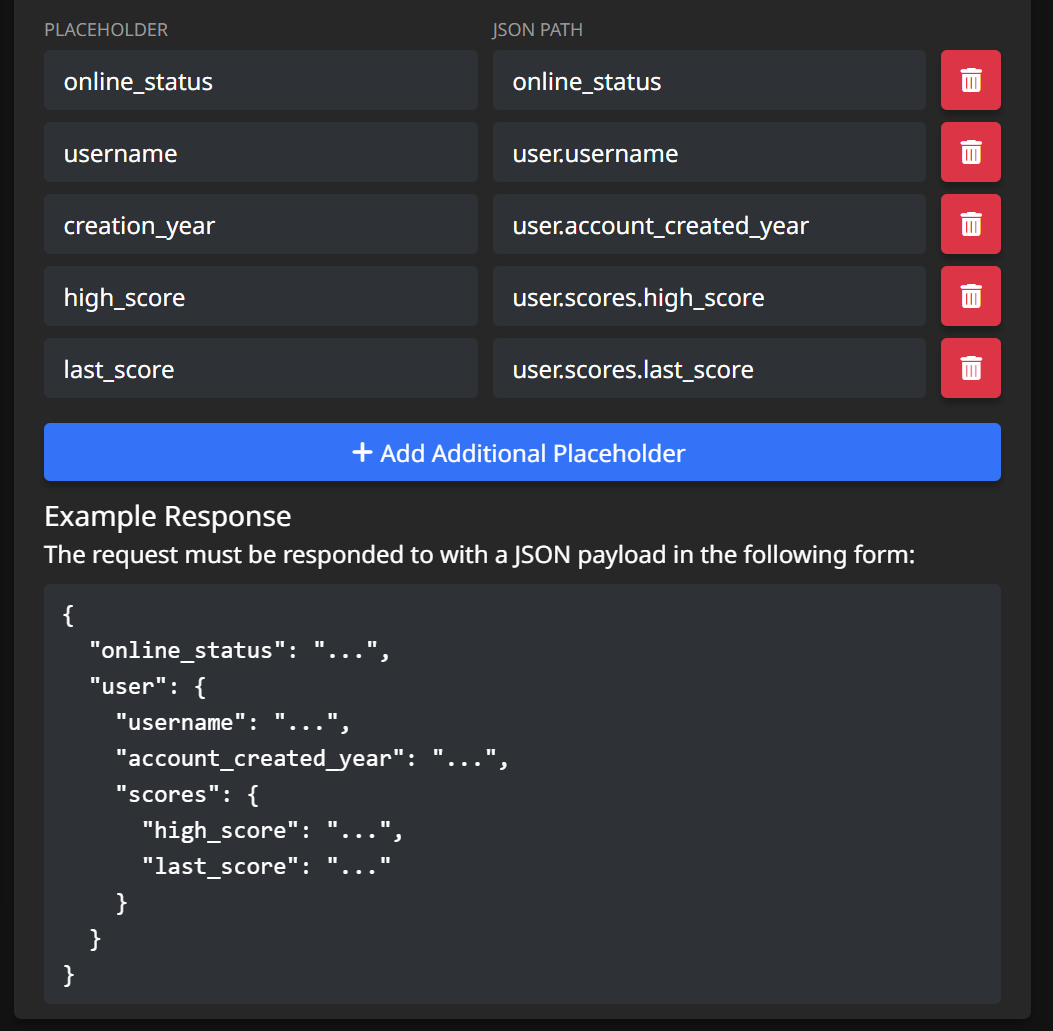
It should be obvious to see how the values are mapped. Note, your placeholder itself can be named completely separate from the JSON path.
You have now successfully configured your first integration! All that is left is to press the final "Create" button. After doing this, you should be taken to a preview page for your integration:
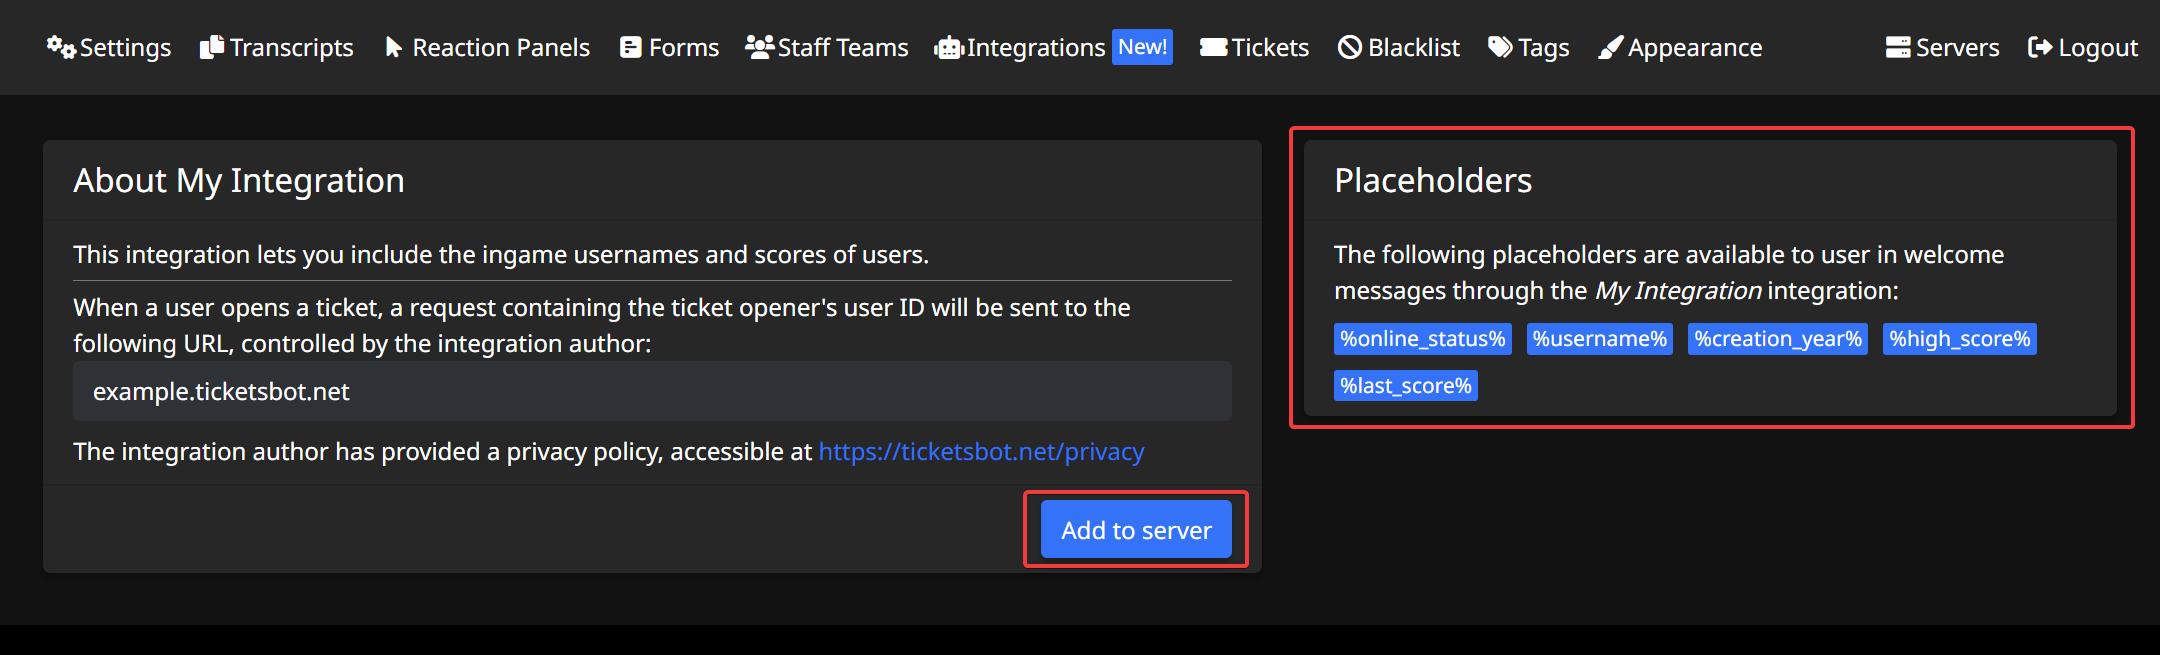
You can view the list of available placeholders on the right-hand side of the page. Don't forget to activate the integration in your server, by pressing the "Add to server" button!
Using Placeholders
Now that we have created out integration and added it to our server (don't forget this part), we can implement the placeholders!
You'll need to head over to the "Reaction Panels" tab of the dashboard for your server, press edit on a panel, and open the welcome message editor:
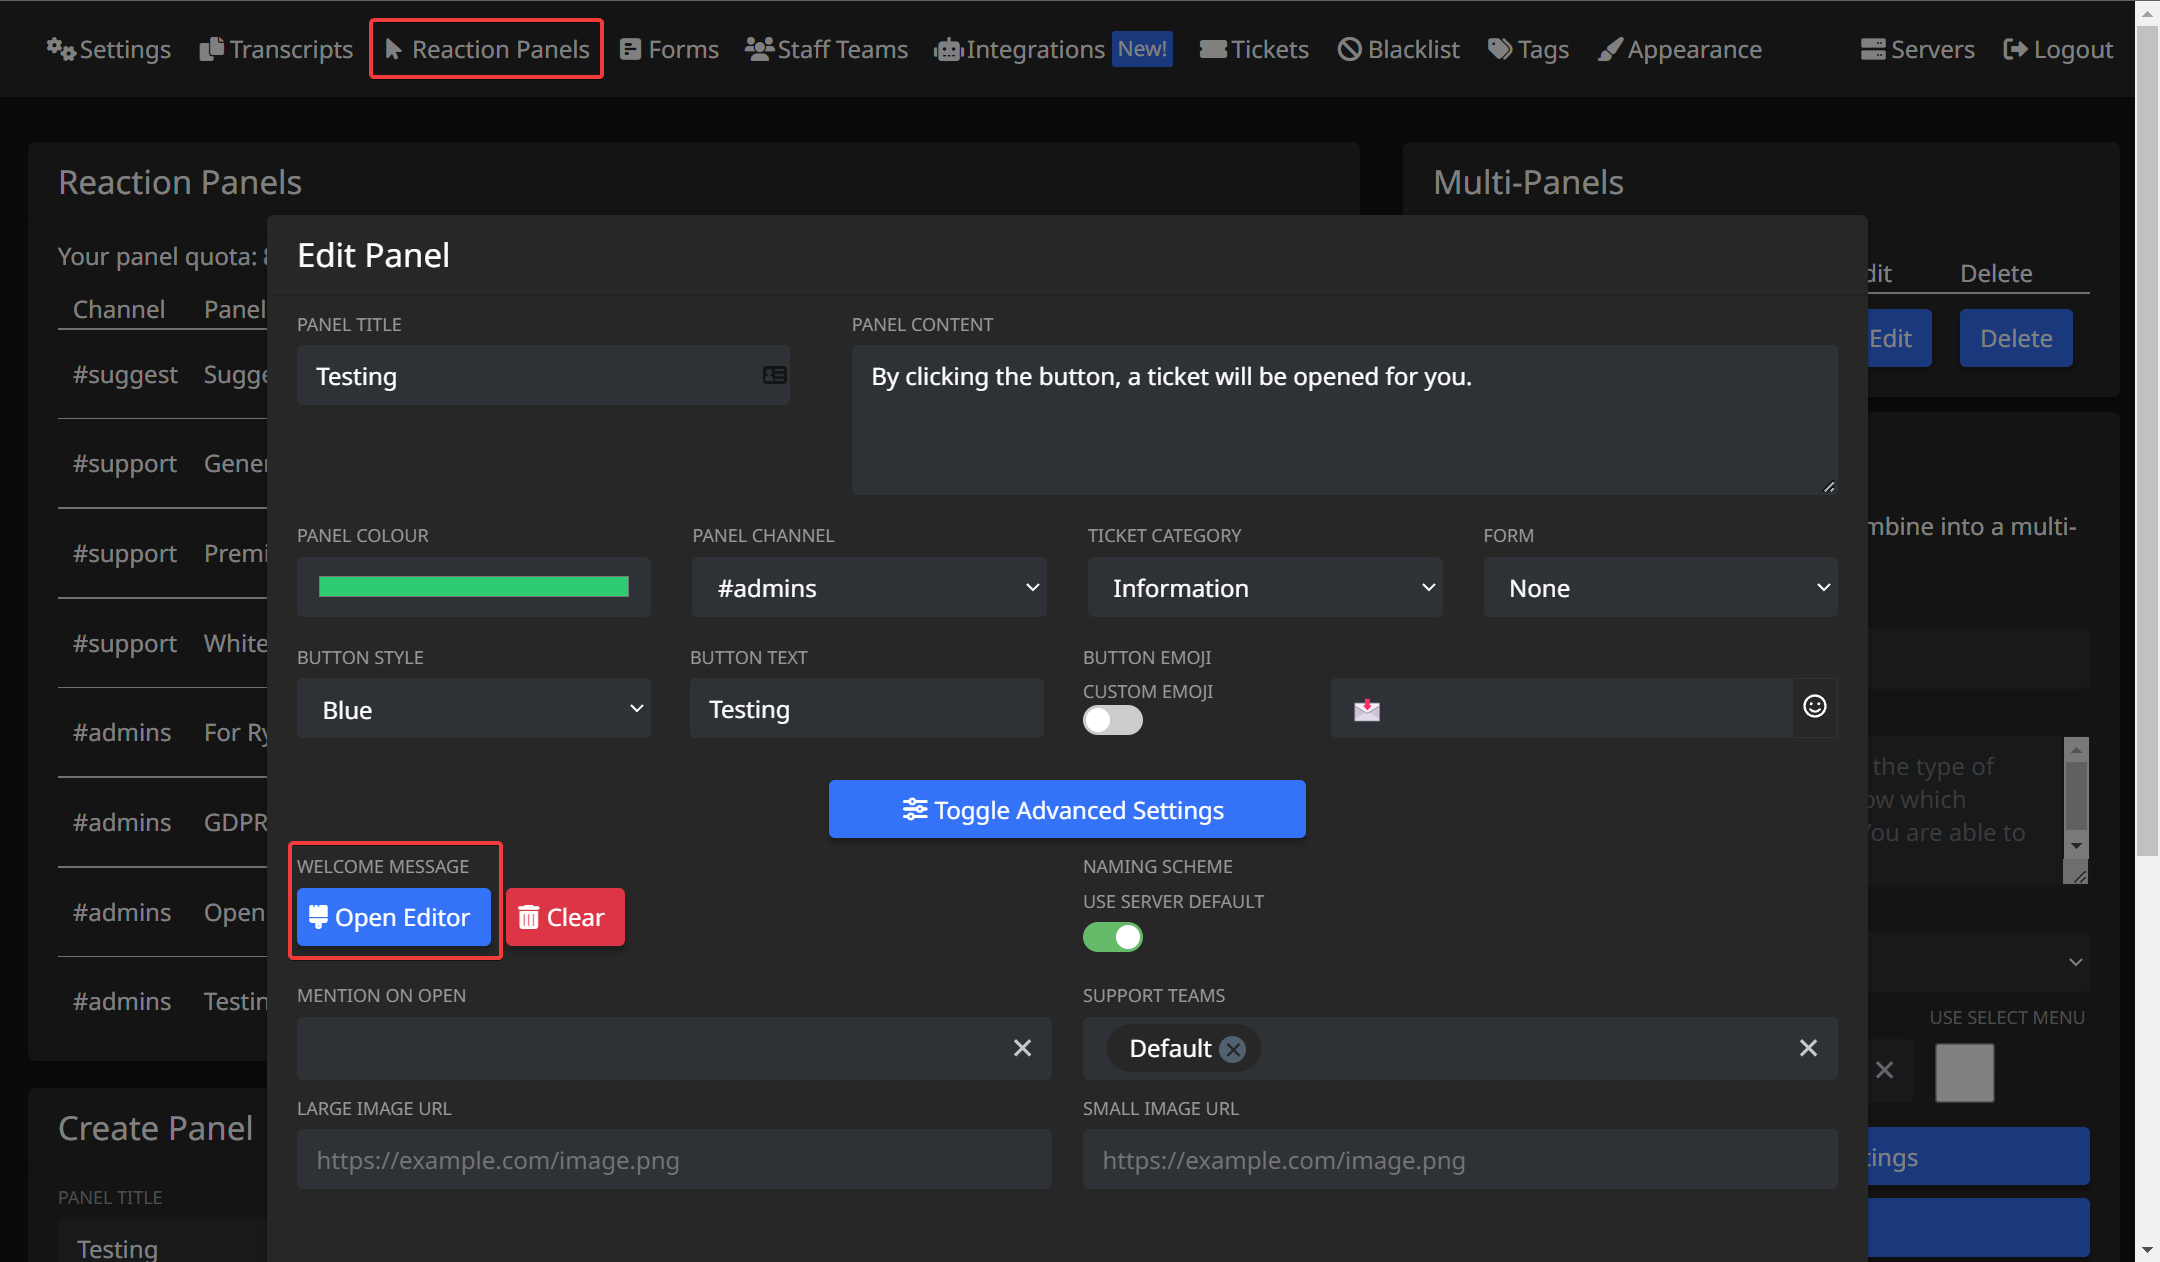
We can then insert our placeholders into the welcome message, like so:
Let's test it out!
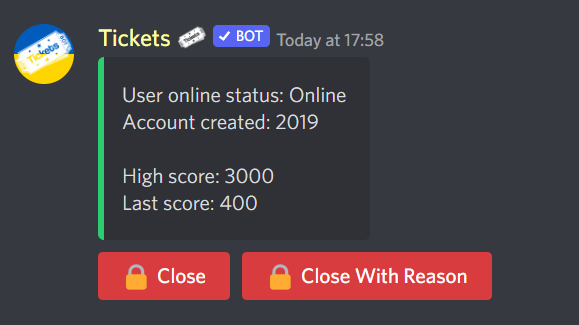
As you can see, the placeholders have successfully been fetched from the web server, and replaced with the provided values!
Need Help?
If you're still not sure about creating integrations, we can help you! You may find it helpful to read our next guide, on how we created the cryptocurrency price integration. If you're still stuck, feel free to ask us in our Discord server!
Security
We have put significant effort into making sure integrations are safe, by ensuring requests are always proxied, and not sent to where they are not supposed to be, including through additional penetration testing.
Integration HTTP requests should be sent to your server via AS13335 (Cloudflare), and it should not be possible to send a request to a private IP.
However, in the case that you do find a vulnerability: we operate a bug bounty program. Join our Discord server and open a ticket to responsibly disclose. In general, we offer up to $1,000 per vulnerability, based on a combination of complexity and severity. Bounties are assessed on a case-by-case basis.
Regarding integrations, we are particularly interested in vulnerabilities related to:
- Accessing internal services
- Exposing the origin IPs of our nodes
- Accessing secret values of other servers
- Access the IP address of another user, via viewing integration logos
Integration logos are proxied by dedicated images proxy nodes running on AS16276 (OVH). These nodes are located outside of our internal network, and do not serve any other purpose. We are not concerned with hiding the IP addresses of these nodes. Note that integration logos viewed on the integration creation and updating pages are not proxied, as they are only viewable by the integration creator, and so would be classed as a self-attack.
When performing security research, please:
- Ensure that target assets are in-scope and operated by us (we utilise serverless functions on infrastructure not run by us). If you are unsure, open a ticket and ask.
- Do not use automated scanners
- Do not launch (D)DoS / resource exhaustion attacks
If you wish to perform static code analysis for your research, you can view the relevant open source code here:
- Integration Proxy
- Image Proxy